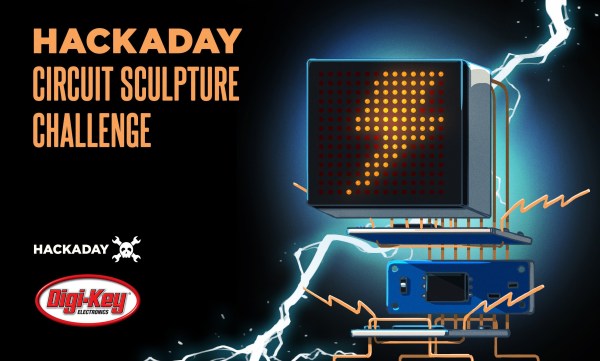
We’re bringing back one of our most popular contests, the Hackaday Circuit Sculpture Challenge! Make your functional circuits go beyond utility by turning them into art!
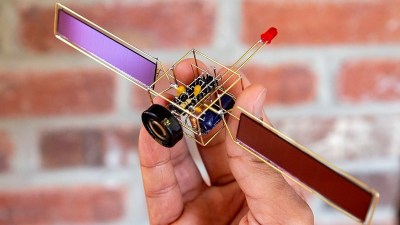
Solar-powered circuit sculpture by [Mohit Bhoite] which was featured last year.Wire and circuit boards are a fantastic media for creating beautiful projects, and for this one we want both the copper and the boards (or lack of) to be part of the beauty. Your sculpture could be crisp and angular bends in brass rod, a rat’s nest of enamel wire, PCBs with organic shapes, or something completely wild. Your only constraint is that there needs to be some type of working circuit involved.
Three entries will be chosen as top winners in the Most Functional, Most Beautiful, and Best Video categories and be awarded $200 in components from Digi-Key who are sponsoring this contest and also putting together a calendar with images of the top twelve sculptures.
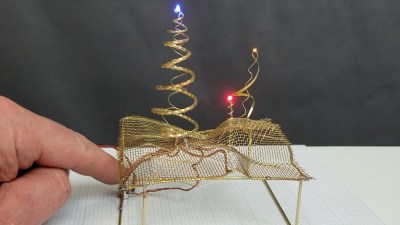
The Wonderlandscape by [Michael Aichlmayr] takes the “sculpture” part of Circuit Sculpture to new levels.Tell us the story of your creation, including a deep dive into how you built the sculpture and what trial and error you went through to pull it off. Many circuit sculptures in the past have included jig-building to get the wire bends just right, so we have a fourth prize of $100 in Tindie credit for the Best Jig build.
Get your project started now on Hackaday.io and use that “Submit Project To:” button in the left sidebar of your project page to enter it in the Circuit Sculpture Challenge. You have until November 10th to submit your entry.
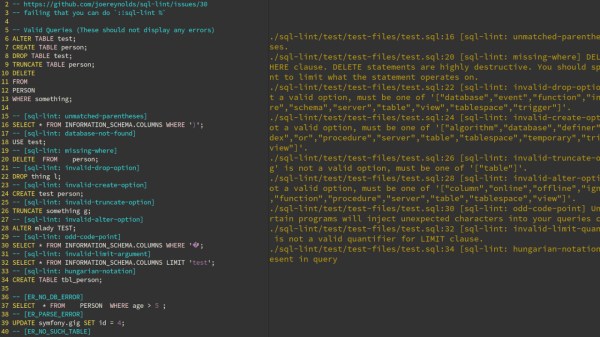
What’s your average success rate of getting a SQL statement right on the first try? In best case, you botched a simple statement without side effects and just have to try again with correct syntax or remove that typo from a table name, but things can easily go wrong fast here. But don’t worry, the days of fixing it on the fly can be over, thanks to [Joe Reynolds] who wrote a linter for SQL.
A linter parses code to tell you where you screwed up. While checking SQL syntax itself is somewhat straightforward, [Joe]’s sql-lint tool will also check the semantics of it by looking up the actual database and performing sanity checks on it. Currently supporting PostgreSQL and MySQL, it can be either run on a single SQL file or a directory of files, or take input directly from the command line. Even better, it also integrates within your editor of choice — assuming it supports external plugins — and the documentation shows how to do that specifically for Vim.
If you can look past the fact that it’s written in TypeScript and consequentially results in a rather large executable (~40 MB), it might serve as an interesting starting point for the language itself, or adds a new perspective on writing this type of analyzer. And if databases aren’t your terrain, how about shell scripts?
I guess it shouldn’t surprise me that by researching weird and interesting keyboards, I would uncover more weird and interesting keyboards. This is the BAT personal keyboard by Infogrip, and it’s something I came across while researching the DataHand keyboard and mentally filed away as something cool to look into.
When I came across a used BAT for a reasonable price, I snagged it, even though it didn’t come with any of the manuals or software, not even a cord. Like I said, reasonable price. I looked these keyboards up and found out that you can buy them new for a lot more than what I paid.
My gently used BAT in all its angular glory.The lowercase letter chords use either the middle thumb key or no thumb key. Image via Infogrip
Instead of stretching your fingers all over a regular keyboard, poking keys one at a time to spell out words, you press combinations of keys simultaneously, like playing chords on a piano.
You’re meant to use your thumb for the red, grey, and blue keys, and lay the other four on the rest of the keys. All of the alphabet keys are chorded with or without the gray thumb key, and all the number, symbol, and modifier keys are accessed through the red and blue layers.
Why would you want one of these? Well, given enough time to learn the chords, you can do anything a standard 104+ keyboard can do with only seven keys. You would never need to look down, not even for those weird seldom-used keys, and the only finger that ever travels is your thumb. All of this reduced hand/finger/wrist travel is going to be easier on the body.
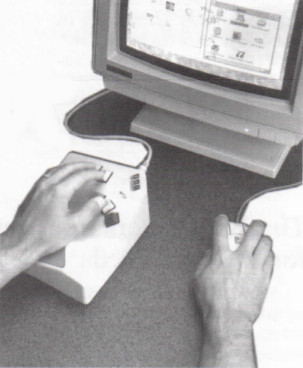
The BAT lets you CAD like a madlad. Via Bill Buxton
The BAT is also part programmable macro pad, and from what I can gather, the main selling point was that you could quickly input shortcuts in CAD programs and the like, because you could keep one hand on the mouse.
The BAT came in both left- and right-handed versions that can be used either alone or together. Imagine how fast you could type if you chorded everything and split the typing duties between both hands! The only trouble is learning all those different finger combinations, although they say it doesn’t take that long.
We might’ve thought that extrusion based 3D printers have hit their peak in performance capabilities. With the remaining process variables being tricky to model and control, there’s only so much we can expect on dimensional accuracy from extruded plastic processes. But what if we mixed machines, adding a second machining process to give the resulting part a machined quality finish? That’s exactly what the folks at E3D have been cooking up over the last few years: a toolchanging workflow that mixes milling and 3D printing into the same process to produce buttery smooth part finishes with tighter dimensional accuracy over merely 3D printing alone.
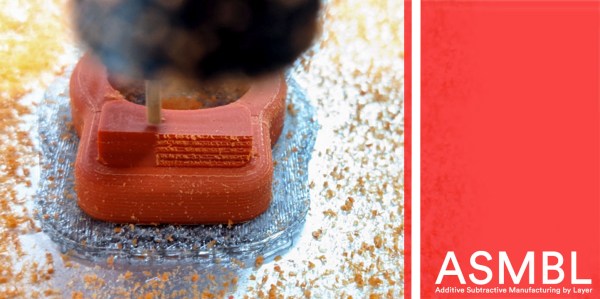
Dubbed ASMBL (Additive/Subtractive Machining By Layer), the process is actually the merging of two complimentary processes combined into one workflow to produce a single part. Here, vanilla 3D printing does the work of producing the part’s overall shape. But at the end of every layer, an endmill enters the workspace and trims down the imperfections of the perimeter with a light finishing pass while local suction pulls away the debris. This concept of mixing og coarse and fine manufacturing processes to produce parts quickly is a re-imagining of a tried-and-true industrial process called near-net-shape manufacturing. However, unlike the industrial process, which happens across separate machines on a large manufacturing facility, E3D’s ASMBL takes place in a single machine that can change tools automatically. The result is that you can kick off a process and then wander back a few hours (and a few hundred tool changes) later to a finished part with machined tolerances.
What are the benefits of such an odd complimentary concoction, you might ask? Well, for one, truly sharp outer corners, something that’s been evading 3D printer enthusiasts for years, are now possible. Layer lines on vertical surfaces all but disappear, and the dimensional tolerances of holes increases as the accuracy of the process is more tightly controlled (or cleaned up!) yielding parts that are more dimensionally accurate… in theory.
But there are certainly more avenues to explore with this mixed process setup, and that’s where you come in. ASMBL is still early in development, but E3D has taken generous steps to let you build on top of their work by posting their Fusion 360 CAM plugin, the bill-of-materials and model files for their milling tool, and even the STEP files for their toolchanging motion system online. Pushing for a future where 3d printers produce the finer details might just be a matter of participating.
It’s exciting to see the community of 3D printer designers continue to rethink the capabilities of its own infrastructure when folks start pushing the bounds beyond pushing plastic. From homebrew headchanging solutions that open opportunity by lowering the price point, to optical calibration software that makes machines smarter, to breakaway Sharpie-assisted support material, there’s no shortage of new ideas to play with in an ecosystem of mixed tools and processes.
Have a look at ASMBL at 2:29 in their preview after the break.
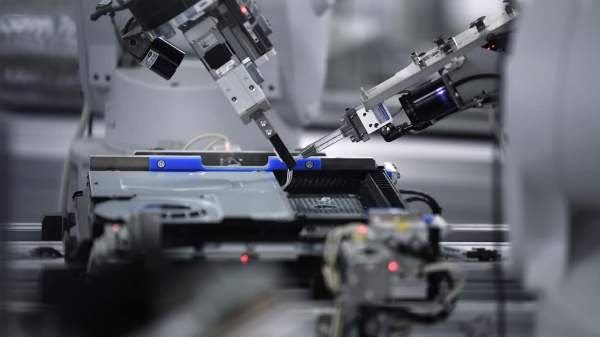
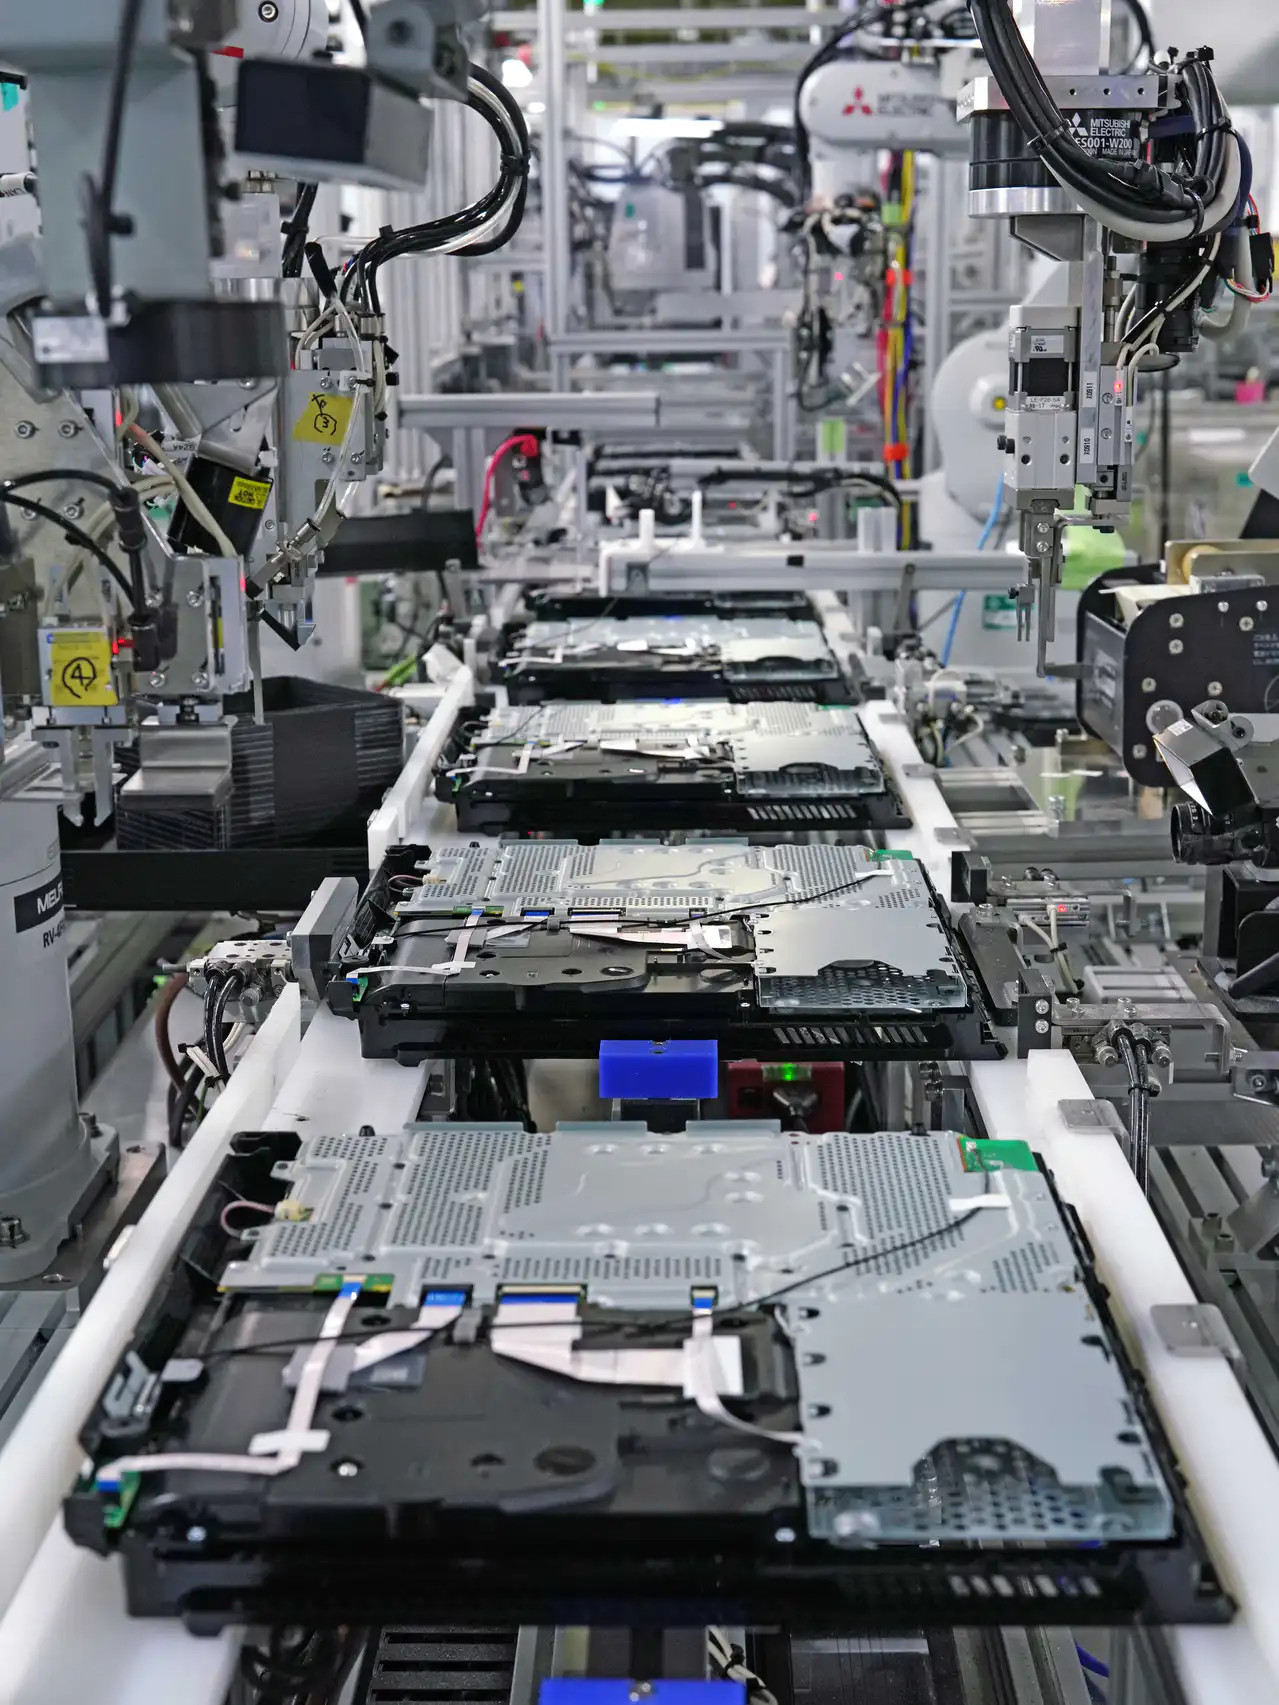
Sony’s video game division is gearing up for their upcoming PlayStation 5, pushing its predecessor PlayStation 4 off the spotlit pedestal. One effect of this change is Sony ever so slightly relaxing secrecy surrounding the PS4, allowing [Nikkei Asian Review] inside a PlayStation 4 final assembly line.
This article was written to support Sony and PlayStation branding for a general audience, thus technical details are few and far in between. This shouldn’t be a huge surprise given how details of mass production can be a competitive advantage and usually kept as trade secrets by people who knew to keep their mouths shut. Even so, we get a few interesting details accompanied by many quality pictures. Giving us a glimpse into an area that was formerly off-limits to many Sony employees never mind external cameras.
The quoted engineers are proud of their success coaxing robots to assemble soft and flexible objects, and rightly so. Generally speaking robots have a hard time handling non-rigid objects, but this team has found ways to let their robots handle the trickier parts of PS4 assembly. Pick up wiring bundles and flat ribbon cables, then plug them into circuit board connectors with appropriate force. Today’s automated process is the result of a lot of engineers continually evolving and refining the system. The assembly machines are covered with signs of those minds at work. From sharpie markers designating positive and negative travel directions for an axis, to reminders written on Post-It notes, to assembly jig parts showing the distinct layer lines of 3D printing.
We love seeing the result of all that hard work, but lament the many interesting stories still untold. We would have loved a video showing the robots in action. For that, the record holder is still Valve who provided an awesome look at the assembly of the Steam Controller that included a timelapse of the assembly line itself being assembled. If you missed that the first time, around, go watch it right now!
At least we know how to start with the foundations: everything we see on this PS4 assembly line is bolted to an aluminum extrusion big or small. These building blocks are useful whether we are building a personal project or a video console final assembly line, so we’ve looked into how they are made and how to combine them with 3D printing for ultimate versatility.
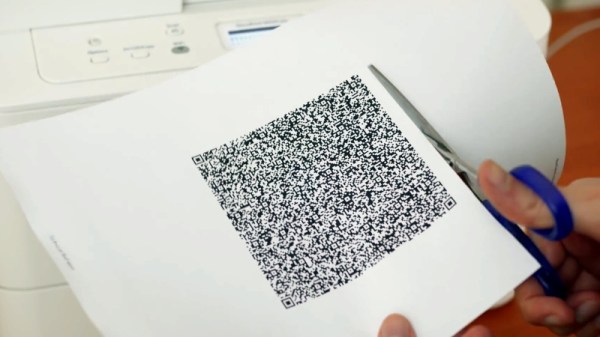
QR codes are usually associated with ASCII text like URLs or serial numbers, but did you know you can also encode binary data into them? To demonstrate this concept, [MattKC] embarked on a journey to create a QR code that holds an executable version of Snake. Video after the break.
As you might expect, the version 40 QR code he ended up using is much larger than the ones you normally see. Consisting of a 171 by 171 grid, it’s the largest version that can still be read by most software. This gave [MattKC] a whopping 2,953 bytes to work with. Not a lot of space, but still bigger than some classic video games of the past.
To start, he first wrote Snake to run in a web browser using HTML, CSS, and JavaScript, which was able to fit in the available space. Modern browsers do a lot of the lifting with built-in features, and [MattKC] wanted more of a challenge, so he decided to instead create a Windows executable file. His first attempts with compiled C code were too large, which led down the rabbit trail of x86 Assembly. Here he found that his knowledge of Assembly was too limited to create a small enough program without investing months into the project. He went back to C and managed to compress his executable using Crinkler, a compressing linker commonly used in the demoscene. This shrunk the file down to 1,478 bytes.
Zbar, a command-line barcode reader for Windows was used to test the final Snake QR code. [MattKC] discovered a bug in Zbarcam that prevented it from reading binary data via a webcam input, so through the power of open source, he submitted a bug fix which is now integrated into the official release.
All the files are available for anyone to play with on [MattKC]’s website. The video below goes into a lot of detail on the entire journey. Since this project proves software can be embedded in QR codes, it means that malware could also be hidden in a QR code, if there is an exploitable bug somewhere in a smartphone QR reader app.
QR codes are an interesting tool with a variety of uses. Take a deep dive into how they work, generate a 3D printable version, or build a QR jukebox, if you want to learn more.
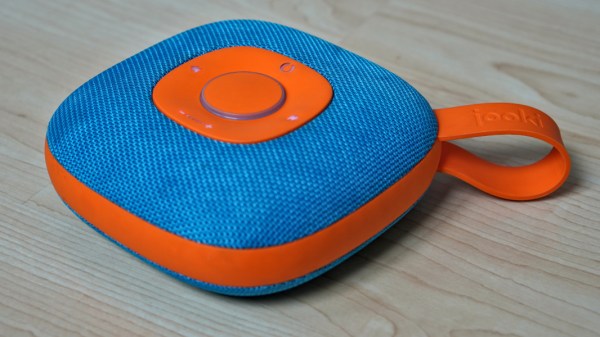
Like bubble wrap or the corkscrew, plenty of everyday objects have lost almost all ties to their original purpose. It could be that the original product had no market but was able to find one in an unexpected place, or simply that the original use case disappeared. We think that this MP3 player for children might arrive at a similar fate as a home automation controller thanks to a recent project by [Sebastian].
The MP3 player is known as a Jooki and works by using small figurines (and a few buttons) to control the device. Different figurines cause the MP3 player to change playlists, for example, but it turns out that the device is capable of communicating over MQTT. This means that [Sebastian] was able to use the MQTT messages from the Jooki to do all kinds of things beyond its intended use with openHAB, an open-source home automation system, such as dimming the lights and closing the blinds when he puts his son to bed.
This platform has considerable potential for hacking thanks to the lightweight communications system it uses under the hood. The Jooki is a little pricey, but if you happen to have one around, it’s an impressive tool that can go well beyond its original intended use.


 Dubbed ASMBL (Additive/Subtractive Machining By Layer), the process is actually the merging of two complimentary processes combined into one workflow to produce a single part. Here, vanilla 3D printing does the work of producing the part’s overall shape. But at the end of every layer, an endmill enters the workspace and trims down the imperfections of the perimeter with a light finishing pass while local suction pulls away the debris. This concept of mixing og coarse and fine manufacturing processes to produce parts quickly is a re-imagining of a tried-and-true industrial process called near-net-shape manufacturing. However, unlike the industrial process, which happens across separate machines on a large manufacturing facility, E3D’s ASMBL takes place in a single machine that can change tools automatically. The result is that you can kick off a process and then wander back a few hours (and a few hundred tool changes) later to a finished part with machined tolerances.