Bare PCB Makes A Decent Homemade Smart Watch

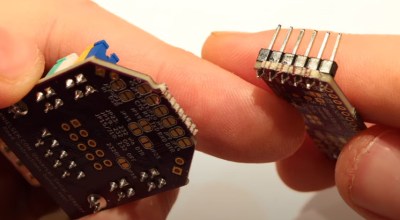
These days, we live in a post-Dick Tracy world, where you can make a phone call with your fancy wristwatch, and lots more besides. [akashv44] has gone a simpler route, designing their own from scratch with a bare PCB design.

The build is based around the ESP-12E microcontroller, providing useful wireless connectivity that lets the watch interface with the outside world. The firmware makes queries of NTP servers and Yahoo’s weather API to collect time and weather data for display. It’s also capable of interacting with Blynk relay modules for controlling other equipment, which [akashv44] uses with lights and an air conditioner. The watch uses a small OLED display and a handful of small surface-mount tactile buttons for control. Power is courtesy of a small lithium-ion pouch cell, with charging handled by a TP4056 battery management IC.

It’s a simple smartwatch, but nonetheless one that teaches all kinds of useful skills in embedded development and design. It’s also funny to think how simple it is to build. A decade ago, before the ESP8266 was released, getting wireless connectivity in such a small package was a major engineering challenge. Even the Apple Watch didn’t come out until 2015! Food for thought.

To Give Is Better Than To Receive

Better to give a talk at a hacker event, that is. Or in your hackerspace, or even just to a bunch of fellow nerds whenever you can. When you give the talk, don’t be afraid to make it too “easy” to understand. Making a tough topic comprehensible is often the sign that you really understand it, after all, and it’s also a fantastic service to the audience. And also don’t be afraid that your talk isn’t “hard core” enough, because with a diverse enough crowd, there will absolutely be folks for whom it’s still entirely new, and they’ll be thankful.

These were the conclusions I got from talking to a whole range of people at Chaos Communication Camp the weekend before last, and it’s one of the great opportunities when you go to an event like this. At Camp, there were a number of simultaneous stages, and with so many talks that new ones are still being released. That meant that everyone had their chance to say their bit, and many many did.

And that’s great. Because it’s obvious that getting the work done, or diving deep into a particular topic, is part of the hacker experience, but it’s also equally important to share what you’ve gained with the rest of the community. The principle of spreading the knowledge is a cornerstone of our culture, and getting people up to talk about what they’ve learned is the manifestation of this cultural value. If you know something, say something!

Of course, when you’re not at a conference, you could be writing up your hacks and sending them in to the tips line (hint, hint!). That’ll work too.

The Demoscene, Now An Irreplaceable Piece Of Cultural Heritage

Break out your tuxedo or your evening gown, we’re going to take in some highbrow culture. A night at the opera perhaps, some Tchaikovsky from the symphony orchestra, or maybe a bit of Shakespeare? No, we’re going to a demo party, because the demoscene is the latest art form to be accepted as officially a part of the national cultural heritage of the Netherlands. This builds on successes adding the scene to the cultural heritage registers of Finland, Germany, and Poland, and should provide a boost to other bids in countries such as Switzerland and eventual UNESCO world acceptance.

It’s all very cool that one of our wider community’s art forms is at last being taken seriously rather than being dismissed by the establishment, because along with greater recognition comes other benefits. Sadly we don’t expect any cities to shell out for a demo auditorium next to the shiny new opera house any time soon, but we can see that it could be used to the benefit of for example a hackerspace chasing grants. meanwhile, feast your eyes on a bit of cultural heritage courtesy of the Dutch Centre For Intangible Cultural Heritage (Dutch language, English translation).

Not sure what the demo scene is? We’ve taken you to a demoparty before.

Header image: People Celebrating Evoke 2019 – Foto Darya Gulyamova

Minimal Mods Make Commodity LNBs Work For QO-100 Reception

A word of advice: If you see an old direct satellite TV dish put out to the curb, grab it before the trash collector does. Like microwave ovens, satellite dishes are an e-waste wonderland, and just throwing them away before taking out the good stuff would be a shame. And with dishes, the good stuff basically amounts to the bit at the end of the arm that contains the feedhorn and low-noise block downconverter (LNB).

But what does one do with such a thing once it’s harvested? Lots of stuff, including modifying it for use with the QO-100 geosynchronous satellite (German link). That’s what [Sebastian Westerhold] and [Celin Matlinski] did with a commodity LNB, although it seems more like something scored on the cheap from one of the usual sources rather than picking through trash. Either way, these LNBs are highly integrated devices that at built specifically for satellite TV use, but with just a little persuasion can be nudged into the K-band to receive the downlink signals from hams using QO-100 as a repeater.

The mods are simple — snipping out the 25 MHz reference crystal on the LNB board and replacing it with a simple LC bandpass filter. This allows the local oscillator on the LNB to be referenced to an external signal generator; when fed with a 25.78 MHz signal, it’s enough to goose the LNB up to 10,490 MHz — right about the downlink frequency. [Sebastian] and [Celin] tested the mods and found that it was easily able to detect the third harmonics of a 3.5-ish GHz signal.

As for testing on actual downlink signals from the satellite, that’ll have to wait. For now, if you’re interested in satellite comms, and you live on the third of the planet covered by QO-100, keep an eye out for those e-waste LNBs and get to work.

Building A Receiver With The ProgRock2 Programmable Crystal

Crystals are key to a lot of radio designs. They act as a stable frequency source and ensure you’re listening to (or transmitting on) exactly the right bit of the radio spectrum. [Q26] decided to use the ProgRock2 “programmable crystal” to build a receiver that could tune multiple frequencies without the usual traditional tuning circuitry. 

 The ProgRock2 is designed as a tiny PCB that can be dropped into a circuit to replace a traditional crystal. The oscillators onboard are programmable from 3.5KHz to 200 MHz, and can be GPS discliplined for accuracy. It’s programmable over a micro USB pot, and can be set to output 24 different frequencies, in eight banks of three. When a bank is selected, the three frequencies will be output on the Clock0, Clock1, and Clock2 pins.There was some confusion regarding the bank selection on the ProgRock2. It’s done by binary, with eight banks selected by grounding the BANK0, BANK1, and BANK2 pins. For example, grounding BANK2 and BANK0 would activate bank 5 (as 101 in binary equals 5). Once this was figured out, [Q26] was on top of things.

In his design, [Q26] hooked up the ProgRock2 into his receiver in place of the regular crystal. Frequency selection is performed by flipping three switches to select banks 0 to 7. It’s an easy way to flip between different frequencies accurately, and is of particular use for situations where you might only listen on a limited selection of amateur channels.

For precision use, we can definitely see the value of a “programmable crystal” oscillator like this. We’ve looked at the fate of some major crystal manufacturers before, too. Video after the break.

Continue reading “Building A Receiver With The ProgRock2 Programmable Crystal”

Is An ADS-B Receiver The Solution For Drone Pilots?

Over the years here at Hackaday, we’ve covered a range of stories about the ongoing panic surrounding drone flights. From plastic bags reported as drone incidents through to airports closed with no evidence of drones being involved, it’s clear that drone fliers are an embattled group facing a legal and aeronautical establishment that seems to understand little about them or their craft.

It sometimes seems to be a no-win situation for fliers, but perhaps [XJet] has something which might improve matters. He’s published a video showing off a portable ADS-B receiver which could be used by drone pilots to check for any aircraft in the vicinity and perhaps more importantly allow the drone community to take the moral high ground when problems occur.

The receiver isn’t particularly special, being a Raspberry Pi with LCD screen and an RTL-SDR receiver in a nice 3D printed enclosure. He says he’ll be publishing all software and build details in due course. But it’s the accessibility which makes it such a good idea, instead of being a very expensive safety device it’s a receiver that could probably be made with a less powerful Pi for under $100.

There is of course a flaw in the plan, that not all pilots are concerned enough for their safety to fit an ADS-B transponder to their aircraft, and so are invisible to both the thus-equipped drone pilot and air traffic control alike. This puts the onus on pilots to consider ADS-B an essential, but from the drone flier’s point of view we’d consider that a spotter should be part of their group anyway.

Curious what the fuss is about? Let us take you on a journey.

Continue reading “Is An ADS-B Receiver The Solution For Drone Pilots?”

Tiny Three-Tube Receiver Completes Spy Radio Suite

In our surface-mount age, it’s easy to be jaded about miniaturization. We pretty much expect every circuit to be dimensionally optimized, something that’s easy to do when SMDs that rival grains of sand are available. But dial the calendar back half a century or so and miniaturization was a much more challenging proposition.

Challenging, perhaps, but by no means unachievable, as [Helge Fyske (LA6NCA)] demonstrates with this ultra-compact regenerative vacuum tube receiver. It’s a companion to his recent “spy transmitter,” a two-tube radio built in — or on, really — an Altoids tin. The transmitter was actually a pretty simple circuit, just a crystal-controlled oscillator and an RF amplifier really, but still managed about 1.5 Watts output on the 80-meter ham band.

The receiver circuit ended up being much more complicated, as receivers do, and therefore harder to cram into the allotted space. [Helge]’s used a three-tube regenerative design, with one tube each devoted to the RF amp, detector/mixer, and audio amplifier stages. As in the transmitter, the receiver tubes are mounted on the outside of the box, with the inside crammed full of components. [Helge] had to be quite careful about component positioning, to prevent interstage coupling and other undesirable side effects of building in such close quarters.

Was it worth it? Judging by the video below, absolutely! We’ve rarely heard performance like that from even a modern receiver with all the bells and whistles, let alone from a homebrew design under such constraints. It sounds fantastic, and hats off to [Helge] for completing his spy radio suite in style.

Continue reading “Tiny Three-Tube Receiver Completes Spy Radio Suite”