Fusion For STM32: Development Board With Debugging And Programming Via WiFi

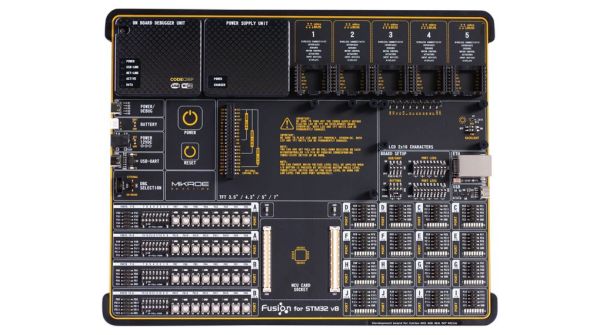
Clearly profiling itself as the Lamborghini or Ferrari of the STM32 development board world, MikroElektronika’s current (8th) revision of their Fusion development board was released last year with support for not only flashing but also debugging the attached STM32 MCU via the onboard WiFi module. The Serbian company’s pricing for the bare board without MCU modules or any other peripherals appears to be around 300 USD/Euro. Additional MCU boards cost between $28 – $60 each.

As the official product page explains, the board is combined with the CodeGrip software to manage the board either via USB-C (driver-free) – which also allows one to configure the WiFi option – and via WiFi. Peripheral boards are added via the 5 onboard MikroBUS expansion slots, either with existing boards, or custom MikroBUS boards. The power supply is also onboard, powered via USB, a barrel jack connector, or an external battery.

The use of WiFi to connect to the board would allow for it to be easily managed and debugged when it’s in a less convenient location than one’s desk, which would seem like a major boon.

Obviously it’s not a cheap board, and the MCU cards each cost about as much as a Nucleo or Discovery board from ST would cost, making it hard to justify purchasing it for anything but a professional environment. However, the tantalizing thing here is probably that so much of the design details are available, from the expansion bus to the pin-out and schematic of the MCU cards (STM32F767ZG version).

The MCU cards use the Hirose FX10A-168S-SV and FX10A-168P-SV(71) connectors, all readily available. This opens the possibility of developing compatible MCU cards. An MCU card template project can for example be found here.

New Part Day: The STM32 That Runs Linux

There are a lot of ARM microcontrollers out there, and the parts from ST are featured prominently is the high-power builds we’re seeing. The STM32F4 and ~F7 are powerhouses with great support, and the STM32F0 and the other younger children of the family make for very good, low-power microcontrollers. Now, the STM32 family is getting a big brother. It runs Linux. It’s two ARM Cortex-A7 cores and one M4 core on the same chip. The STM32MP1 is the chip you want if you still can’t figure out how to waste computing cycles by blinking LEDs.

Block diagram of the STM32MP157 Image: ST

First, that Linux support. The STM32MP157C was mainlined into Linux last summer, and there is support for Android. So yes, this chip can run Linux. There is an optional 3D GPU in this family, a MIPI-DSI controller, support for HDMI-CEC, USB 2.0, and 10/100M or Gigabit Ethernet. This brings us the inevitable question of whether you can build a Raspberry Pi clone with these parts. Maybe, champ, but if you’re asking that question it’s probably not you that’s going to build one. It looks as if this chip is designed for phones, set-top boxes, and smart TVs. That doesn’t preclude a single board computer, but the biggest problem there is maintaining software support anyway.

The chip family in question all come with dual ARM Cortex-A7 processors running at a nominal 650MHz. There’s also a Cortex-M4 running at 209MHz, and the ST literature suggests that engineers are already running Linux on the A7 and an RTOS on the M4. This chip will need external memory, but DDR3 / DDR3L / LPDDR2 / LPDDR3 are supported.

This chip is only announced right now, you can’t get it on Mouser or Digikey yet, and there’s no information on pricing. However, there are two development boards available, the Evaluation board, which features 1 GB of DDR3L, 128 MB of Flash, and an 8 GB eMMC. There’s a 5.5″ display, and enough connectors to make your heart flutter. The Discovery board is a bit more cut down, and comes with a 4″ 480×800 LCD, WiFi, Bluetooth LE, and of course it comes with GPIO expansion connectors for an Arduino and Raspberry Pi. The Discovery Board is not available at this time, but it will sell for $99 USD.

Art With Steppers And STM32

Automotive dashboards are something that largely go untouched in the average car’s life. Other than the occasional wipe with a damp cloth, they’re generally reliable for the life of the car and considered too tricky to repair as age sets in. Nevertheless, some hackers find themselves tinkering with them, and learn skills in the process, such as how to control stepper motors and talk to the CAN bus. Having done some projects in the past, [Dan] had some old tachometers lying around and decided to turn them into a piece of art.

The build is powered by an STM32 – a powerful ARM-based platform with plenty of IO and potential. [Dan] leveraged its capabilities to have the board generate music and react to its onboard accelerometer data while also driving the stepper motors from the old tachometers. The project was then completed by 3D printing a mounting plate and placing the tachometer assemblies into the back of an IKEA canvas print.

The end result is a piece of wall art that emits eerie stringed music while twitching around. It came about from [Dan]’s prior projects in working with dashboards. It’s a fun use of some well-earned hacking skills, but we reckon there’s even more potential. There’s a huge number of projects that could benefit from lightweight tiny actuators, and we’d love to see a robot made entirely out of junkyard dashboard parts.

For another dashboard hack, why not check out this beautiful Jeep desk clock?

New Part Day: STM32F7, An ARM Cortex-M7

It was announced last year, but ST is finally rolling out the STM32F7, the first microcontroller in production that is based on the ARM Cortex-M7.

The previous go-to part from the ST catalog was the STM32F4, an extremely powerful chip based on the ARM Cortex M4 processor. This chip was incredibly powerful in its time, and is still a respectable choice for any application that needs a lot of horsepower, but not a complete Linux system. We’ve seen the ~F4 chip pump out 800×600 VGA, drive a thermal imaging camera, and put OpenCV inside a webcam. Now there’s a new, even more powerful part on the market, and the mind reels thinking what might be possible.

Right now there a few STM32F7 parts out, both with speeds up to 216MHz, Flash between 512k and 1MB, and 320kB of RAM. Peripherals include Ethernet, USB OTG, SPDIF support, and I²S. The most advanced chip in the line includes a TFT LCD controller, and a crypto processor on-chip. All of the chips in the STM32F7 line are pin compatible with the STM32F4 line, with BGA and QFP packages available.

As with the introduction of all of ST’s microcontrollers, they’re rolling out a new Discovery board with this launch. It features Ethernet, a bunch of audio peripherals, USB OTG, apparently an Arduino-style pin layout, and a 4.3 inch, 480×272 pixel LCD with capacitive touch. When this is available through the normal distributors, it will sell for around $50. The chips themselves are already available from some of the usual distributors, for $17 to $20 in quantity one. That’s a chunk of change for a microcontroller, but the possibilities for what this can do are really only limited by an engineer’s imagination.

Better VGA On The STM32F4

[Cliff] is pushing VGA video out of a microcontroller at 800×600 resolution and 60 frames per second. This microcontroller has no video hardware. Before we get to the technical overview, here’s the very impressive demo.

The microcontroller in question is the STM32F4, a fairly powerful ARM that we’ve seen a lot of use in some pretty interesting applications. We’ve seen 800×600 VGA on the STM32F4 before, with a circles and text demo and the Bitbox console. [Cliff]’s build is much more capable, though; he’s running 800×600 @ 60FPS with an underclocked CPU and most (90%) of the microcontroller’s resources free.

This isn’t just a demo, though; [Cliff] is writing up a complete tutorial for generating VGA on this chip. It begins with an introduction to pushing pixels, and soon he’ll have a walkthrough on timing and his rasterization framework.

Just because [Cliff] has gone through the trouble of putting together these tutorials doesn’t mean you can’t pull out an STM Discovery board and make your own microcontroller video hacks. [Cliff] has an entire library of for graphics to allow others to build snazzy video apps.

RGB LED Matrices With The STM32 And DMA

A few years ago, [Frans-Willem] bought a few RGB LED panels. Ten 32×16 panels is a lot of LEDs, and to drive all of these panels requires some sufficiently powerful hardware. He tried working with an FPGA development board, but that didn’t have enough memory for 24-bit color. The microcontroller du jour – a TI Stellaris – couldn’t get more than 16 bits of color without flickering. With a bunch of LEDs but no way to drive them, [Frans-Willem] put the panels in a box somewhere, waiting for the day they could be used to their fullest capacity.

This day came when [Frans-Willem] was introduced to the STM32 series of chips with the F1 Discovery board. While looking for some electronic playthings to use with this board, he stumbled upon the LED panels and gave them one more try. The results are spectacular, with 33 bits of color, with animations streamed over a router over WiFi.

The panels in question are HUB75 LED panels. In the 32×8 panels, there are six data pins – two each for each color – four row select pins, and three control pins. The row select pins select which row of pixels is active at any one time. Cycle through them fast enough, and it will seem like they’re all on at once. The control pins work pretty much like the control pins of a shift register, with the data pins filling in the obvious role.

The code that actually drives the LEDs all happens on an STM32F4 with the help of DMA and FSMC, or the Flexible Static Memory Controller found on the chip. This peripheral takes care of the control lines found in memory, so when you toggle the write strobe the chip will dump whatever is on the data lines to a specific address in memory. It’s a great way to take care of generating a clock signal.

For sending pixels to this display driver, [Frans-Willem] is using the ever-popular TP-Link WR703N. He had originally planned to send all the pixel data over the USB port, but there was too much overhead, a USB 1.1 isn’t fast enough. That was fixed by using the UART on the router with a new driver and a recompiled version of OpenWRT.

All the software to replicate this project is available on Github, and there’s a great video showing what the completed project can do. You can check that out below.

Continue reading “RGB LED Matrices With The STM32 And DMA”