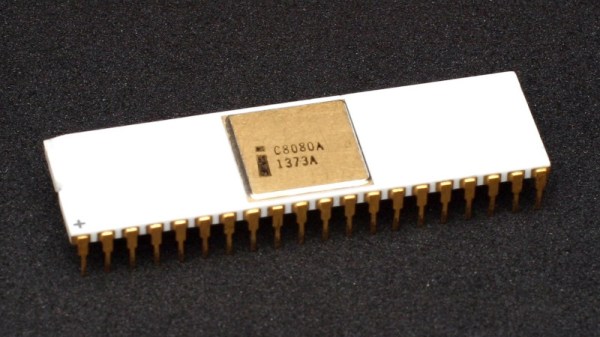
Adding Analog Touch To (Nearly) Any Mechanical Keyboard

The new hotness for DIY electronics is mechanical keyboards, and over the past few years we’ve seen some amazing innovations. This one is something different. It adds an analog sensor to nearly any mechanical key switch, does it with a minimal number of parts, and doesn’t require any modification of the switch itself. It’s a reddit thread and imgur post, but the idea is just so good we can overlook the documentation on this one.

The key development behind this type of sensor is realizing that nearly every mechanical keyswitch (Cherry MX, Kalth, Gateron) has a spring in the bottom. A spring is just a coil of wire, and an inductor is just a coil of wire, too. By putting a spiral trace on the PCB of a mechanical keyboard underneath the keyswitch, you can sense the inductance of this spring. This does require a little bit of additional hardware, in this case an LDC1614 inductance to digital converter, but this is an I2C-readable part that can, theoretically, be integrated rather easily with any mechanical keyboard PCB and firmware.

The downside to using the LDC1614 is that sampling is somewhat time-limited, with four channels or individual keys being polled at 500 Hz. This isn’t a problem if the use-case is adding analog to your WASD keys, but it may become a problem for an entire keyboard. Additionally, the LDC1614 is a slightly expensive part, at about $2 USD in quantity 1000. A fully analog keyboard using this technique is going to be pricey.

Right now, the proof-of-concept for this analog mechanical keyswitch is just a 0.1 mm flexible PCB that is shoehorned inbetween a Cherry MX red and a (normal) mechanical keyboard PCB. The next step in the development will be a 2×4 keypad with analog sensors, and opening up the hardware and firmware examples up under a GPL license.

Giant Connect Four Pits You Against The Computer

You can build a Connect Four solver in software, but it won’t be all that much fun. Now apply that same automation to a 15-foot-tall plywood version of the classic board game and you’ve just created a smile-making-machine for everyone within eyesight. Behold the Mono-Purpose Automated Robot Versed In Connnect4 (Marvin) which Ben and Jonathan dreamed up on their way home from Maker Faire last year, and made into their exhibit this year.

On the physical side of things they got really creative in lifting the discs and sorting them into the column chosen by the software brain of the game. A chain travels along one side with fingers every few feet. The fingers travel along the channel, lifting the discs. Those fingers are a couple of bolts, with some metal filler, all epoxied into one solid unit.

At the top of the disc elevator, and at the top position of each column in the gaming board, there are IR reflectance sensors which send feedback to the Arduino that drives the hardware. This proved a major issue during setup the day before the Faire. The reflectance sensors are just blasting out IR and not using a carrier signal. In direct sunlight, the detector was in a constant state of being tripped. After some trial and error, the logic for the sensors was flipped to detect the absence of sunlight by placing black plastic behind that top row of the board and putting duct tape over the IR emittors.

There’s a router and laptop rolled into the system. The Arduino makes an HTTP request to software on the laptop. In addition to determining where the next move should be made, the laptop is connected to a large screen which shows the current state of the gaming board. This is a head-to-head, human versus machine game. The human player drops their discs from the top of the board using a paint roller that hooks into a hole at the center of the disc. This way the player’s disc passes by the sensors, triggering the machine’s next move.

It’s a clever build and due to the sheer size it’s pretty awesome they were able to get it to the Faire from Philadelphia. Don’t miss the video after the break that shows off the fun and excitement of this gaming giant.

Continue reading “Giant Connect Four Pits You Against The Computer”

A Nibble And A Half Of Wooden Bits

If you are familiar with binary, what would you need to teach someone who only knows decimal? If you do not know how to count in binary, let us know if the video below the break helps you understand how the base-2 number system works. If learning or counting binary is not what you are interested in, maybe you can appreciate the mechanics involved with making a counter that cycles through all the ones and zeros (links to the video shown below). The mechanism is simple enough. A lever at the corner of each “1” panel is attached off-center, so it hangs when it is upside-down, then falls to the side when it is upright, so it can swivel the adjacent panel.

Perhaps this is a desktop bauble to show off your adeptness at carpentry, or skills with a laser cutter, or 3D printer. No matter what it is made out of, it will not help you get any work done unless you are a teacher who wants to demonstrate the discrete nature of binary. If wood and bits are up your alley, we have a gorgeous binary driftwood clock to feast your eyes on. Meanwhile if analog methods of working digital numbers suit you, we have binary math performed with paper models.

Continue reading “A Nibble And A Half Of Wooden Bits”

Nim Writes C Code — And More — For You

When we first heard Nim, we thought about the game. In this case, though, nim is a programming language. Sure, we need another programming language, right? But Nim is a bit different. It is not only cross-platform, but instead of targeting assembly language or machine code, it targets other languages. So a Nim program can wind up compiled by C or interpreted by JavaScript or even compiled by Objective C. On top of that, it generates very efficient code with — at least potentially — low overhead. Check out [Steve Kellock’s] quick introduction to the language.

The fact that it can target different compiler backends means it can support your PC or your Mac or your Raspberry Pi. Thanks to the JavaScript option, it can even target your browser. If you read [Steve’s] post he shows how a simple Hello World program can wind up at under 50K. Of course, that’s nothing the C compiler can’t do which makes sense because the C compiler is actually generating the finished executable, It is a bit harder though to strip out all the overhead yourself.

Continue reading “Nim Writes C Code — And More — For You”

DIY Studio Lights To Improve Your Videos

It’s 2018, a full thirteen years since YouTube was founded. With an online sharing service up and running, and high-resolution cameras in just about every mobile phone, the production of video has been democratized. Sadly, for those citizens with eyes, the production of good video is not so widespread. What’s one thing you need for good video? Good lighting – and you can build it yourself.

This build from [DIY Perks] relies upon readily available components and uses simple build techniques accessible to the average maker. Using cheap LED strips (albeit photography-grade ones), along with off-the-shelf plastics and dimmer modules, it’s possible to build a light that preserves colour integrity while being lightweight, compact, and easy to use. The final product is remarkably elegant – at a glance it could be a commercial product. Nifty tricks like daisy chaining the power supplies and combining different spectrum LEDs for better control add to the functionality.

Overall, it’s a build that does take some time, but it could easily be completed in a weekend and the results are top notch. It’s not the first lightbox build we’ve seen here, either. Video after the break.

[Thanks to Keith O for the tip!]

Continue reading “DIY Studio Lights To Improve Your Videos”

Minimal Blinky Project Makes The Chip The Circuit Board

We’ve got a thing for projects that have no real practical value but instead seek to answer a simple yet fundamental question: I wonder if I can do that? This dead-bug style 555 blinky light is one of those projects, undertaken just to see how small a circuit can be. Pretty small, as it turns out, and we bet it can get even smaller.

[Danko]’s minimal circuit is about as small as possible for the DIP version of the venerable 555 chip. The BOM is stripped to the bone: just the chip, three resistors, a capacitor, and an LED. All the discrete components are SMDs in 0805. The chip’s leads are bent around the package to form connections, and the SMDs bridge those “traces” to complete the circuit. [Danko] shows the build in step-by-step detail in the video below. There’s some fairly fine work here, but we can’t help wondering just how far down the scale this could be pushed. We know someone’s made a smaller blinky using a tiny microcontroller, but we’d love to see this tried with the BGA version of the chip which is only 1.4 mm on a side.

Cheers to [Danko] for trying this out and having some fun with an old chip. He seems to have a bit of a thing for the 555; check out this cute robot sculpture that’s built around the chip.

Continue reading “Minimal Blinky Project Makes The Chip The Circuit Board”

DIY Puff-Suck Interface Aims For Faster Text Input

Puff and Suck (or Sip and Puff) systems allow people with little to no arm mobility to more easily interact with computers by using a straw-like unit as an input device. [Ana] tells us that the usual way these devices are used to input text involves a screen-based keyboard; a cursor is moved to a letter using some method (joystick, mouse emulator, buttons, or eye tracking) and that letter is selected with a sip or puff into a tube.

[Ana] saw such systems as effective and intuitive to use, but also limited in speed because there’s only so fast that one can select letters one at a time. That led to trying a new method; one that requires a bit more work on the user’s part, but the reward is faster text entry. The Puff-Suck Interface for Fast Text Input turns a hollow plastic disk and a rubber diaphragm into bipolar pressure switch, able to detect three states: suck, puff, and idle. The unit works by having an IR emitter and receiver pair on each side of a diaphragm (one half of which is shown in the image above). When air is blown into or sucked out of the unit, the diaphragm moves and physically blocks one or the other emitter-receiver pair. The resulting signals are interpreted by an attached Arduino.

How does this enable faster text input? By throwing out the usual “screen keyboard” interface and using Morse code, with puffs as dots and sucks as dashes. The project then acts as a kind of Morse code keyboard. It does require skill on the user’s part, but the reward is much faster text entry. The idea got selected as a finalist in the Human-Computer Interface Challenge portion of the 2018 Hackaday Prize!

Morse code may seem like a strange throwback to some, but not only does the bipolar nature of [Ana]’s puff-suck switch closely resemble that of Morse code input paddles, it’s also easy to learn. Morse code is far from dead; we have pages of projects and news showing its involvement in everything from whimsical projects to solving serious communication needs.