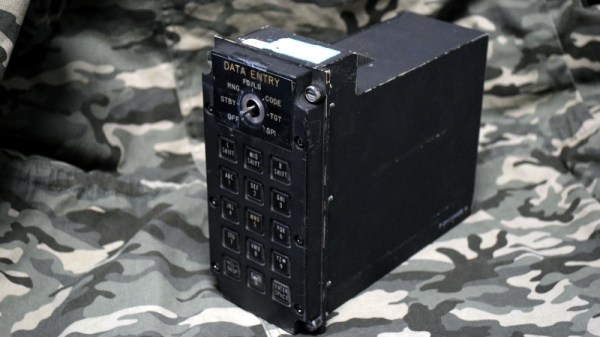
Amazon has released the Echo Dot Kids Edition, an always-on, Internet-connected microphone. According to Amazon’s Children’s Privacy Disclosure, the Amazon Echo Dot Kids Edition collects data such as, ‘name, birthdate, contact information (including phone numbers and email addresses), voice, photos, videos, location, and certain activity and device information. The Amazon Echo Dot Kids Edition is able to read audiobooks for bedtime reading and teaches your children to live in a dystopian panopticon of Orwellian proportions. It comes in green, red, and blue.
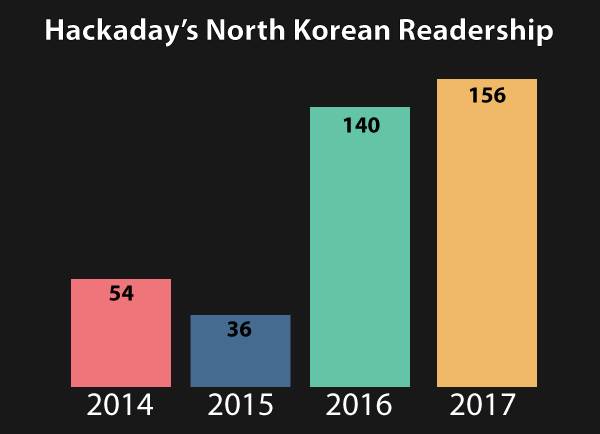
 Kim Possible! The biggest news headline this week is the coming end of the Korean War. The peninsula has been in a state of war since 1950, but leaders from both countries have agreed to negotiate a treaty to replace the 60-year-old truce. There is also an agreement between the two countries for complete denuclearization. This is great news for Hackaday. Every day, we’re eyeing our North Korean readership. Some days we get a view, some days we don’t, but year over year we’re always getting more views. Will this treaty result in even more Hackaday readers in North Korea? Only time will tell. Here’s some music. It wasn’t a chicken.
The East Coast RepRap Festival is on. Inspired by the Midwest RepRap Festival, the ERRF is happening north of Baltimore on June 23rd and 24th. What’s it going to be like? Nobody knows! This is the first time ERRF is happening, but judging by MRRF standards, it should be awesome. Also, crab season.
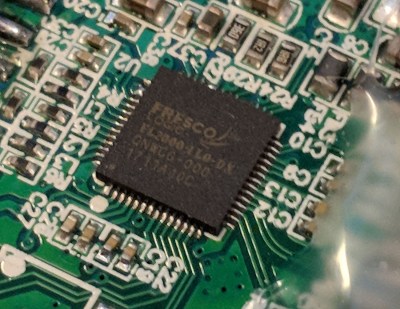
One of the most interesting hacks of this year is [Steve Markgraf]’s tool to allow transmit-only SDR through cheap USB 3.0 to VGA adapters. The hack relies on the Fresco Logic FL2000 chip and gives you the ability to transmit FM, TVB-T, and create your own GSM cell site. You can also spoof GPS to get something besides a rattata in Pokemon Go or hack your ankle bracelet to keep your parole officer off your back. The open question, though, is which USB to VGA adapter has the FL2000 chipset. I can confirm this one on Amazon has the relevant chipset. It’s a bit expensive at $15 (the same chipset is available from the usual eBay and AliExpress suppliers for $6), but if you’re looking for something that is available with Prime, there you go. Now we’re looking for shared OSH Park projects with a VGA input on one end and some antennas on the other. Make it happen, people.
Supercapacitors are awesome, but is it possible to fly a drone with a bank of them? Sure, for about 10 seconds. [dronelab] built a 7-cell, 200F supercap and managed to fly a little racing quad for about ten seconds. Not terribly great, but this is going to be awesome when we get multi-thousand Farad superultramegacaps.
Like Open Hardware? The Open Source Hardware Association is opening up the Ada Lovelace Fellowship for women, LGTBA+ and other minorities to attend the Open Hardware Summit. The deadline is tomorrow, so do it soon.
M3D has announced a new 3D printer that can print with four filaments. The Crane Quad is your basic i3 ripoff with an interesting extruder. It looks like it uses four tiny motors to feed filament into the main extruder motor. This isn’t really anything new; the Prusa i3 multimaterial upgrade does the same thing. However, M3D claims they have mastered color mixing. The Prusa upgrade doesn’t do mixing, and this is most likely the reason it works so well. Can M3D pull it off? This is a very, very, very hard problem.

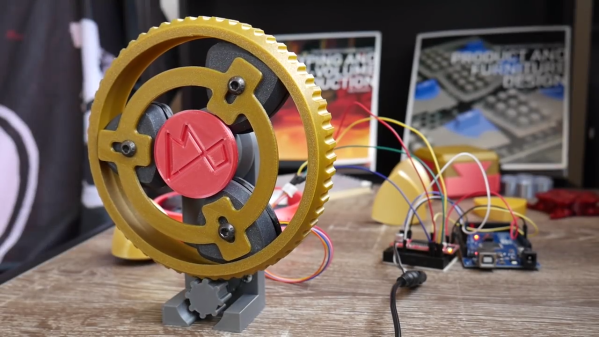
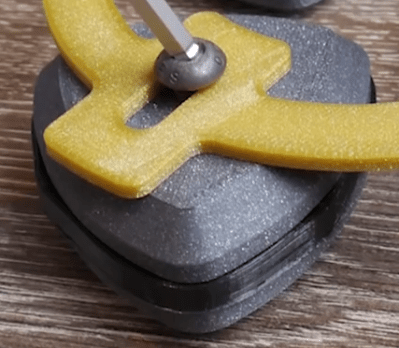 [Angus] finally arrived at a working bearing after a ton of suggestions from the community, and trying a number of attempts until he was able to achieve what he set out to do. The trick was to create a flexible insert (3D printed as well) for the center of the triangle edge, which grips the surfaces the triangle comes into contact with. A frame is also made to hold the bearings in place and allows their centers to move up and down as necessary.