Benchtop Fume Extractor Cuts The Cord, Clears The Air

What good is safety gear that isn’t used because it’s annoying and gets in the way of getting the job at hand completed? None, really, and the solder fume extractor is one item that never seems to live in harmony with your workspace. They’re often noisy, they obstruct your vision, and a power cord draped across your bench is a sure way to ruin your soldering zen.

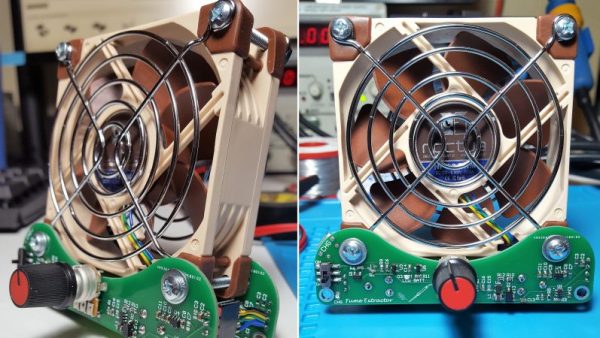
To fix those problems, [Nate] has built a nice battery powered solder fume extractor that’s so low profile and so quiet, you won’t mind sharing a bench with it. Based on a standard 80-mm case fan, the extractor has a built-in 18650 battery for power and a USB charging port. There are nice little features, like a speed control and a low-battery indicator. The fan mounts to a pair of custom PCBs, which form the feet for the fan. [Nate] claims to have run the fan for 12 hours straight on battery before needing a charge, and that it’s so quiet he needs to add a power indicator to the next version. Also making an appearance in rev 2 will be a carbon filter to catch the fumes, but as [Nate] notes, better to spread them around for now than let them go directly up his nose.

Are you in the hacking arts for the long haul? Let’s hope so. If you are, make sure you’re up on the basics of mitigating inhalation hazards.

Repairs You Can Print: Nintendo 3DS XL Lives Again!

Handheld game consoles have a hard life, and even the most well-built models can sometimes fail. The Nintendo 3DS XL, for example, can fail at its hinge, which is what happened to the one owned by [Mark]. Would he fix the hinge? No, he had a far simpler if a little less flexible solution, a 3D-printed bracket that clips over the whole device.

Sometimes the best pieces of work are also the simplest ones, and this one certainly fits that bill on both counts. When your console dies, you want it fixed, and though this doesn’t extend as far as providing a working hinge action it should allow you to play without further damaging anything. It’s not impossible to imagine that it could be made to incorporate a flexible zig-zag section to produce a closeable hinge, but if your Nintendo is broken you’ll care little for such niceties. The project can be downloaded from its Thingiverse page.

A common failure that we’d expect to accompany a broken hinge would be a faulty flexible ribbon cable. Fortunately, those are fixable on the 3DS, too.

A Few Laser-Cut Cases For Your SBCs

Single-board computers, usually featuring ARM processors, have revolutionized the world of the hardware hacker over the last decade. The computing power you would have found in a desktop computer not so long ago, mounted on a small PCB and powered from a mobile phone charger.

With a few notable exceptions though, these single board computers are just that, boards. No cases in the pack, which has, of course, spawned a huge aftermarket of commercial offerings and a pile of homemade ones of varying sophistication. If these homemade offerings are your fancy then today’s link may be of interest, some very well-designed laser-cut cases from [Nick Smith] for a selection of popular and less well-known boards.

The Orange Pi Lite and Raspberry Pi Zero are both familiar enough, but one of the delights of writing for Hackaday reveals itself in the discovery of the more esoteric Marvell ESPRESSObin, an SBC with multiple network ports and serial ATA.

Are cases your passion? Step back in time for our round-up of case designs for the first Raspberry Pi.

Via Hacker News.


Beating Life-Force Amulet

It’s one thing to see science-fiction slowly become reality, but quite another to take that process into your own hands. Inspired by a movie prop, [Eric Strebel] decided to build himself a 21st science-fiction artifact: a pulsing, life-force amulet.

At the — aheam — heart of this amulet is a blinking LED circuit which [Strebel] modified into a slow pulse with the help of his friends. To add to the surreal quality of the amulet, he sourced a stone from a local gem show, bringing his circuit along to get an idea of what the final product would look like. Once [Strebel] had shaped the stone to a more manageable size, he took a polyester filler mold of its rear face to use as a base from which to cast a durable resin housing for the circuit.

[Strebel] is using a pair of coin cell batteries which fit snugly behind the glowing LED, and in case he ever needs to get inside the amulet, he’s attached the stone to the rear with sew-on straps — super-gluing them to each piece. He went for a bit of an industrial look for the necklace — a braided oil line with a modified quick-release clasp that works like a charm.

How does this amulet stack up to one from the 23rd century? You be the judge!

A 3D Printable Raman Probe

Scientific instruments are expensive. In a lot of cases, really expensive, so if you have spent any time in a well-equipped lab, the chances are that it would have been one backed up by the resources of a university, or a large company. Those experimenters who wish to pursue such matters outside those environments have traditionally had to rely on obsolete instruments from the surplus market. A fascinating endeavor in itself, but one that can sometimes limit the opportunity to pursue science.

It has been interesting then to see the impact of the arrival of affordable 3D printing on the creation of self-built scientific instruments. A fantastic example has come our way, [David H Haffner Sr]’s 3D printable Raman probe. A Raman spectroscope is an instrument in which the light scattered from the sample exposed to an incident monochromatic source is collected, as opposed to that reflected or transmitted through it. Scattered light can be a huge magnitude weaker than other modes, thus the design of a Raman probe is critical to its success. (If you are curious, read this multi-part explanation on Raman spectroscopy.)

This is a work in progress at the time of writing, but it still makes for an interesting examination of Raman probe design. Interestingly the sensor is a standard DSLR camera, which though not a cheap device is possibly more affordable than a more dedicated sensor.

This isn’t the first Raman spectrometer we’ve seen on these pages, we’ve also brought you a Fourier transform spectrometer, and plenty of more conventional instruments.

Towards Sensible Packaging For 3D Printer Filament

Filament-based 3D printers are remarkably wasteful. If you buy a kilogram of filament from your favorite supplier, the odds are that it will come wrapped around a plastic spool weighing about 250 grams. Use the filament, and that spool will be thrown in the trash. Very, very few products have such wasteful packaging as 3D printer filament, with the possible exception of inkjet cartridges or getting a receipt with your purchase at CVS.

For the last few years, [Richard Horne], better known as RichRap, has been working towards a solution to the problem of the wasteful spools for 3D printer filament. Now, it looks like he has a solution with the MakerSpool. It’s the perfect solution for a 3D printing ecosystem that doesn’t waste 20% of the total plastic on packaging.

The design of the MakerSpool is fairly straightforward and also 3D printable. It’s a plastic filament spool, just a shade over 200mm in diameter, consisting of two halves that screw together. Add in some RepRap ‘teardrop’ logos, and you have a spool that should fit nearly any machine, and will accept any type of filament.

The trick with this system is, of course, getting the filament onto the spool in the first place. Obviously, filament manufacturers would have to ship unspooled filament that’s somehow constrained and hopefully vacuum packed. Das Filament, a filament manufacturer out of Germany, has already tested this and it looks like they have their process down. It is possible to ship a kilogram of 1.75 filament without a spool, and held together with zip ties. Other filament manufacturers also have packaging processes that are amenable to this style of packaging.

Whether this sort of packing will catch on is anyone’s guess, but there are obvious advantages. There is less waste for the environmentalists in the crowd, but with that you also get reduced shipping costs. It’s a win-win for any filament manufacturer that could also result in reduced costs passed onto the consumer.

Boost Tube Replacement Through 3D Printing

[Sam] is the lucky owner of a 1990 VW Corrado G60. To the uninitiated, that’s the souped-up, go fast version with the fancy supercharger on top. While performing some mods to the air intake (car-speak for “hacks”), there came a need for a custom tube to eliminate the original silencer box. With available options costing up to $400, suddenly 3D printing a replacement seemed like a better answer.

3D printing intake parts for a supercharged vehicle has some unique challenges. The intake must be able to take the boost pressures seen by the engine, in this case up to around 10 psi. There must be no air leaks at all as this risks confusing the sensors that measure how much air is entering the engine. Lastly, the tube must be able to withstand the hot, and often oily environment under the hood.

The first attempt was completed with TPU filament, which unfortunately did not hold pressure. A followup with PLA fared better, but was unable to withstand the heat present in the engine bay. After some experimentation, a successful print was made in PETG which was more robust. In the final design, [Sam] applied a rubber coating and then some aluminum tape, to both help seal any micro-holes in the 3D printed surface as well as help protect against heat.

After over a month of testing, [Sam]’s data logs indicate the tube is performing well and holding boost. It goes to show that with some perseverance and iterative design, 3D printed parts can often save the day.

Perhaps you’re inspired by this hack but need to jack up your car to work on it? Never fear, you can 3D print those too.