Ultra-Tiny Wii Uses Custom Parts And Looks Amazing

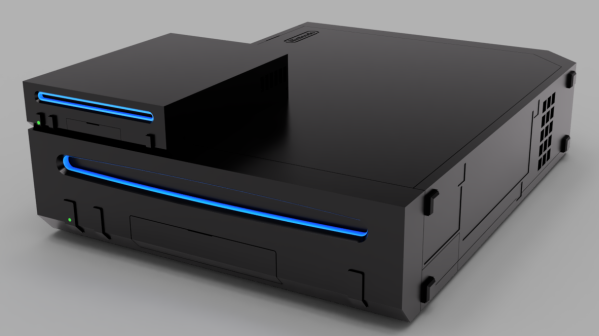
The Nintendo Wii was never a large console. Indeed, it was smaller than both the Xbox 360, PlayStation 3, and most consoles of previous generations, too. That’s not to say it couldn’t be smaller, though. [loopj] has built what is perhaps the smallest Wii yet, which measures roughly the same size as a deck of cards. The best bit? The housing is even to scale!

There’s no emulation jiggery-pokery here. This build uses an original Wii motherboard that’s been cut down to the bare basics. Measuring just 62 mm by 62 mm, it features the CPU, GPU, RAM, and flash memory, while most of the extraneous hardware has been eliminated. Power and data is provided to the board from a special Wii Power Strip PCB, while the Periphlex flex PCB handles breaking out controller interfaces. Indeed, the build is nicknamed Short Stack as it’s built from a number of specialist PCBs for builds like this one. It also uses two boards designed by [YveltalGriffin] — the fujiflex for HDMI video output and the nandFlex to handle the Wii’s NAND memory chip.

[loopj] also had to design two further PCBs specifically for this build. One handles power, the micro SD card, HDMI connector, and controller ports. Meanwhile, the second handles the power, reset, and sync buttons along with status LEDs. Another neat hack of [loopj]’s own devising is using TRRS connectors in place of the original bulky GameCube controller ports.

Ultimately, it’s volume is just 7.4% that of an original Nintendo Wii. It’s probably possible to go smaller, too, says [loopj], so don’t expect things to end here. We’ve seen some other great Wii mods before, too, like this excellent handheld design.

Synesthetic Clock Doesn’t Require Synesthesia

We often think of synesthetes as those people who associate say, colors with numbers. But the phenomenon can occur with any of the senses. Simply put, when one sense is activated, synesthesia causes one to experience an unrelated, activated sense. Sounds trippy, no?

Thankfully, [Markus Opitz]’s synesthetic clock doesn’t require one to have synesthesia. It’s actually quite easy to read, we think. Can you tell what time it is in the image above? The only real requirement seems to be knowing the AM color from the PM color. The minute display cycles through blue, green, yellow, and red as the hour progresses.

Behind that pair of GC9a01 round displays lies an ESP32 and a real-time clock module. [Markus] couldn’t find a fillArc function, so instead he is drawing triangles whose ends lie outside the visible area. To calculate the size of the triangle, [Markus] is using the angle function tangent, so each minute has an angle of 6°.

[Markus] created a simple but attractive oak housing for the clock, but suggests anything from cardboard and plastic to a book. What’s the most interesting thing you’ve ever used for an enclosure? Let us know in the comments.

Do you appreciate a good analog clock when you see one? Here’s a clock that uses analog meters for its display.

Wozamp Turns Apple II Into Music Player

Besides obvious technological advancements, early computers built by Apple differed in a major way from their modern analogs. Rather than relying on planned obsolescence as a business model, computers like the Apple II were designed to be upgradable and long-term devices users would own for a substantially longer time than an iPhone or Macbook. With the right hardware they can even be used in the modern era as this project demonstrates by turning one into a music player.

The requirements for this build are fairly short; an Apple II with a serial card and a piece of software called surl-server which is a proxy that allows older computers to communicate over modern networks. In this case it handles transcoding and resampling with the help of a Raspberry Pi 3. With that all set up, the media player can play audio files in an FTP network share or an online web radio station. It can also display album art on the Apple II monitor and includes a VU meter that is active during playback.

Although the 11.52 kHz sampling rate and 5-bit DAC may not meet the stringent requirements of audiophile critics, it’s an impressive build for a machine of this era. In fact, the Apple II has a vibrant community still active in the retrocomputing world, with plenty of projects built for it including others related to its unique audio capabilities. And if you don’t have an original Apple II you can always get by with an FPGA instead.

Retrotechtacular: TOPS Runs The 1970s British Railroad

How do you make the trains run on time? British Rail adopted TOPS, a computer system born of IBM’s SAGE defense project, along with work from Standford and Southern Pacific Railroad. Before TOPS, running the railroad took paper. Lots of paper, ranging from a train’s history, assignments, and all the other bits of data required to keep the trains moving. TOPS kept this data in real-time on computer screens all across the system. While British Rail wasn’t the only company to deploy TOPS, they were certainly proud of it and produced the video you can see below about how the system worked.

There are a lot of pictures of old big iron and the narrator says it has an “immense storage capacity.”  The actual computers in question were a pair of IBM System/370 mainframes that each had 4 MB of RAM. There were also banks of 3330 disk drives that used removable disk packs of — gasp — between 100 and 200 MB per pack.

As primitive and large as those disk drives were, they pioneered many familiar-sounding technologies. For example, they used voice coils, servo tracking, MFM encoding, and error-correcting encoding.

Continue reading “Retrotechtacular: TOPS Runs The 1970s British Railroad”

Video Poker Takes Your Money In 10 Lines Of BASIC

It wasn’t easy, but [D. Scott Williamson] succeeded in implementing Jacks or Better Video Poker in 10 lines of BASIC, complete with flashing light and sound! Each round, one places a bet then plays a hand of 5-card draw, hoping to end up with Jacks or better.

This program is [Scott]’s entry into the 2024 BASIC 10 Liner Contest, which at this writing has concluded submissions and expects to announce results on April 6th 2024. Contestants may choose any 8-bit computer system BASIC, and must implement their program within ten lines of code (classically limited to 80 characters per line, but there are different categories with different constraints on line width.)

10 lines of BASIC is truly an exercise in information density.

We’ve seen impressive 10-line BASIC programs before, like this re-implementation of the E.T. video game. (Fun fact: while considered one of the worst video games of all time, there’s a compelling case to be made that while it was a flop, it was ahead of its time and mostly just misunderstood.)

These programs don’t look much like the typical BASIC programs many of us remember. They are exercises in information density, where every character counts. So we’re delighted to see [Scott] also provides a version of his code formatted and commented for better readability, and a logical overview that steps through each line.

He spends a little time talking about the various challenges, as well. For example, hand ranking required a clever solution. IF…THEN conditionals would rapidly consume the limited lines of code, so hands are ranked programmatically. The 52-card deck is also simulated, rather than simply generating random cards on the fly.

The result looks great, and you can watch it in action in the video, just under the page break. If this sort of challenge tweaks your interest, there’s plenty of time to get started on next year’s BASIC 10 Liner Contest. Fire up those emulators!

Continue reading “Video Poker Takes Your Money In 10 Lines Of BASIC”

Breadboard SDR Doesn’t Need Much

[Grug Huhler] built a simple Tayloe mixer and detector on a breadboard. He decided to extend it a bit to be a full-blown software defined radio (SDR). He then used WSJT-X to monitor FT8 signals and found that he could pick up signals from all over the world with the little breadboard system.

A Raspberry Pi Pico generates a quadrature clock that acts as the local oscillator for the radio. All the processing of the input signal to a quadrature signal is done with a 74LV4052A, which is nothing more than an analog multiplexer. In principle, the device takes a binary number from zero to three and uses it to connect a common signal to one of four channels. There are two common lines and two sets of four channels. In this case, only half of the chip is in use.

An antenna network (two resistors and a capacitor) couples the antenna to one of the common pins, and the Pi generates two square waves, 90 degrees out of phase with each other. This produces select signals in binary of 00, 01, 11, and 10. An op amp and a handful of passive components couple the resulting signals to a PC soundcard, where the software processes the data. The Pi can create clocks up to about 15 or 20 MHz easily using the PIO.

The antenna is a 20-meter-long wire outside, and that accounts for some of the radio’s success. There are several programs than can work with soundcard input like this and [Grug] shows Quisk as a general-purpose receiver. If you missed the first video explaining the Tayloe mixer design, you can catch it below the first video.

This isn’t the first breadboard SDR we’ve seen, but they all use different parts. We’ve even seen a one-bit SDR with three components total (not including the microcontroller). Seriously.

Continue reading “Breadboard SDR Doesn’t Need Much”

Playing Audio On The Pi Pico With No DAC To Speak Of

Normally, if you want to play music or other audio on a microcontroller, you need to get yourself a DAC. Or at least, that’s the easiest way to go about it and the one most likely to get you good, intelligible audio. You don’t have to go that way, though, as [antirez] demonstrates.

[antirez] decided to do this with a Pi Pico, but it’s applicable to other microcontrollers too. It’s all done with a single pin and a PWM output. The PWM output is set to a very high frequency beyond human hearing. In this case, it was 100 KHz. Then, the duty cycle of the PWM is changed to essentially output various average voltage levels at the pin. Vary the output voltage as per your desired sound file by using each sample to vary the duty cycle of the PWM. Voila! You can output whatever sound you want on that pin! [antirez] steps through the basics of doing this, including processing simple WAV files into a raw format that can be dumped into MicroPython code.

There’s no sound sample on the project page, and we’d have to assume it sounds pretty crunchy when hooked up to a speaker. And yet, it could prove a useful technique if you’re designing your own audio greeting cards or something, so keep that in mind!