Finally – A Big-Screen Vectrex

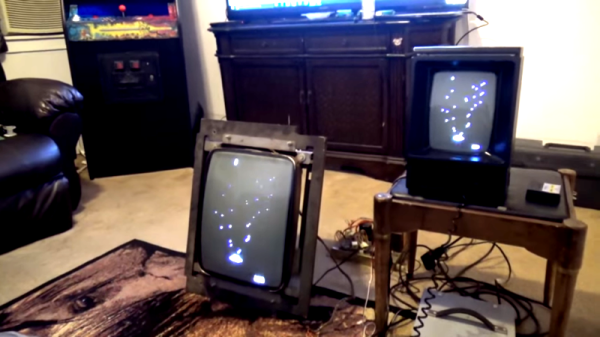
The Vectrex is in no way the most popular console of all time, but it is one of the more unique. Eschewing typical raster-based rendering, it instead relies on a vector-based display. Since the average home television of the era would be completely unable to display such signals, the Vectrex had its screen built in. This got [Arcade Jason] wondering – would it be possible to hook the Vectrex up to a bigger screen?

First, a suitable monitor had to be found. The 19V2000 turned out to be a good candidate – much larger at 19 inches, and found in a variety of arcade cabinets from years past. From there, the project became a matter of identifying the signal outputs of the Vectrex. [Arcade Jason] took the liberty of modifying the levels of the signals on the Vectrex board itself, and then fixing the now-overscanned image on the original screen by adjusting the onboard trimpots. With the Vectrex’s X and Y signals now boosted somewhat, they were wired up to the inputs of the larger arcade screen. For the Z signal, things got even hackier – a Walmart “Computer Amplifier”, typically used for speakers, was instead pressed in to service to amplify the signal.

There are plenty of wires running all over the carpet in this video, but the fact is, it works brilliantly. Future plans involve upgrading to an even larger 23 inch monitor, and possibly even experiments with color vector displays. It just goes to show that the Vectrex, even today, maintains a die-hard following.

Perhaps you’d like to try this, but need to fix your original Vectrex screen first? Never fear – that’s possible, too.


Pi Handheld With A Mindblowing Enclosure

The Raspberry Pi is possibly the world’s most popular emulation platform these days. While it was never intended to serve this purpose, the fact remains that a small, compact computer with flexible I/O is ideally suited to it. We’ve featured a multitude of builds over the years using a Pi in a mobile form factor to take games on the go. [Michael]’s build, however, offers a lot more than a few Nintendo ROMs and some buttons from eBay. It’s a tour de force in enclosure design.

The build starts with the electronics. In 2017 it’s no longer necessary to cobble together five different accessory boards to handle the controls, battery charging, and display. Boards like Kite’s Super All In One exist, handling everything necessary for a handheld game console. With this as a starting point, he then set out to recreate Nintendo’s classic Game Boy, with a few tweaks to form and function.

It’s a textbook example of smart planning, design, and execution. We are taken through the process of creating the initial CAD drawings, then combining 3D printed parts with wood and carbon fibre for a look that is more akin to a high-end piece of hi-fi gear than anything related to gaming. The attention to detail is superb and the write-up makes it look easy, while [Michael] shares tips on how to safely cut carbon fibre to make your own buttons.

The final results are stunning, and it’s a great example of why a fine piece of wood is always a classy way to go for an enclosure. For another great example, try this walnut keyboard, or check out the roots of the Raspberry Pi Game Boy movement.

[Jeri] Builds A Magnetic Loop Antenna

Most new hams quickly learn that the high-frequency bands are where the action is, and getting on the air somewhere between 40- and 160-meters is the way to make those coveted globe-hopping contacts. Trouble is, the easiest antennas to build — horizontal center-fed dipoles — start to claim a lot of real estate at these wavelengths.

So hacker of note and dedicated amateur radio operator [Jeri Ellsworth (AI6TK)] has started a video series devoted to building a magnetic loop antenna for the 160- and 80-meter bands. The first video, included after the break, is an overview of the rationale behind a magnetic loop. It’s not just the length of the dipole that makes them difficult to deploy for these bands; as [Jeri] explains, propagation has a lot to do with dipole height too. [Jeri] covers most of the mechanical aspects of the antenna in the first installment; consuming a 50-foot coil of 3/4″ copper tubing means it won’t be a cheap build, but we’re really looking forward to seeing how it turns out.

We were sorry to hear that castAR, the augmented reality company that [Jeri] co-founded, shut its doors back in June. But if that means we get more great projects like this and guided tours of cool museums to boot, maybe [Jeri]’s loss is our gain?

Continue reading “[Jeri] Builds A Magnetic Loop Antenna”

Listening For Hand Gestures

[B. Aswinth Raj] wanted to control a VLC player with hand gestures. He turned to two common ultrasonic sensors and Python to do the job. There is also, of course, an Arduino. You can see a video of the results, below.

The Arduino code reads the distance from both sensors — one for the left hand and the other for the right. This allows the device to react to single hand gestures that get closer or further away from one sensor as well as gestures involving both hands. For example, raising your left hand and moving it closer or further away will adjust the volume. The right hand controls rewind and fast forward. Raising both hands will start or stop playback.

Continue reading “Listening For Hand Gestures”

The Internet Of Jack-O’-Lanterns

As the candy rush fades, the Halloween hacks continue pouring in. [Jeremy S Cook] has taken a few fundamental concepts and dressed them up inside the smartest pumpkin on the block.

This pumpkin has a WEMOS D1 Mini ESP8266 brain, LED eyes in place of a candle for illumination, and a small USB power bank for power. The code [Cook] is using is a modified sketch by YouTuber [Innovative Tom], which creates a server on your network — don’t forget to insert your network credentials! — that enable control of the LEDs from your computer or smart phone.

[Cook] has wired the LEDs to the relevant pins on the D1 Mini, zip-tied the battery and board together and stuff them in a plastic bag to keep them dry. Stick that into the pumpkin, hot glue the LEDs in place, and test it out!

Continue reading “The Internet Of Jack-O’-Lanterns”

Add Intuitiveness To OpenSCAD With Encoders

The first time I saw 3D modeling and 3D printing used practically was at a hack day event. We printed simple plastic struts to hold a couple of spring-loaded wires apart. Nothing revolutionary as far as parts go but it was the moment I realized the value of a printer.

Since then, I have used OpenSCAD because that is what I saw the first time but the intuitiveness of other programs led me to develop the OpenVectorKB which allowed the ubiquitous vectors in OpenSCAD to be changed at will while keeping the parametric qualities of the program, and even leveraging them.

All three values in a vector, X, Y, and Z, are modified by twisting encoder knobs. The device acts as a keyboard to

  1. select the relevant value
  2. replace it with an updated value
  3. refresh the display
  4. move the cursor back to the starting point

There is no software to install and it runs off a Teensy-LC so reprogramming it for other programs is possible in any program where rotary encoders may be useful. Additional modes include a mouse, arrow keys, Audacity editing controls, and VLC time searching.

Here’s an article in favor of OpenSCAD and here’s one against it. This article does a good job of explaining OpenSCAD.

Continue reading “Add Intuitiveness To OpenSCAD With Encoders”

Hackaday Prize Entry: Volturnus ROV Rules The River

Water is kind of like information: both are a vital part of life and are found all around us. But not all water or information is healthy. Much of it may look harmless, but is actually polluted. A staggering number of people in the world have no access to fresh, clean water. ROVs can collect samples and detect pollution, but commercial types are way too expensive for the legions of people who need them.

UV light reveals the presence of optical brightening agents in a sample of lake water.

[allai5] wants to be the catalyst for change. She’s the president of Rogue Robotics, a group of high school students throughout central New Jersey who have pooled their talents to design and build a simple, open-source ROV that’s affordable, repeatable, and environmentally friendly. The team uses Volturnus ROV to collect water samples and UV light to determine the presence of a general type of pollutant known as optical brightening agents (OBAs). This is the stuff they add to laundry detergents and copy paper to whiten the fibers’ appearance. By design, OBAs fluoresce brightly under UV light. After soaking a cotton pad in water sample, it’s easy to see if OBAs are present.

At 12″ x 12″ x 18″, Volturnus ROV is compact enough to explore most of the nooks and crannies of any body of water. It moves under the power of three thrusters—500 GPH bilge pump motors driven by a pair of L298N controllers—and is controlled by an Arduino Mega using a wireless joystick. The driver of the ROV navigates the drink through the eyes of a waterproof car back-up camera whose feed is flipped with a Python script.

Volturnus ROV is not a one-stop solution for dealing with marine pollution. The team would like to add filtration in the future and move the electronics to the bottom so it can go faster. Rogue Robotics’ aim has always been to make an ROV that does a few things well. Right now, it’s an excellent jumping-off point for awareness and blueprint for action. Find your inspiration after the break.

Continue reading “Hackaday Prize Entry: Volturnus ROV Rules The River”