Review: Inkplate 2 Shrinks Down, Adds Color

Regular Hackaday readers may recall the Inkplate family of devices: open source all-in-one development boards that combine the power and versatility of the ESP32 with electronic paper displays salvaged from commercial e-readers. By taking the sharp, high-speed, displays intended for readers such as Amazon’s Kindle and bundling it together with all the hardware and software you need to make it work, the Inkplate provided a turn-key platform for anyone looking to get serious with e-paper.

Given the fact that their screens were pulled from recycled readers, it’s no surprise the previous Inkplate entries came in familiar 6 and 10 inch variants. There was even an upgraded 6 inch model that benefited from newer reader technology by adopting a touch-sensitive backlit panel, which we took a close look at last year. Their large displays make them excellent for wall mounted applications, such as a household notification center or constantly-changing art display. Plus, as you might expect, the Inkplate is an ideal choice for anyone looking to roll their own custom e-reader.
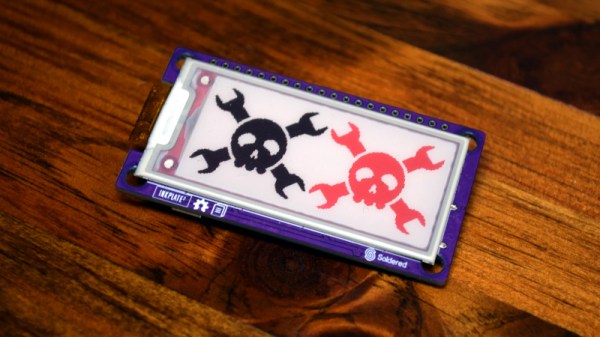
But of course, not every application needs so much screen real estate. In fact, for some tasks, such a large display could be considered a liability. Seeing a void in their existing product lineup, the folks at Soldered Electronics (previously e-radionica) have recently unveiled the diminutive Inkplate 2. This new miniature Inkplate uses the same software library as its larger predecessors, but thanks to its 2.13 inch three-color display, lends itself to a wider array of potential projects. Plus it’s considerably cheaper than the larger Inkplate models, at just $35 USD.

Considering the crowd sourced funding campaign for the Inkplate 2 blew past its goal in just 72 hours, it seems clear there’s plenty of interest in this new smaller model. But if you’re still not sure if it’s the e-paper solution you’ve been waiting for, maybe we can help — the folks at Soldered sent along a pre-production version of the Inkplate 2 for us to play around with, so let’s take it for a test drive and see what all the fuss is about.

Continue reading “Review: Inkplate 2 Shrinks Down, Adds Color”

All About USB-C: Introduction For Hackers

We’ve now had at least five years of USB-C ports in our devices. It’s a standard that many manufacturers and hackers can get behind. Initially, there was plenty of confusion about what we’d actually encounter out there, and manufacturer-induced aberrations have put some people off. However, USB-C is here to stay, and I’d like to show you how USB-C actually gets used out there, what you can expect out of it as a power user, and what you can get out of it as a hobbyist.

Modern devices have a set of common needs – they need a power input, or a power output, sometimes both, typically a USB2 connection, and often some higher-speed connectivity like a display output/input or USB 3. USB-C is an interface that aims to be able to take care of all of those. Everything aforementioned is optional, which is a blessing and a curse, but you can quickly learn to distinguish what to expect out of a device based on how it looks; if ever in doubt, I’d like to show you how to check.

Continue reading “All About USB-C: Introduction For Hackers”

Gift Idea From 1969: A Kitchen Computer

The end of the year is often a time for people to exchange presents and — of course — the rich want to buy each other the best presents. The Neiman Marcus company was famous for having a catalog of gift ideas. Many were what you’d consider normal gifts, but there were usually extreme ones, like a tank trunk filled with 100,000 gallons of cologne. One year, the strange gift was an authentic Chinese junk complete with sails and teak decks. They apparently sold three at $11,500 (in 1962 money, no less). Over the top? In 1969, they featured a kitchen computer.

Wait a minute! In 1969, computers were the purview of big companies, universities, and NASA, right? Well, not really. By that time, some industrial minicomputers were not millions of dollars but were still many thousands of dollars. The price in the catalog for the kitchen computer was $10,600. That’s about $86,000 in today’s money. The actual machine was a Honeywell 316, based on one of the computers that helped run the early Internet.

Continue reading “Gift Idea From 1969: A Kitchen Computer”

A crown ornament made from PCB material

Clever Design Technique Makes Flexible PCB Fit For A Queen

Printed circuit boards can be square, round, octagonal, or whatever shape you desire. But there’s little choice when it comes to the third dimension: most PCBs are flat and rigid. Sure, you can make flexible PCBs like the kapton-backed ones you find inside electronic gadgets, but those are complicated to work with. As it turns out however, you can also make flexible boards using regular PCB material: check out [Rehana Al-Soltane]’s Flexible Crown PCB, a project she did as part of [Neil Gershenfeld]’s “How To Make (Almost) Anything” class at MIT.

The basic idea is to create flexures in the PCB by milling out several long slots with thin pieces connecting the two sides. [Rehana] got this idea from [Quentin Bolsée]’s flexible capacitive sensor project and applied it to make a crown-shaped PCB with sparkly LEDs. The crown can bend through 180 degrees and can actually be worn as a head ornament, with pin headers to clamp it down on the wearer’s hair.

[Rehana] used a tool called svg-pcb to design the board. This is an open source toolkit that lets you design PCBs by describing them in code, rather than drawing shapes by hand. Although this might look a bit odd if you’re used to working with traditional PCB design software, it’s ideal for making repetitive structures like the flexures in the crown: simply write a for loop and let the tool generate a perfect array of identical slots.

Fabricating the Flexible Crown posed a few difficulties of its own, because the PCB began to flex and wiggle itself loose before the milling process was finished. As it turned out, the trick was to cut all the slots on the interior first and only mill the board’s outline as the very last step.

Adding flexures to a PCB like this looks like a promising technique and we’ll keep an eye on further developments in this field. There are other ways of making bendy boards though: researchers at the University of Maryland used a laser engraver to make foldable PCBs. Our 2019 Flexible PCB Contest also yielded several impressive implementations.

Continue reading “Clever Design Technique Makes Flexible PCB Fit For A Queen”

Nucleo-F429ZI development board with STM32F429 microcontroller

Epic Guide To Bare-Metal STM32 Programming

[Sergey Lyubka] put together this epic guide for bare-metal microcontroller programming.  While the general concepts should be applicable to most any microcontroller, [Sergey]s examples specifically relate to the Nucleo-F429ZI development board featuring the ARM-based STM32F429 microcontroller.

In the realm of computer systems, bare-metal programming most often refers to programming the processor without an intervening operating system. This generally applies to programming BIOS, hardware drivers, communication drivers, elements of the operating system, and so forth. Even in the world of embedded programming, were things are generally quite low-level (close to the metal), we’ve grown accustomed to a good amount of hardware abstraction. For example, we often start projects already standing on the shoulders of various libraries, boot loaders, and integrated development tools.

When we forego these abstractions and program directly on the microprocessor or microcontroller, we’re working on the bare metal. [Sergey] aptly defines this as programming the microcontroller “using just a compiler and a datasheet, nothing else.” His guide starts at the very foundation by examining the processor’s memory map and registers including locations for memory mapped I/O pins and other peripherals.

The guide walks us through writing up a minimal firmware program from boot vector to blinking an LED connected to an I/O pin. The demonstration continues with setup and use of necessary tools such as the compiler, linker, and flasher. We move on to increasingly advanced topics like timers, interrupts, UART output, debuggers, and even configuring an embedded web server to expose a complete device dashboard.

While initially more time consuming, working close to the metal provides a good deal of additional insight into, and control over, hardware operations.  For even more on the subject, you may like our STM32 Bootcamp series on bare-metal STM32 programming.

A dekatron-based clock with a GPS receiver and a plastic dinosaur on top

Dekatron Clock Tells The Time, Sans Semiconductors

Over the years, there have been several memory and display technologies that served a particular niche for a while, only to be replaced and forgotten when a more suitable technology came along. One of those was the dekatron: a combination memory and display tube that saw some use in the 1950s and ’60s but became obsolete soon after. Their retro design and combined memory/display functionality make them excellent components for today’s clock hackers however, as [grobinson6000] demonstrates in his Dekaclock project.

A dekatron tube is basically a neon tube with ten cathodes arranged in a circle. Only one of them is illuminated at any time, and you can make the tube jump to the next cathode by applying pulses to its pins. The Dekaclock uses the 50 Hz mains frequency to generate 20 ms pulses in one tube; when it reaches 100 ms, it triggers the next tube that counts hundreds of ms, which triggers another one that counts seconds, and so on with minutes and hours.

The Dekaclock uses no semiconductors at all: the entire system is built from glass tubes and passive components. However, [grobinson6000] also built an auxiliary system, full of semiconductors, that makes the clock a bit easier to use. It sits on top of the Dekaclock and automatically sets the correct time using a GPS receiver. It also keeps track of the time displayed by the dekatrons, and tells you how far they have drifted from their initial setting.

Both systems are housed in sleek wooden cases that perfectly fit the tubes’ retro aesthetic. [grobinson6000] was inspired to make the Dekaclock after watching another dekatron clock we featured earlier, and designed the GPS receiver to work alongside it. Dekatrons are surprisingly versatile devices: you can use them to make anything from internet speed gauges to kitchen timers.

Continue reading “Dekatron Clock Tells The Time, Sans Semiconductors”

Perhaps It’s Time To Talk About All Those Fakes And Clones

A while back, I bought a cheap spectrum analyser via AliExpress. I come from the age when a spectrum analyser was an extremely expensive item with a built-in CRT display, so there’s still a minor thrill to buying one for a few tens of dollars even if it’s obvious to all and sundry that the march of technology has brought within reach the previously unattainable. My AliExpress spectrum analyser is a clone of a design that first appeared in a German amateur radio magazine, and in my review at the time I found it to be worth the small outlay but a bit deaf and wide compared to its more expensive brethren. Continue reading “Perhaps It’s Time To Talk About All Those Fakes And Clones”