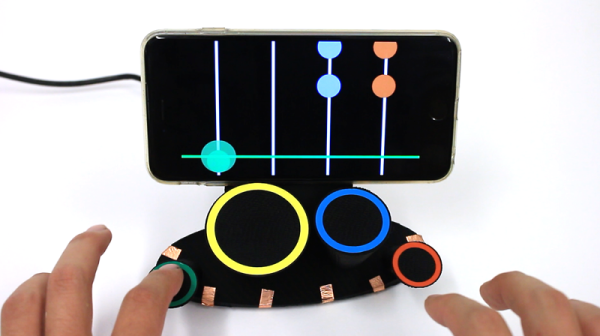
Tiny-TS: Just How Small Can A Playable Synethesiser Get?

The early electronic synthesizers were huge machines, racks of electronic modules that filled entire rooms. Integration of electronics over time successively reduced them, first to the size of a large piece of furniture, then to  tabletop consoles, to standalone keyboards, and to small MIDI black boxes taking their instructions from another instrument or a computer. The original mass of discrete electronics had been reduced to a pile of ICs, then chipsets, then finally single ICs and software implementations on microcomputers.

It’s thus possible to make a synthesizer these days that is pretty small. If you can fit a microcontroller in it, you can fit a synth into it. But how about a playable synthesizer? One with a keyboard, on which you can give a recital? How small can you make one of those? [Jan Ostman] has a contender for the smallest playable synthesizer prize with his Tiny-TS, a credit-card synthesiser with a one-octave capacitive keyboard and analog controls for synthesis parameters.

The heart of the synth is an ATMega328, for which he provides the software. The parameters adjustable by a series of pots are listed as DCO: Coarse pitch and Double, DCF: Filter peak and ENVmod, and ENV: Attack and Release affecting amplitude. You can build your own, or he tells us that he has the project up as a Kickstarter campaign if you fancy the chance of buying one ready-made.

In case you are wondering, it doesn’t sound too bad. Some minimalist synths sacrifice the breadth of sounds they can create, but not this one. He takes it through its paces in a YouTube video which we’ve put below the break.

Continue reading “Tiny-TS: Just How Small Can A Playable Synethesiser Get?”

Miniature Engine Model Made Of Paper

You can make a lot of stuff out of paper, but a single-stroke engine model less than an inch across? That’s a new one, courtesy of Russian hacker [Aliaksei Zholner], who built a quite remarkable model of a single-stroke engine out of paper (in Russian, translated version via Google Translate). Measuring less than an inch across, it is driven by compressed air and accurately models the rotary action of a single-stroke engine, where a piston in the cylinder drives a flywheel that creates the engine cycle.

The creator has managed to run it at up to about 60 revolutions per second, or about 3600rpm. That’s an impressive speed for a few bits of paper and glue, and there is even an input restrictor that can control the airflow that drives the model.  We’ve featured some interesting paper creations before, such as this papercraft robot and a Strandbeest, but this one is a step beyond. [Aliaksei] has also made the plans and template for this available, so those with steady hands can go ahead and try to make their own.

Continue reading “Miniature Engine Model Made Of Paper”

The Nest: Album Release Hidden In A Rock

First there were vinyl records, then came cassettes, CDs, those failed audio-on-DVD formats, and then downloads. To quote the band, [Bateleur], “you can’t pay someone to take a CD these days.” So how do you release your new album? By hiding a Raspberry Pi in a semi-transparent fake rock on a mountainous cliff, and requiring a secret whistle to enable it, naturally.

Once activated, you’ll be able to plug into the USB port and download the album, or sit there on a remote hillside cliff overlooking the ocean and enjoy the new tunes. Because there’s a headphone jack in the rock, naturally. Besides being a cool hack, we think that putting people in the right physical and mental space for a serious listening is brilliant. Watch the video embedded below for an idea of the making of and a view from the site.

Continue reading “The Nest: Album Release Hidden In A Rock”

7 LED’s, 2 Pins – Beat That, Charlieplexing

[Tim]’s Dice10 is an exercise in minimalism. Building an electronic dice using an ATtiny10 with code that fits within 1kB is not too difficult. Charlieplexing the LED’s would have used three of the four available GPIO pins. [Tim] upped the game by using just two GPIO pins to drive the seven LED’s for the dice. A third GPIO is used as a touch button input. Besides the ATtiny and the LED’s, the only other component used is a capacitor across the supply inputs.

2 GPIO for 7 LED's
2 GPIO for 7 LED’s

The LED’s are grouped in three pairs of two LED’s and a single centre LED. Usually, Charlieplexed LED’s are connected across pairs of GPIO pins. But his scheme includes connections to the 5V and GND terminals, besides the two GPIO pins. Building a truth table makes it easy to figure out what’s going on.

STATE PB2 PB0 LED's
1     Z   Z   --
2     L   Z   LED 1/2
3     H   Z   LED 3/4
4     Z   L   LED 5/6
5     Z   H   --
6     H   L   LED9
7     L   H   --
8     H   H   --
9     L   L   --

Only the logic states used are listed in the table. It’s possible to add two more LED’s between PB0 and GND and one more anti-parallel with LED9, making a total of 10 LED’s driven by two pins. That’s quite a hack. The important thing here is to have two LED’s in series in the arms that connect to either 5V or GND.

[Tim] has posted  the code and hardware source files on his Github repo, and his blog post has some additional details on how he solved the problem.

If you’re looking for more inspirations on minimal dice designs, check this “PIC powered pair of electronic dice” which uses a PIC 12F629 with five outputs driving a pair of 7 pips to make a dual dice.

1kb-thumb

If you have a cool project in mind, there is still plenty of time to enter the 1 kB Challenge! Deadline is January 5, so check it out and fire up your assemblers!

Making A Shifter Knob From Old Skateboards

Do you have a car? Does that car have a manual transmission? Do you want to beautify your shifter knob, while simultaneously gaining mad street cred, yo? Well, you’re in luck, because all of that can be done for the low, low price of a couple old skateboard decks, a lathe, and a lot of glue.

This project, from [basiltab] illustrates how you can use old skateboard decks to create really cool looking custom shifter knobs. The process starts with cutting the decks up into uniform strips, which are then glued and clamped to form small planks. Sections of the decks were alternated, to create a visually interesting pattern. The planks are then sanded so that they’re smooth and flat, and then glued up in a jig to form blocks with a threaded aluminum insert in the center. Optionally, aluminum can be used for some of the layers to add a little flair (2-part epoxy was used in place of glue for the aluminum).

After the glue has dried, the blocks can then be turned on a lathe to create the desired shape of the knob. As you can see, the results are pretty darn nifty. And, they certainly have a little more artistic credibility than the giant acrylic shifter knobs you normally find at your local auto parts store. Don’t worry, if you thought this article was about shift registers, we’ve got you covered there too.

Thirty Days Of 3D Printing Filament

Our first 3D printers only printed ABS and PLA plastic. Yeah, we heard about PVA for support structures, but no one could get them to stick. There was also polycarbonate, but you had to have an all metal hot end with a fan to print that stuff. Now there’s a lot of variety out there: flexible, wood and stone, nylon, PETG, and more.

If you are still printing with just the old standards, you might enjoy [all3dp’s] comparison chart of 30 different filament types–that’s enough for one day a month–well at least for four months. It is too many for February, and a day short for the rest of the months. In addition to a table, there’s a short write-up about each type of plastic, its characteristics, and its technical data. There’s even magnetic PLA (see video below) which, in addition to being magnetic, will actually rust in water which might be good for some artistic prints.

Continue reading “Thirty Days Of 3D Printing Filament”

Reverse Engineering An ST-Link Programmer

We’re not sure why [lujji] would want to hack ST’s ST-Link programmer firmware, but it’s definitely cool that he did, and his writeup is a great primer in hacking embedded devices in two parts: first he unpacks and decrypts the factory firmware and verifies that he can then upload his own encrypted firmware through the bootloader, and then he dumps the bootloader, figures out where it’s locking the firmware image, and sidesteps the protection.

[lujji]’s project was greatly helped out by having the firmware’s encryption keys from previous work by [Taylor Killian]. Once able to run his own code on an intact device, [lujji] wrote a quick routine that dumped the entire flash ROM contents out over the serial port. This gave him the bootloader binary, the missing piece in the two-part puzzle.

If you’ve ever broken copy protection of the mid-1990’s, you won’t be surprised what happened next. [lujji] located the routine where the bootloader adds in the read protection, and NOPped it out. After uploading firmware with this altered bootloader, [lujji] found that it wasn’t read-protected anymore. Game over!

We glossed over a couple useful tips and tricks along the way, so if you’re into reversing firmware, give [lujji]’s blog a look. If you just want a nice ARM programmer with UART capabilities, however, there’s no reason to go to these extremes. The Black Magic Probe project gives you equal functionality and it’s open source. Or given that the official ST-Link programmers are given away nearly free with every Nucleo board, just buying one is clearly the path of least resistance. But a nice hack like this is its own reward for those who want to take that path. Thanks, [lujji] for writing it up.