Hackaday Links: November 29, 2015

The Raspberry Pi Zero was announced this week, so you know what that means: someone is going to destroy a Game Boy Micro. If you’re interested in putting the Zero in a tiny handheld of your own design, here are the dimensions, courtesy of [Bert].

[Ahmed] – the kid with the clock – and his family are suing his school district and city for $15 Million. The family is also seeking written apologies from the city’s mayor and police chief.

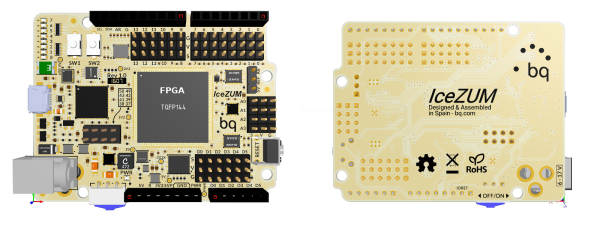
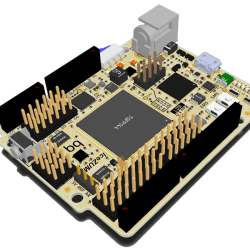
There are a lot — a lot — of ‘intro to FPGA’ boards out there, and the huge variety is an example of how the ‘educational FPGA’ is a hard nut to crack. Here’s the latest one from a Kickstarter. It uses an ICE40, so an open source toolchain is available, and at only $50, it’s cheap enough to start digging around with LUTs and gates.

Over on Hackaday.io, [Joseph] is building a YAG laser. This laser will require a parabolic mirror with the YAG rod at the focus. There’s an interesting way to make one of these: cut out some acrylic and beat a copper pipe against a form. A little polish and nickel plating and you have a custom mirror for a laser.

You know those machines with wooden gears, tracks, and dozens of ball bearings? Cool, huh? Tiny magnetic balls exist, and the obvious extension to this line of thought is amazing.

[David Windestål] is awesome. Completely and totally awesome. Usually, he’s behind the controls of an RC plane or tricopter, but this time he’s behind a slo-mo camera, an RC heli, and a watermelon. That’s a 550-sized heli with carbon fiber blades spinning at 2500 RPM, shot at 1000 FPS.

How do you label your cables? Apparently, you can use a label printer with heat shrink tubing. Nothing else, even: just put heat shrink through a label maker.

Office Dog Triangulation Keeps Spot Accounted For

[Matt Reed] works at a pet friendly work-space, where his pooch called [Bean] loves to wander around and disappear. She’s not getting in trouble, but nonetheless, [Matt] worries about her. So he took the creepy stalker route and put a beacon on her collar to track her every move.

He’s using a small BLE beacon that will poll a signal every second, sending out a unique ID code and a RSSI value (Received Signal Strength Indicator). Normally beacons are placed in a stationary location to help people navigate — but this time, it’s on a moving dog.

In order to better understand [Bean’s] location in the office, [Matt] set up three Raspberry Pi’s with Bluetooth adapters around the office. Using Noble, Node.js listens for the RSSI values and triangulates [Bean’s] position, much like a cellphone can be located using different ping times from cellular towers.

Continue reading “Office Dog Triangulation Keeps Spot Accounted For”

Strike A Chord With This Pocket Keyboard

[Brian] managed to resist the draw of the Left Shark costume and went as a cyberpunk for Halloween this year. Among his costume’s props was a small, one-handed chording keyboard that fit easily into one of his pockets. Now he could have just glued a couple of key caps to something small and called it a day. Instead, [Brian] made a fully functional and modular chording keyboard that can communicate over Bluetooth or USB.

What is a chording keyboard, you ask? Instead of entering keystrokes one at a time, a much smaller set of keys are mashed in meaningful combinations called chords. Once you know what you’re doing, it’s much faster than a standard keyboard. If you’ve ever seen a court reporter hammering away on a tiny machine, you have seen a chording keyboard in action. Our own [Elliott Williams] covered the topic in detail over the summer.

[Brian]’s keyboard has seven keys, one for each finger and three for the thumb. Any key found on a standard 104-key can be made by pressing a combination of keys with the fingers in relation to the center, near, or far thumb keys. We’re pretty impressed that he was able to stuff all of that hardware in such a small 3D-printed package. It’s based on an Arduino micro and uses an Adafruit EZ Key for Bluetooth communication with a phone or tablet.

The ultimate plan is to make this into a wrist-mounted chording keyboard that extends or retracts with the flick of your wrist. [Brian] has made some progress on this, having developed and printed the mechanism. But as you can see in the video after the break, adding the keyboard to it is just too much for the hobby servos he chose to move. Still, if he can dial it in this is going to be awesome!

The keyboard also has an ADXL335 accelerometer breakout, which means it can function as a tilt mouse. Neither the Bluetooth nor the tilt mouse functionality are imperative, though—if you want to make your own and leave either of these out, there is no need to alter the code.

Continue reading “Strike A Chord With This Pocket Keyboard”

This VU Meter Is Built Into The Speaker

Depending on the music you’re listening to, watching a VU meter bounce to the music is always a good time. So why not integrate the VU meter right into the audio source? That’s what [Matikas] did, and it’s pretty fantastic.

He started with a pair of speakers he had and picked up some NeoPixel LED strips. Carefully wrapping the LED strips around the inside circumference of each speaker, the LEDs fit behind the speaker grills, giving it a cool effect when they’re on.

To control the LEDs, he’s using an Arduino Uno (Atmega328p) which measures the audio level in order to modulate the LED output. A bit of software later (shared on GitHub if you’re interested!) and the VU meters were ready for action — check it out!

Continue reading “This VU Meter Is Built Into The Speaker”

Building Custom Integrated Circuits

The first integrated circuits weren’t tiny flecks of silicon mounted to metal carriers and embedded in epoxy or ceramic. The first integrated circuits, albeit a looser definition of such, were just a few transistors, resistors, and diodes mashed together in the same package. With this in mind, [Rupert] created his own custom IC. It’s an IR receiver transmitter constructed out of a transistor, resistor, and an LED.

The attentive reader should be asking, “wait, can’t you just buy an IR receiver transmitter?” Yes, yes you can. But that’s not a hack™, and would otherwise be very uninteresting.

[Rupert]’s IC is just three parts, a 2n2222 transistor, a 220Ω resistor and an IR LED. With a good bit of deadbug soldering, these three parts were melded into something that resembled, and had the same pinout of, a Vishay TSOP4838 IR receiver. The epoxy used to encapsulate this integrated circuit is a standard 2-part epoxy and laser printer toner. Once everything is mixed up into a gooey slurry, it’s dripped over the IC producing a blob of an integrated circuit. It’s functionally identical to the standard commercial version, and looks good enough for a really cool project [Rupert]’s been working on.

Thanks [foehammer] for the tip.

Start Gaming Early With IKEA High (Score) Chair

If you want your kid to be really great at something, you have to start them out early. [Phil Tucker] must want his kid to be a video gamer pretty badly. [Phil’s] build starts with a $20 IKEA high chair. He likes these chairs because at that price point, tearing into them isn’t a big risk. What’s more is you can buy extra trays so you can use it as a modular project with different trays serving different purposes.

The chair has two joysticks and two buttons, looking suspiciously like a video game controller. The current incarnation (see video, below) uses an Arduino Uno to trigger an Akai MPC1000 synthesizer via the MIDI interface.

Continue reading “Start Gaming Early With IKEA High (Score) Chair”

First Raspberry Pi Zero Hack – Piggy-Back WiFi.

And we have the first Raspberry Pi Zero hack! In less than 72 hours from the official release announcement [Shintaro] attached an Edimax WiFi USB Adapter directly to the USB solder pads on the Pi Zero. He couldn’t bear to disturb the small dimensions of the Pi Zero by using the USB On-the-Go (OTG). The OTG is needed to convert the micro-USB connector on the board to a full USB-A connector.

The case was removed from the Edimax and the device and Zero wrapped in Kapton to insulate the exposed solder points. Power was taken from the PP1 and PP6 points on the back of the board. These are the unregulated inputs from the USB power so should be used with caution. Some cheap USB power supplies can put out more that 5 volts when first connected and that might let the smoke out of a device.

raspberry_pi_quarter

The data wires were connected to PP22 and PP23, also on the back, and behind the USB data connector. Since USB is a differential signal these wires were carefully kept of equal length to avoid distorting the signal.

An SD card was created and edited on a Raspberry Pi B 2 to set the WiFi credentials. Inserted into the Zero it booted fine and started up the WiFi network connection.

Congratulations, [Shintaro] for the first Hackaday Raspberry Pi Zero hack. Is that a Hack-a-Zero-Day hack?