K40 Laser Cutter, Meet Raspberry Pi

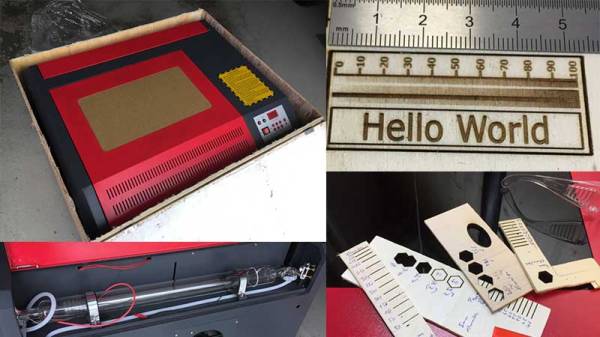
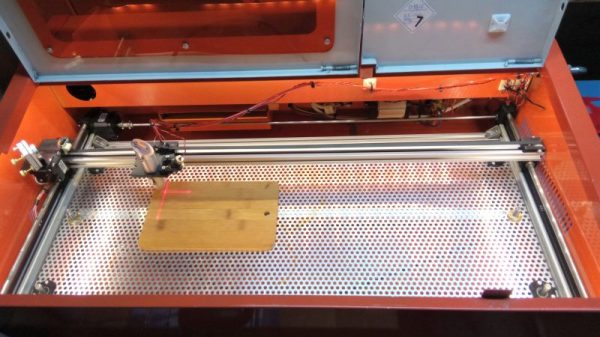
The inexpensive Chinese K40 laser cutter has become the staple of many a small workshop within our community, providing a not-very-large and not-very-powerful cutter for a not-very-high price. As shipped it’s a machine that’s not without its flaws, and there is a whole community of people who have contributed fixes and upgrades to make these cutters into something a lot more useful.

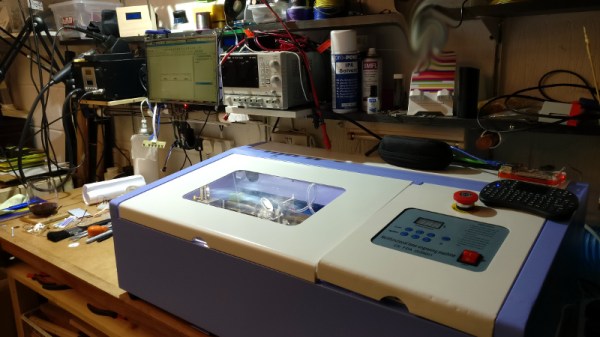
[Alex Eames] bought a K40, and since he’s the person behind the Raspi.tv Raspberry Pi business, when he switched from the supplied Corel-based software to the popular open-source K40 Whisperer his obvious choice was to run it on a Raspberry Pi. Since K40 Whisperer is written in Python he reasoned that the Pi’s ARM platform would not prevent its use, so he set to work and documented the process and his workflow.

It’s a straightforward enough process, and his K40 now has a Pi into which he can SFTP his files rather than the inevitable old laptop that accompanies most K40s. With so many K40 improvements created by its community, we find it surprising that some enterprising Chinese manufacturer hasn’t seen the opportunity to make a quick buck or two extra and incorporate some of them into their products at the factory, including one of the many single board computers that could perform this task.

We’ve covered a lot of K40 stories over the years, if you are new to this machine you might like to take a look at this story of bringing one to life.

Laser Cutter Alignment Mod Skips Beam Combiner

A lot of the DIY laser engravers and cutters we cover here on Hackaday are made with laser diodes salvaged from Blu-ray drives and projectors, which are visible lasers in the 400 – 450nm range (appearing as violet or blue). Unfortunately there is an upper limit in terms of power on visible diode lasers, most builds max out at 5W or so. If you need more power than that, you’ll likely find yourself looking at gas laser cutters like the K40. While the K40 is a great starting point if you’re looking to get into “real” lasers, it’s a very different beast from the homebrew builds using visible lasers.

With a gas laser the beam itself is invisible, making it much more difficult to align or do test runs. One solution is to add a visible laser to the K40 which can be used to verify alignment, but making sure it’s traveling down the same path as the primary laser usually requires an expensive beam combiner. Looking to avoid this cost, [gafu] wanted to see if it was possible to simply move the visible laser into the path of the primary beam mechanically.

An adjustable microswitch detects when the lid has been opened.

In the setup that [gafu] has come up with, a cheap laser module (the type from a handheld laser pointer) is moved into the path of the primary laser on an arm that’s actuated by a simple hobby servo. To prevent the primary and visible lasers from firing at the same time, an Arduino is used to control the servo given the current state of the K40’s lid. If the lid of the K40 is open, the primary laser is shutoff and the visible laser is rotated into position so the operator can see where the primary laser’s beam would be hitting. Once the lid is closed, the visible laser rotates out of the way and the primary is powered back up.

Running the cutting or engraving job with the lid of the K40 machine open now let’s [gafu] watch a “dry run” of the entire operation with the visible laser before finally committing to blasting the target with the full power beam.

We’ve covered many hacks and modifications for everyone’s favorite entry-level CO2 laser cutter. From replacing the controller to making it bigger, K40 owners certainly seem like a creative bunch.

Hacking A K40 Laser Cutter

The distinctive blue-and-white enclosure of the Chinese-made K40 laser cutter has become a common sight in workshops and hackerspaces, as they represent the cheapest route to a working cutter that can be found. It’s fair to say though that they are not a particularly good or safe machine when shipped, and [Archie Roques] has put together a blog post detailing the modifications to make something better of a stock K40 performed at Norwich Hackspace.

After checking that their K40 worked, and hooking up suitable cooling and ventilation for it, the first task facing the Norwich crew was to install a set of interlocks. (A stock K40 doesn’t shut off the laser when you open the lid!) A switch under the lid saw to that, along with an Arduino Nano clone to aggregate this, a key switch, and an emergency stop button. A new front panel was created to hold this, complete a temperature display and retro ammeter to replace the modern original.

Norwich’s laser cutter has further to go. For example, while we secretly approve of their adjustable bed formed from a pile of beer mats, we concede that their plans to make something more practical have merit. The K40 may not be the best in the world, indeed it’s probable we should be calling it an engraver rather than a cutter, but if that means that a small hackerspace can have a cutter and then make it useful without breaking the bank, it’s good to see how it’s done.

This isn’t the first K40 enhancement we’ve featured. Norwich might like to look at this improved controller, or even extend their cutter’s bed. Meanwhile if [Archie]’s name rings a bell, it might be because of his Raspberry Pi laptop.

Bringing A 50 Watt Laser Cutter To Life

This is the future and we live in a world of 3D printers and laser cutters. Have you ever pondered the question of getting yourself a laser cutter? Well [Erich Styger] just landed a 50 Watt Laser Cutter from AliExpress and has written up a detailed guide to his experience.

[Erich] had been wrestling with the idea of buying one for himself for some time but was put off by the difficulty in their operation. This changed when [Scorch] published the K40 Whisperer control software which allows for better control over these machines. With the hopes of an interesting weekend project, [Erich Styger] took a leap of faith and spent $900 on a model 4040 laser cutter.

In his blog, he goes through the steps in setting up the machine as well as calibrating the laser. With a plethora of images and a detailed look at each aspect of the leveling and testing, [Erich Styger] had a weekend well spent and a working K40 laser cutter for his workshop. But perhaps the more valuable part of the stories is the overall experience.

It was not a “what you see is what you get” order, but it did turn out to be a hacker’s “what you want is what you get” adventure. The machine didn’t look the same as the picture, it came with a burned CD-R with a box full of small parts (in addition to separate shipment of a USB thumb drive and silicone sealant), and there were some mechanical touchups plus a stuck switch requiring reassembly. He has done an excellent job of documenting from order to test-runs and the photos alone are worth taking a look.

Adding value to inexpensive laser cutters in an often-featured project around here. If you are looking for more details on these wonderful machines, be sure to check out more tales of Cheap Laser Cutters and our coverage of the K40 Whisperer software launch from last month.

Take Control Of Your Cheap Laser Cutter

The relatively inexpensive K40 laser cutter/engraver machines from China have brought laser cutting to the masses, but they are not without their faults. Sure, they’re only powerful enough for the lightest cutting tasks, but on top of that, their bundled software is inflexible and disappointing. If your workshop or hackspace has one of these machines languishing in the corner, then the release of a new piece of software, K40 Whisperer from [Scorch], is an interesting and welcome development.

He tells us that the reverse engineering process required to understand the K40’s protocol was non-trivial, given that it does not use handy decimal numbers to issue commands. A spreadsheet was used to collate data packets and spot repeating patterns to analyse the inner workings. Feature-wise, the software reads SVG and DXF files, and can split SVGs by colour. It has a halftone algorithm for rendering grey scales, and cuts from the inside of each shape first to avoid pieces of work dropping out of the piece of material. Currently it works with the stock M2 Nano controller board and is available as a Windows download, though it can also be compiled for Linux distributions, or MacOS, and he is asking owners to test it with as many machines as possible to ensure compatibility with other boards.

He has posted a video of K40 Whisperer in action, which you can see below the break.

Continue reading “Take Control Of Your Cheap Laser Cutter”

Laser Surgery: Expanding The Bed Of A Cheap Chinese Laser Cutter

Don’t you just hate it when you spend less than $400 on a 40-watt laser cutter and it turns out to have a work area the size of a sheet of copy paper? [Kostas Filosofou] sure did, but rather than stick with that limited work envelope, he modified his cheap K40 laser cutter so it has almost five times the original space.

The K40 doesn’t make any pretenses — it’s a cheap laser cutter and engraver from China. But with new units going for $344 on eBay now, it’s almost a no-brainer. Even with its limitations, you’re still getting a 40-watt CO2 laser and decent motion control hardware to play with. [Kostas] began the embiggening by removing the high-voltage power supply from its original space-hogging home to the right of the work area. With that living in a new outboard enclosure, a new X-Y gantry of extruded aluminum rails and 3D-printed parts was built, and a better exhaust fan was installed. Custom mirror assemblies were turned, better fans were added to the radiator, and oh yeah — he added a Z-axis to the bed too.

We’re sure [Kostas] ran the tab up a little on this build, but when you’re spending so little to start with, it’s easy to get carried away. Speaking of which, if you feel the need for an even bigger cutter, an enormous 100-watt unit might be more your style.

Continue reading “Laser Surgery: Expanding The Bed Of A Cheap Chinese Laser Cutter”

Making Laser Cutter Designs Work In A 3D Printer

The main mechanical tools in a hacker’s shop used to be a drill press and a lathe. Maybe a CNC mill, if you were lucky. Laser cutters are still a rare tool to find in a personal shop, but today’s hackers increasingly have access to 3D printers. What happens when you have a design for a laser cutter (2D parts) but only have access to a 3D printer? You punt.

[DIY3DTECH] has a two-part video on taking a 2D design (in an SVG file) and bringing it into TinkerCad. At that point, he assembles the part in software and creates a printable object. You can see the videos below.

Continue reading “Making Laser Cutter Designs Work In A 3D Printer”