Join Hackaday Editor-in-Chief Elliot Williams and Managing Editor Tom Nardi for your weekly review of the best projects, hacks, and bits of news that we can cram into 45 minutes or so. We’ll look at the latest developments in DIY air-powered engines, discuss the whimsical combination of GitHub’s API and a cheap thermal printer, and marvel at impressive pieces of homebrew biology equipment. We’ve also got an exceptionally polished folding cyberdeck, a bevy of high-tech cloud chambers, and some soda bottles that are more than meets the eye. Finally we’ll go over the pros and cons of today’s super-smart cameras, and speculate wildly about what a new EU law means for our battery powered gadgets.
Take a look at the links below if you want to follow along, and as always, tell us what you think about this episode in the comments!
There’s an old joke about the Thermos bottle that keeps things hot and cold, so someone loaded it with soup and ice cream. That joke is a little close to home when it comes to FDM 3D printers.
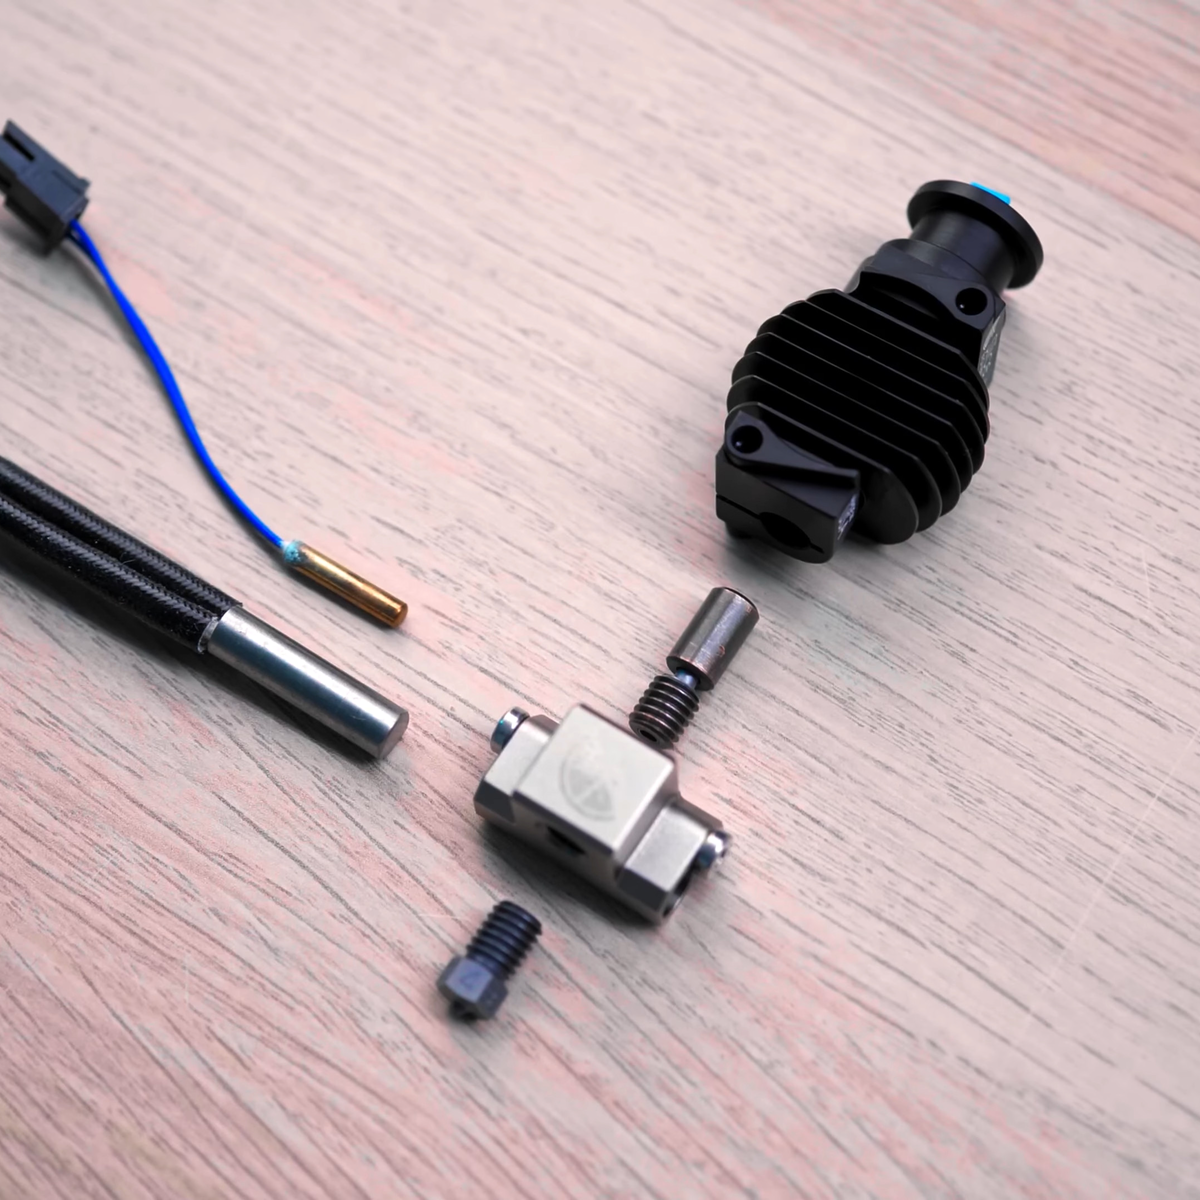
You want to melt plastic, of course, or things won’t print, so you need heat. But if the plastic filament gets hot too early, it will get soft, expand, and jam. Heat crawling up the hot end like this is known as heat creep and there are a variety of ways that hot ends try to cope with the need to be hot and cold at the same time. Most hotends today are air-cooled with a small fan. But water-cooled hotends have been around for a while and are showing up more and more. Is it a gimmick? Are you using, planning to use, or have used (and abandoned) water cooling on your hot end?
Heat Break
The most common method is to use a heat-break between the heating block and the rest of the filament path. The heat-break is designed to transfer as little heat as necessary, and it usually screws into a large heat sink that has a fan running over it. What heat makes it across the break should blow away with the fan cooling.
High tech solutions include making heat-breaks out of titanium or even two dissimilar metals, all with the aim of transferring less heat into the cooler part of the hot end. More modern hot ends use support structures so the heatbreak doesn’t need mechanical rigidity, and they can make very thin-walled heatbreaks that don’t transmit much heat. Surely, then, this is case closed, right? Maybe not.
While it is true that a standard heat-break and a fan can do the job for common 3D printing tasks, there can be problems. First, if you want to print fast — time is money, after all — you need more power to melt more filament per second. If a heatbreak transfers 10% of the heat, this increases demands on the upstream cooling. Some engineering materials want to print at higher temperatures, so you can have the same problem there as well. If you want to heat the entire print chamber, which can help with certain printing materials, that can also cause problems since the ambient air is now hotter. Blowing hot air around isn’t going to cool as effectively. Not to mention, fans that can operate at high temperatures are notoriously expensive.
There are other downsides to fans. Over a long print, a marginal system might eventually let enough heat creep up. Then there’s the noise of a fan blowing during operation. True, you probably have other fans and noisy parts, but it is still one more noise source. With water cooling, you can move the radiator outside a heated enclosure and use larger, slower, and quieter fans while getting more cooling right where you want it. Continue reading “3D Printering: Water-Cooled Hotends”→
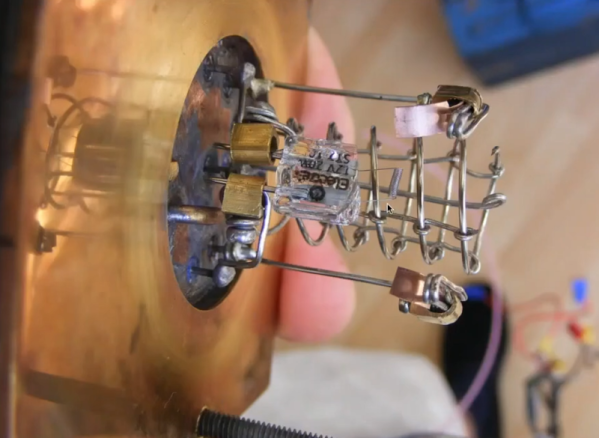
Hats off to [Paul Brooking] as he shows off his homemade mass spectrometer in two recent videos you can see below. The first video demonstrates that the device works. The second video shows details about how it was made.
It’s not a good starter project, requiring quite a bit of sophisticated gear including two-stage vacuum pumps, Peltier cold plates, and ion sources, but if you aren’t familiar with mass spectrometers the basic idea is simple enough. You take a sample and bombard it with electrons. This creates a stream of ions of the component parts of the sample. Ions of heavy elements, obviously, weigh more than ions of lighter elements. A magnetic field deflects the ions, and the lighter ones are deflected more than the heavier ones. By detecting ions at a certain spot in the deflected beam, you can determine the relative amount of ions at a certain mass.
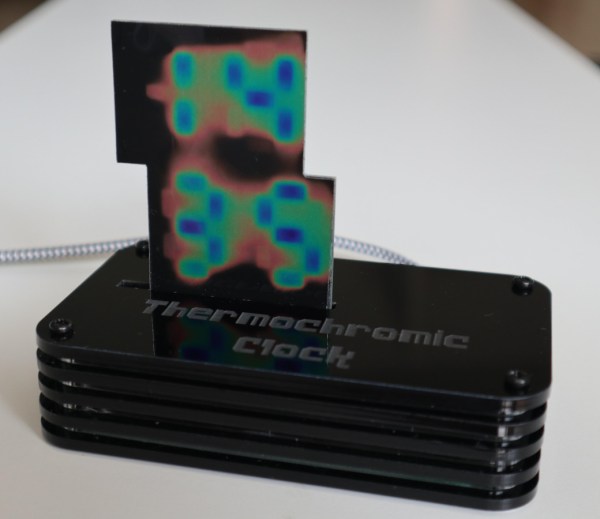
We’re always fans of interesting clock builds around here, whether it’s a word clock, marble clock, or in this case a clock using a unique display method. Of course, since this is a build by Hackaday’s own [Moritz v. Sivers] the display that was chosen for this build was a custom thermochromic display. These displays use heat-sensitive material to change color, and his latest build leverages that into one of the more colorful clock builds we’ve seen.
The clock’s display is built around a piece of thermochromic film encased in clear acrylic. The way the film operates is based on an LCD display, but using heat to display the segments. For this build, as opposed to his previous builds using larger displays, he needed to refine the method he used for generating the heat required for the color change. For that he swapped out the Peltier devices for surface mount resistors and completely redesigned the drivers and the PCBs around this new method.
Of course, the actual clock mechanism is worth a mention as well. The device uses an ESP8266 board to handle the operation of the clock, and it is able to use its wireless capabilities to get the current time via NTP. All of the files needed to recreate this are available on the project page as well, including code, CAD files, and PCB layouts. It’s always good to have an interesting clock around your home, but if you’re not a fan of electronic clocks like this we can recommend any number of mechanical clocks as well.
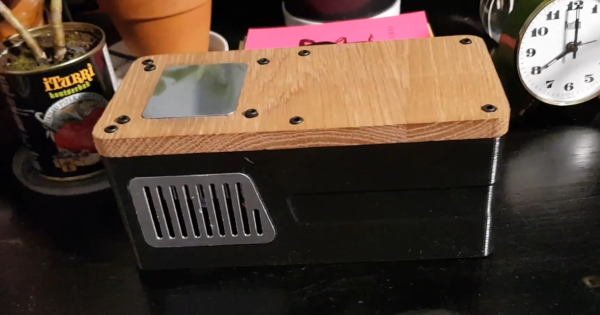
Your smartphone might be able to tell you what the weather is like outside, but you’d have to go outside yourself to really feel it. To do this from the comfort of your own bed, [Sagarrabanana] built a clock that lets you really feel the temperature. Video below with English subtitles.
It is basically a box with a solenoid inside to knock out the time, and a Peltier plate on top. Give the box two knocks, which are detected by a piezo element, and it will tell you the current time down to 15 minute increments in “bell tower” format. Give it three knocks, and the ESP8266 will fetch the ambient outside temperature from a cloud service and cool or heat the Peltier element to that temperature, using a H-bridge motor driver module. The code and design files are available on GitHub if you want to build your own.
All the components are housed inside an attractive 3D printed box with a machined wood top. Although we think this is a very interesting idea, we can’t help but suspect that it might be counterproductive for getting you out of bed on those cold winter mornings.
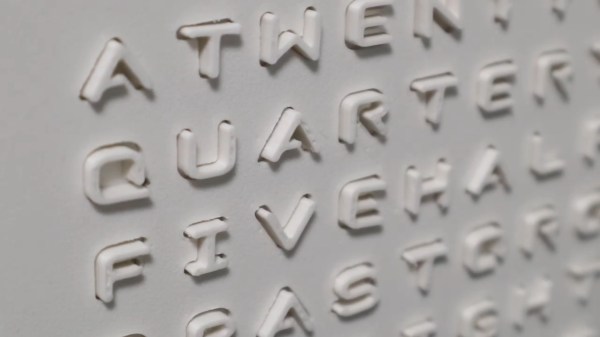
By this point, pretty much everyone has come across a word clock project, if not built one themselves. There’s just an appeal to looking at a clock and seeing the time in a more human form than mere digits on a face. But there are senses beyond sight. Have you ever heard a word clock? Have you ever felt a word clock? These are questions to which Hackaday’s own [Moritz Sivers] can now answer yes, because he’s gone through the extreme learning process involved in designing and building a haptic word clock driven with the power of magnets.
Individual letters of the display are actuated by a matrix of magnetic coils on custom PCBs. These work in a vaguely similar fashion to LED matrices, except they generate magnetic fields that can push or pull on a magnet instead of generating light. As such, there are a variety of different challenges to be tackled: from coil design, to driving the increased power consumption, to even considering how coils interact with their neighbors. Inspired by research on other haptic displays, [Moritz] used ferrous foil to make the magnets latch into place. This way, each letter will stay in its forward or back position without powering the coil to hold it there. Plus the letter remains more stable while nearby coils are activated.
Check out the video below to see this display’s actuation in action. We’re absolutely in love with the satisfying *click* the magnets make as they latch into place.
Plenty of areas around the world don’t get any snowfall, so if you live in one of these places you’ll need to travel to experience the true joy of winter. If you’re not willing to travel, though, you could make some similar ice crystals yourself instead. While this build from [Brian] aka [AlphaPhoenix] doesn’t generate a flurry of small ice crystals, it does generate a single enormous one in a very specific way.
The ice that [Brian] is growing is created in a pressure chamber that has been set up specifically for this hexagonal crystal. Unlike common ice that is made up of randomly arranged and varying crystals frozen together, this enormous block of ice is actually one single crystal. When the air is pumped out of the pressure chamber, the only thing left in the vessel is the seed crystal and water vapor. A custom peltier cooler inside with an attached heat sink serves a double purpose, both to keep the ice crystal cold (and growing) and to heat up a small pool of water at the bottom of the vessel to increase the amount of water vapor in the chamber, which will eventually be deposited onto the crystal in the specific hexagonal shape.
The build is interesting to watch, and since the ice crystal growth had to be filmed inside of a freezer there’s perhaps a second hack here which involved getting the camera gear set up in that unusual environment. Either way, the giant snowball of an ice crystal eventually came out of the freezer after many tries, and isn’t the first time we’ve seen interesting applications for custom peltier coolers, either.