Designing A Drone To Fire From A Grenade Launcher

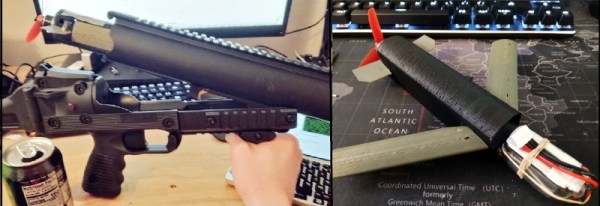
You might think that tiny autonomous drones that can be fired out of a standard 40 mm grenade launcher for rapid deployment would be the kind of thing the military would love to get their hands on. Which is true, of course, and a number of companies are working on the idea for police and military applications. But [Glytch] thinks the technology could also be used for search and rescue operations, so he’s working on creating a version for us civilians.

During his presentation “3D Printing Canister-Launchable Drones for City-Scale Wardriving” at the 2019 CircleCityCon, [Glytch] gave an overview of his progress towards creating a small fixed-wing Unmanned Aerial Vehicle (UAV) that can be built even by those of us who don’t have the budgets of a three letter government agency. He’s not at the point where he can do a test launch just yet, but the design is coming along nicely, and we’re extremely interested in seeing where it goes from here.
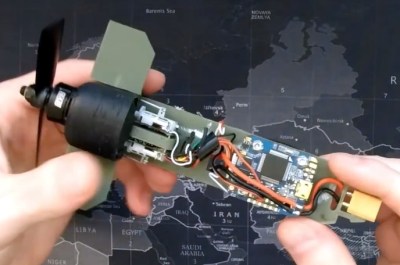
The only way you’re fitting a winged aircraft into the bore of a 40 mm launcher is by folding it up, and so far, that’s where [Glytch] has directed most of his efforts. The wings of his UAV will use a rigid leading edge that folds flat until deployment. When in flight mode, ripstop nylon attached between the body of the drone and the leading edge will be pulled taught to form the actual wing surface; think of it sort of like a bat’s wing. A similar trick will be used for the two control surfaces at the rear of the craft.

Internally, the UAV is using all off-the-shelf components which [Glytch] hopes will keep it cheap enough that they could eventually be mass produced. As he explained in a recent YouTube video, the motor, speed controller, receiver, and flight controller, are all the sort of thing you’d expect to find in a small RC quadcopter. To make it easier to manage the UAV in the field, the batteries and payload will be housed in a detachable nose cone; allowing the user to rapidly configure the hardware for different missions.

Right now, [Glytch] says the biggest obstacle keeping his drone out of the air is finding a foldable propeller with the specific characteristics he requires. Unable to find anything commercially available, he’s currently looking into designing it himself and having it 3D printed on an SLA machine. He also needs to design a sabot to hold the drone as it travels through the barrel of the launcher. Incidentally, he’s currently testing his design with an Airsoft grenade launcher, as he doesn’t want to wade through the paperwork involved in getting the real deal.

[Glytch] is no stranger to the world of high-tech UAVs. The “Watch Dog” inspired hacking drone he created last year was a huge hit, and he’s recently been working on a HD video and telemetry link over WiFi with the Raspberry Pi Zero for his flying creations.

Continue reading “Designing A Drone To Fire From A Grenade Launcher”

A Custom Built FPV Monitor To Keep The Fans Happy

If you’re going to be flying around a FPV-capable aircraft, be it a quadcopter or a fixed-wing plane, you shouldn’t be surprised if bystanders want to take a turn wearing your googles. Of course we hope that you’re good enough flying line of sight that you don’t need to be wearing the googles to stay airborne, but it does make it harder to pull off the sort of tricks and maneuvers that your audience wants to see. So if you want to put on a good show, the audience really needs their own display.

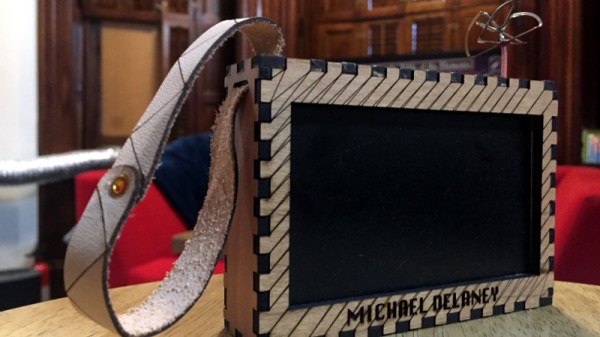
Unfortunately, as avid FPV flier [Michael Delaney] discovered, even the “cheap” ones will run you at least $100 USD. So he did what any self-respecting hacker would do, he set out to build his own. Using a collection of off the shelf components he was able to build a very impressive monitor that lets the viewer see through the eyes of his quadcopter at less than half the cost of commercially available offerings. Though even if he hadn’t manged to beat the cost of a turn-key monitor, we think it would have been more than worth it for this piece of highly customized gear.

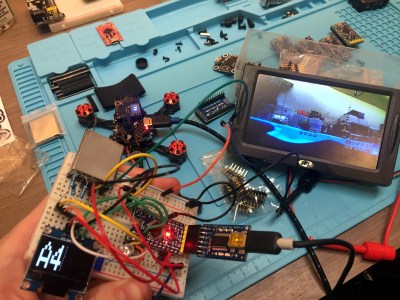
At the heart of the monitor is a Boscam RX5808 5.8 GHz receiver, which is controlled by an Arduino Pro Mini. The video output from the receiver is sent to a 4.2″ TFT screen intended for the Raspberry Pi, and on the backside of the laser-cut wooden enclosure there’s a 128 x 64 I2C OLED to display the currently selected channel and diagnostic information.

An especially nice touch for this project is the custom PCB used to tie all the components together. [Michael] could have taken the easy route and sent the design out for fabrication, but instead went with the traditional method of etching his own board in acid. Though he did modernize the process a bit by using a laser and pre-sensitized copper clad board, a method that seems to be gaining in popularity as laser engravers become a more common component of the hacker’s arsenal.

We’ve previously covered using the RX5808 and Arduino combo to create a spectrum analyzer, in case you want to do more than just watch your friends do powerloops.

Beginning BLE Experiments And Making Everything Better

Successfully connecting things without physical wires has a profound effect on the maker brain. Machines talking to each other without any cables is as amazing today as it was a decade ago. When Bluetooth came out, it was a breakthrough since it offered a wireless way to connect cellphones to a PC. But Bluetooth is a complicated, high-bandwidth power hog, and it didn’t make sense for battery-powered devices with less demanding throughput requirements to pay the energy price. Enter Bluetooth LE (BLE), with power requirements modest enough to enable a multitude of applications including low power sensor nodes and beacons.

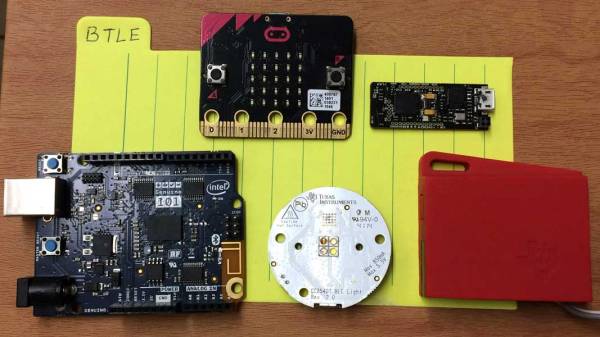
Over the years, a number of gadgets with BLE have popped up such as the LightBlue Bean, BLE Beacons as well as quadcopters like the FlexBot that rely on BLE for communication. Android or iOS apps are the predominant method of talking to these wonderful gadgets though there are alternatives.

This is the first in a two part series on building with BLE devices. First, I’ll survey some BLE devices and how to get started with BLE from the Linux command line. Later, we will go into describing the process of making a NodeJS cross-platform app that will leverage the BLE capabilities and connect it to the Internet.
Lets get started.
Continue reading “Beginning BLE Experiments And Making Everything Better”

These Twenty Amazing Projects Won The Robotics Module Challenge

Right now, we’re running the greatest hardware competition on the planet. The Hackaday Prize is the Academy Awards of Open Hardware, and we’re opening the gates to thousands of hardware hackers, makers, and artist to create the next big thing.

Last week, we wrapped up the second challenge in The Hackaday Prize, the Robotics Module challenge. Now we’re happy to announce twenty of those projects have been selected to move onto the final round and have been awarded a $1000 cash prize. Congratulations to the winners of the Robotics Module Challenge portion of the Hackaday Prize. Here are the winners, in no particular order:

Robotics Module Challenge Hackaday Prize Finalists:

These projects are fantastic

These are the best projects the Robotics Module Challenge in this year’s Hackaday Prize has to offer. These projects are simply fantastic. You answered the call with more than 200 entries for this challenge, and have created the best projects that can be turned into smarter, better robots. Need some proof? Just take a look at some of these projects. Continue reading “These Twenty Amazing Projects Won The Robotics Module Challenge”

Autonomous Spaceplane Travels To 10 Km, Lands Safely 200 Km Away

Space balloons, where one sends instrument packages to the edge of space on a weather balloon, are a low-cost way to scratch the space itch. But once you’ve logged the pressure and temperature and tracked your balloon, what’s the next challenge? How about releasing an autonomous glider and having it return itself to Earth safely?

That’s what [IzzyBrand] and his cohorts did, and we have to say we’re mightily impressed. The glider itself looks like nothing to write home about: in true Flite Test fashion, it’s just a flying wing made with foam core and Coroplast reinforced with duct tape. A pair of servo-controlled elevons lies on the trailing edge of the wings, while inside the fuselage are a Raspberry Pi and a Pixhawk flight controller along with a GPS receiver. Cameras point fore and aft, a pair of 5200 mAh batteries provide the juice, and handwarmers stuffed into the avionics bay prevent freezing.

After a long series of test releases from a quadcopter, flight day finally came. Winds aloft prevented a full 30-kilometer release, so the glider was set free at 10 kilometers. The glider then proceeded to a pre-programmed landing zone over 80 kilometers from the release point. At one point the winds were literally pushing the glider backward, but the little plane prevailed and eventually spiraled down to a perfect landing.

We’ve been covering space balloons for a while, but take a moment to consider the accomplishment presented here. On a shoestring budget, a team of amateurs hit a target the size of two soccer fields with an autonomous aircraft from a range of almost 200 kilometers. That’s why we’re impressed, and we can’t wait to see what they can do after a release from the edge of space.

Continue reading “Autonomous Spaceplane Travels To 10 Km, Lands Safely 200 Km Away”

3D Drone Video

If you enjoy flying quadcopters, it is a good bet that you’ll have a drone with a camera. It used to be enough to record a video for later viewing, but these days you really want to see a live stream. The really cool setups have goggles so you can feel like you are actually in the cockpit. [Andi2345] decided to go one step further and build a drone that streams 3D video. You can see a video of the system, below.

Outdoors, there’s probably not a lot of advantage to having a 3D view, but it ought to be great for a small indoor drone. The problem is, of course, a small drone doesn’t have a lot of capacity for two cameras. The final product uses two cameras kept in sync with a sync separator IC and a microcontroller, while an analog switch intersperses the frames.

On the viewing side, a USB frame grabber and a Raspberry Pi splits the images again. At first, the system used an LCD screen married with a Google Cardboard-style goggle, but eventually, this became a custom Android application.

Continue reading “3D Drone Video”

Upgrading A 3D Printer With OctoPrint

If you’ve been hanging around 3D printing communities, or reading the various 3D printing posts that have popped up here on Hackaday, you’ve almost certainly heard of OctoPrint. Created and maintained by Gina Häußge, OctoPrint allows you to turn an old computer (or more commonly a small ARM board like the Raspberry Pi or BeagleBone) into a network-accessible control panel for your 3D printer. Thanks to a thriving collection of community developed plugins, it can even control other hardware such as lights, enclosure heaters, smart plugs, or anything else you can think to hook onto the GPIO pins of your chosen ARM board. The project has become so popular that the new Prusa i3 MK3 has a header on the control board specifically for connecting a Pi Zero W running OctoPrint.

Even still, I never personally “got” OctoPrint. I was happy enough with my single printer connected to my computer and controlled directly from my slicer over USB. The majority of the things I print are of my own design, so when setting up the printer it only seemed logical that I would have it connected to the machine I’d be doing my designing on. If I’m sitting at my computer, I just need to rotate my chair to the right and I’m at my printer. What do I need to control the thing over WiFi for?

But things got tricky when I wanted to set up a second printer to help with speeding up larger projects. I couldn’t control them both from the same machine, and while I could print from SD on the second printer if I really had to, the idea seemed painfully antiquated. It would be like when Scotty tried talking into the computer’s mouse in “Voyage Home”. Whether I “got it” or not, I was about to dive headfirst into the world of OctoPrint.

Continue reading “Upgrading A 3D Printer With OctoPrint”