There are cheap LCDs available from China, and when plugged into an Arduino, these displays serve as useful interfaces or even shinier baubles for your latest project. [Michael] picked up a few of these displays in the hope of putting a few animated .GIFs on them. This is an impossible task with an ATMega microcontroller – the Arduino does not have the RAM or the processing power to play full-screen animations. It is possible to display 3D vector graphics, with an updated graphics library [Michael] wrote.
The display in question uses the ILI9341 LCD driver, found in the Adafruit library, and an optimized 3D graphics driver. Both of these drivers have noticeable flicker when the animation updates, caused by the delay between erasing a previous frame and when a new frame is drawn.
With 16-bit color and a resolution of 320×240 pixels, there simply isn’t enough memory or the processing power on an ATMega microcontroller to render anything in the time it takes to display a single frame. There isn’t enough memory to render off-screen, either. To solve this problem, [Michael] built his render library to only render pixels that are different from the previous frame.
Rendering in 3D presents its own problems, with convex surfaces that can overlap themselves. To fix this, [Michael]’s library renders objects from front to back – if the pixel doesn’t change, it doesn’t need to be rendered. This automatically handles occlusions.
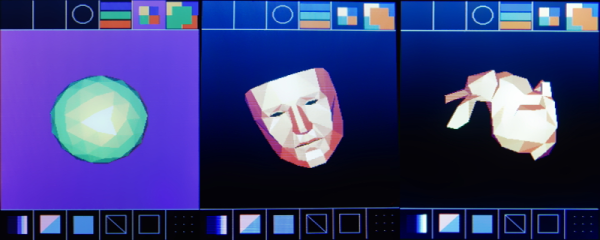
In a demo application, [Michael]’s LCD and Arduino can display the Stanford bunny, a low-poly 3D face, and geometric object. It’s not a video game yet, but [Michael] thinks he can port the classic game Spectre to this platform and have it run at a decent frame rate.
Video of the demo below.