Meter Backlight

Adding A Backlight To A Cheap Multimeter

We don’t all need super high quality electronic testing gear. Sometimes second-hand or inexpensive equipment is accurate enough to get the job done. Though it can be a bit annoying to miss out on some of those “luxury” features. [Ekriirke] had this problem with his cheap multimeter. He wished the LCD screen had a backlight for easier visibility, so rather than upgrade to a more expensive unit he just added one himself.

After opening up the multimeter [Ekriirke] found that it ran on a single 12V battery. He realized that the simplest thing to do would be to wire up four white LEDs in series. The four LEDs were arranged within the case off to each side of the LCD, one in each corner. The leads were bent at 90 degree angles and soldered together “dead bug” style. Thin strips of copper foil tape were attached to the PCB in such a way that the anode and cathode from the LEDs would make contact when the case was closed back up.

The tape wraps around to the other side of the PCB where there was more room for the next piece of the circuit. A capacitor, resistor, and transistor are used in conjunction with a momentary switch. This circuit allows [Ekriirke] to turn on the light for about ten seconds by pressing the button one time. The circuit also runs through the meter’s dial switch, preventing the LEDs from being turned on while the meter itself is turned off.

[via Reddit]

Caption CERN Contest – Safe Science Is No Accident

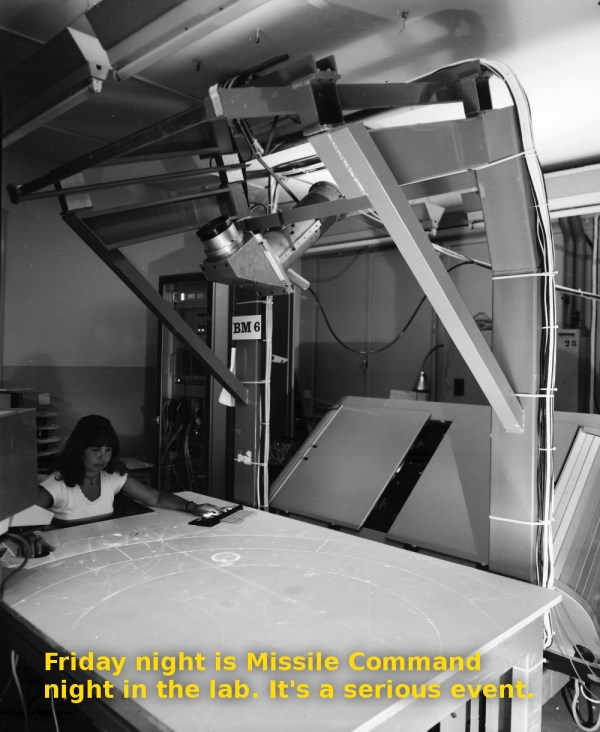
Week 18 has faded into history, but not before you wrote some great captions! A hearty thanks to all the entrants. Astute reader [jlbrian7] has done it again! He’s uncovered the story behind this image. The woman in this photo is manually analyzing photographs of charged particles taken in a bubble chamber. He linked to an article from Fermilab, and to a 1971 film about Gargamelle, CERN’s largest bubble chamber at the time. The film is well worth a watch. It’s aimed at the layman, explaining the design, construction, and operation of bubble chambers. The photo scanning section starts at 14:40. The video has plenty of “1970’s-isms”, such as referring to the women analyzing the photographs as “scanning girls”. The filmmaker even bookend the section with an actual scanned girl – a possibly NSFW (by today’s standards) ASCII art printout of a nude pin-up model, as printed by a Control Data Corporation supercomputer.

The Funnies:

  • “Tabatha, the dungeon master, plots tonight’s dungeon and dragons game inside the exploded atom.”- [LloydTCannonIII]
  • “CERN, the only place you can watch Netflix on the same table that you eat lunch and plot global domination. Muwahahaha!” – [Joshua]
  • “They take Kerbal Space Program very serious at CERN. Here you can see the first interactive real time orbital view display.” – [haxtormoogle]

This week’s winner is [Jarrett] with “Friday night is Missile Command night in the lab. It’s a serious event”

We’re giving away two prizes this week – one to [jlbrian7] for his research on this and other CERN images, and one to [Jarrett] for his winning caption! Congrats to both of you. Enjoy your Logic Pirates From The Hackaday Store!

Week 19

cern-19-sm
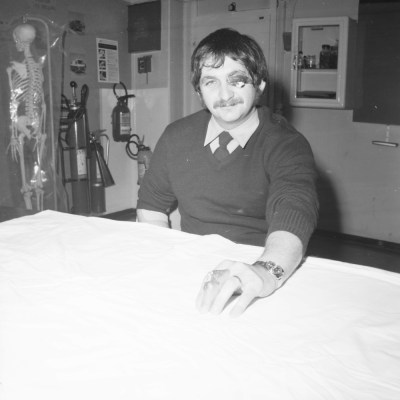
Just about every workplace has to worry about safety. Many companies have a safety team that is trained to handle emergencies and help patients until proper medical technicians arrive. In a typical office environment this training is pretty easy, but what if you’re working on the bleeding edge of science? CERN’s safety team trains for everything, including badly burned hands and partially removed eyeballs. Don’t worry, these are just simulated injuries, which is probably why this CERN scientist is so calm, even smiling for the photo! CERN’s medical room also appears to be well stocked – with a full skeleton, and no less than four different types of fire extinguishers.

So, even though we already have a pretty good idea of what is going on in this photo (and the accompanying album), we’re sure you’ll come up with some great captions. Have at it!

This week’s prize is a Lightblue Bean from The Hackaday Store. Add your humorous caption as a comment to this project log. Make sure you’re commenting on the contest log, not on the contest itself (or on this post).

As always, if you actually have information about the image or the people in it, let CERN know on the original image discussion page.

Good Luck!

Olimex Claims The World’s First $9 Computer Costs $39

The C.H.I.P. from Next Thing Co. bills itself as the world’s first nine dollar computer. That’s not a lie; their Kickstarter took in over two million dollars for a tiny single board computer with composite Video, WiFi, Bluetooth 512MB of RAM, 4GB of storage, and a 1GHz CPU. That’s a complete computer, sans keyboard, mouse, and monitor. You won’t get that with the $35 Raspberry Pi – you’ll need to add a WiFi adapter and an SD card for the same functionality – and you won’t get that with any other single board computer.

Understandably, the C.H.I.P. is already extremely successful. The company behind it has about 50,000 pre-orders, and people lined up to wait until well into next year for this computer. Exactly how Next Thing Co. managed to build a single board computer and send it out the door for nine dollars is a question that has yet to be answered, and is leaving more than a few people puzzled.

The Olimex blog has given their opinion of the C.H.I.P, and if that’s to be believed, the news isn’t good. The guys at Olimex know their stuff when it comes to making cheap single board computers; they have more than a few for sale, and they know what the Flash and DRAM market is like. To them, it’s impossible to sell a computer like the C.H.I.P. at $9. A quote from Allwinner for a similar module is $16 at the quantity Next Thing Co. would be looking at. That’s just the module with RAM and Flash – no Wifi, no board, no connectors. How could it be possible to sell this computer for only $9?

Continue reading “Olimex Claims The World’s First $9 Computer Costs $39”

Give Me A Welder And Rod Stock And I’ll Build You The World

Metal fabrication is a an art that often goes under appreciated. The ability to take common stock in the form of sheet, pipe (square or round), and in this case rod, and make it into anything is intoxicating for the artist and super villain inside of each of us. Recently [asciiArtVandaly] took on an interesting job and was thoughtful enough to make a photo album of the process. He literally created the world out of metal.

The build is a wire-frame globe. The latitude and longitude rods are rolled to the proper arc, but holding them in place is a bit of a trick. This image shows the welding jig built just for this project. It has large and small nobs to match the increasing spacing of the rods, with washers holding down ever other joint. If you want to see an example of rod-rolling check out the unrelated How It’s Made segment found after the break.

This jig is visually stunning to look at, but the math used to lay something like this out is only mildly interesting compared to the work done to add the continents to the piece. Each of these were cut out and then hand hammered to match the curve of the globe before being welded in place and outfitted with lighting for cities. That’s a skill you can’t get without a lot of practice — and get this, [asciiArtVandalay] does it as a hobby. Who knew robot engineers needed hobbies?

The finished globe is about eighty pounds of stainless steel. The build ends up being corporate art for a company sure to turn [Tyler Durden’s] eye.

Continue reading “Give Me A Welder And Rod Stock And I’ll Build You The World”

Hackerspace Happeninging: A Booc For C-Base

In the annals of hackerspace history, there’s one space that stands above the rest. It’s c-base, the crashed spaceship below Berlin that’s also one of the first hackerspaces in the world. Before NYC Resistor, Noisebridge, and every other building filled with tools and cool people, there was c-base.

Although the Hackerspace movement has only been around for a little less than a decade now, c-base itself is much, much older. It was founded way back in 1995, marking this year as the second decade of c-base’s existence. A few of the members of c-base are celebrating this occasion by publishing a book on the vast and storied history of their hackerspace.

The mythology of c-base includes a space station crashing in the middle of Berlin, with the giant, famous disco ball in Berlin being the station’s antenna. Yes, it’s weird, but all good hackerspaces have some sort of irreverent mythos surrounding them. The c-booc will document the twenty year long excavation of the space station, chronicling how this hackerspace came to be.

The booc is a Kickstarter project, and if funded, will be available for pickup at the Chaos Communication Camp this August

Arduino Controlled AC

Arduino Controlled Air Conditioner

Now that summer is coming, it’s time to break out the Air Conditioners! There are some old AC units out there that still work just fine, but nowadays we are used to everything being remotely controlled and automatic. [Phil] had an old window-mounted AC unit that still worked but was installed in a not-so-convenient place. To access the AC’s controls, one would have to climb over a large desk. This is a perfect opportunity to use the plethora of widely available hobby electronics to make an automatic AC controller retrofit.

First things first, there needs to be a way to turn the current control knob on the AC. [Phil] modeled up a 3D bracket to hold an RC car servo to the AC control panel. Attached to the servo horn is a slotted cylinder sized appropriately to fit the shape of the control knob. An Arduino measures the temperature of the room via a DS18B20 temperature sensor which then has the servo turn the control knob to the appropriate position, on or off. The Arduino sends temperature data back to a PC via MegunoLink Pro which graphs past data and also displays current temperature data. Using MegunoLink Pro, the min/max temperature points can also be set without uploading a new sketch to the Arduino.

Arduino Controlled AC

From the temp vs time graph, it looks like the room temperature stays a consistent 23 +/- 1 °C. [Phil] did us summer-swelterers a favor and made all his design files available. This is a great idea but wonder if leaving the air conditioner unit switch in the ‘on’ position and turning the unit on/off via a relay connected to the 120vac line would work just as well.

Hackaday Prize Entry: Teaching OpAmps

TI makes some great chips, and to sell those chips, they’re more than willing to put together some awesome tutorials, examples, and online classes to get engineers up and running. This isn’t limited to $5 Launchpads; TI has a great video and lab series for their precision OpAmps. These tutorials come with an evaluation module that costs about $200. Yes, that’s two Benjamins for a few OpAmps and a PCB. Of course no engineer would ever pay this; their job would. But what about someone who wants to learn at home?

That’s where [SUF]’s project for The Hackaday Prize comes in. He’s building a replica of a $200 lab board, and even without researching the cheapest solution for each individual component, [SUF] reckons he can build this kit for about $50. Like I said, the TI board is a business purchase.

The complete lab and tutorial TI offers uses NI’s virtual lab. This, again, isn’t something a random electron hacker could afford, but anyone who wants to go through this teaching module would probably use their own tools anyway.

As far as projects to teach electronics go, [SUF] has knocked it out of the park. He’s already relying on excellent tutorials, but bringing the price down to something a little more sane and amenable to checkbooks that aren’t tied to the corporate account.


The 2015 Hackaday Prize is sponsored by: