Hackaday Links Column Banner

Hackaday Links: September 29, 2024

There was movement in the “AM Radio in Every Vehicle Act” last week, with the bill advancing out of the US House of Representatives Energy and Commerce Committee and heading to a full floor vote. For those not playing along at home, auto manufacturers have been making moves toward deleting AM radios from cars because they’re too sensitive to all the RF interference generated by modern vehicles. The trouble with that is that the government has spent a lot of effort on making AM broadcasters the centerpiece of a robust and survivable emergency communications system that reaches 90% of the US population.

The bill would require cars and trucks manufactured or sold in the US to be equipped to receive AM broadcasts without further fees or subscriptions, and seems to enjoy bipartisan support in both the House and the Senate. Critics of the bill will likely point out that while the AM broadcast system is a fantastic resource for emergency communications, if nobody is listening to it when an event happens, what’s the point? That’s fair, but short-sighted; emergency communications isn’t just about warning people that something is going to happen, but coordinating the response after the fact. We imagine Hurricane Helene’s path of devastation from Florida to Pennsylvania this week and the subsequent emergency response might bring that fact into focus a bit.

Continue reading “Hackaday Links: September 29, 2024”

Curing CRT Cataracts Freshens Up Retro Roundy TVs

It’s been a long time since the family TV has had a CRT in it, and even longer since that it was using what was basically an overgrown oscilloscope tube. But “roundies” were once a thing, and even back in the early 80s you’d still find them in living rooms on TV repair calls, usually sporting a characteristic and unsightly bullseye discoloration.

Fast-forward a few decades, and roundy TVs have become collectible enough that curing their CRT cataracts is necessary for restorationists like [shango066], a skill he demonstrates in the video below. The defect comes from the composite construction of CRTs — a safety feature added by television manufacturers wisely concerned with the safety aspects of putting a particle accelerator with the twin hazards of high vacuum and high voltage in the family home. The phosphor-covered face of the tube was covered by a secondary glass cover, often tinted and frosted to improve the admittedly marginal viewing experience. This cover was often glued in place with an epoxy resin that eventually oxidized from the edges in, making the bullseye pattern.

The remedy for this problem? According to [shango066], it’s heat, and plenty of it. After liberating the tube from the remarkably clean TV chassis, he took advantage of a warm summer’s day and got the tube face cooking under a black plastic wrap. Once things were warmed up, more heat was added to really soften the glue; you can easily see the softening progress across the face of the tube in the video below. Once softened, gentle prying with wooden chopsticks completes the job of freeing the safety lens, also in remarkably good shape.

With the adhesive peeled off in an oddly satisfying manner, all that’s left is a thorough cleaning and gluing the lens back on with a little silicone sealant around the edges. We’d love to see the restored TV in operation, but that’s left to a promised future video. In the meantime, please enjoy a look at the retro necessities TV owners depended on in the good old days, which really weren’t all that good when you get down to it.

Continue reading “Curing CRT Cataracts Freshens Up Retro Roundy TVs”

Internet Connected TI-84 To Cut Your Academic Career Short

In an educational project with ethically questionable applications, [ChromaLock] has converted the ubiquitous TI-84 calculator into the ultimate cheating device.

The foundation of this hack lies in the TI-84’s link protocol, which has been a mainstay in calculator mods for years. [ChromaLock] uses this interface to connect to a tiny WiFi-enabled XIAO ESP32-C3 module hidden in the calculator. It’s mounted on a custom PCB with a simple MOSFET-based level shifting circuit, and slots neatly into a space on the calculator rear cover. The connecting wires are soldered directly to the pads of the 2.5 mm jack, and to the battery connections for power.

But what does this mod do? It connects your calculator to the internet and gives you a launcher with several applets. These allow you to view images badly pixelated images on the TI-84’s screen, text-chat with an accomplice, install more apps or notes, or hit up ChatGPT for some potentially hallucinated answers. Inputting long sections of text on the calculator’s keypad is a time-consuming process, so [ChromaLock] teased a camera integration, which will probably make use of newer LLMs image input capabilities. The ESP32 doesn’t handle all the heavy lifting, and needs to connect to an external server for more complex interfaces.

To prevent pre-installed programs from being used for cheating on TI-84s, examiners will often wipe the memory or put it into test mode. This mod can circumvent both. Pre-installed programs are not required on the calculator to interface with the hardware module, and installing the launcher is done by sending two variables containing a password and download command to the ESP32 module. The response from the module will also automatically break the calculator out of test mode.

We cannot help but admire [ChromaLock]’s ingenuity and polished implementation, and hopefully our readers are more interested in technical details than academic self-sabotage. For those who need even more capability in their calculator, we’d suggest checking out the NumWorks. Continue reading “Internet Connected TI-84 To Cut Your Academic Career Short”

An ESP32 Delivers Perfect Slot Car Control

If your memory of slot cars as a childhood toy is of lightweight controllers with wire-wound rheostats inside, then you’re many years behind the state of the art when it comes to competitive slot car racing. In that world the full force of modern electronics has been brought to keeping the car on the road, and as an example here’s [Maker Fabio] with a cutting edge controller that has an ESP32 at its heart.

It’s obvious that a huge amount of attention has gone into both the physical design of the unit and its software, and the result speaks for itself. The trigger sits on a proper bearing, and the sensor is a Hall-effect device on the PCB. The firmware was written in the Arduino IDE, and through the trigger and a rotary encoder all of its options can be configured on a small OLED display. Individual settings can be configured for each car, and we’re treated to a full explanation of this in the video.

We are told that the files for both software and hardware will be released in due course, as this is still a work in progress for the moment. The video meanwhile provides ample demonstration, so we look forward to the release.

It’s a surprise to find relatively few projects from the slot car world on these pages, given the amount of potential there is in them for electronic improvement. Here’s one from a few years ago though.

Continue reading “An ESP32 Delivers Perfect Slot Car Control”

Dog Poop Drone Cleans Up The Yard So You Don’t Have To

Sometimes you instantly know who’s behind a project from the subject matter alone. So when we saw this “aerial dog poop removal system” show up in the tips line, we knew it had to be the work of [Caleb Olson].

If you’re unfamiliar with [Caleb]’s oeuvre, let us refresh your memory. [Caleb] has been on a bit of a dog poop journey, starting with a machine-learning system that analyzed security camera footage to detect when the adorable [Twinkie] dropped a deuce in the yard. Not content with just knowing when a poop event has occurred, he automated the task of locating the packages with a poop-pointing robot laser. Removal of the poop remained a manual task, one which [Caleb] was keen to outsource, hence the current work.

The video below, from a lightning talk at a conference, is pretty much all we have to go on, and the quality is a bit potato-esque. And while [Caleb]’s PoopCopter is clearly still a prototype, it’s easy to get the gist. Combining data from the previous poop-adjacent efforts, [Caleb] has built a quadcopter that can (or will, someday) be guided to the approximate location of the offending package, home in on it using a downward-looking camera, and autonomously whisk it away.

The retrieval mechanism is the high point for us; rather than a complicated, servo-laden “sky scoop” or something similar, the drone has a bell-shaped container on its belly with a series of geared leaves on the open end. The leaves are open when the drone descends onto the payload, and then close as the drone does a quick rotation around the yaw axis. And, as [Caleb] gleefully notes, the leaves can also open in midair with a high-torque yaw move in the opposite direction; the potential for neighborly hijinx is staggering.

All jokes and puns aside, this looks fantastic, and we can’t wait for more information and a better video. And lest you think [Caleb] only works on “Number Two” problems, never fear — he’s also put considerable work into automating his offspring and taking the awkwardness out of social interactions.

Continue reading “Dog Poop Drone Cleans Up The Yard So You Don’t Have To”

Man-in-the-Middle PCB Unlocks HP Ink Cartridges

It’s a well-known secret that inkjet ink is being kept at artificially high prices, which is why many opt to forego ‘genuine’ manufacturer cartridges and get third-party ones instead. Many of these third-party ones are so-called re-manufactured ones, where a third-party refills an empty OEM cartridge. This is increasingly being done due to digital rights management (DRM) reasons, with tracking chips added to each cartridge. These chip prohibit e.g. the manual refilling of empty cartridges with a syringe, but with the right tweak or attack can be bypassed, with [Jay Summet] showing off an interesting HP cartridge DRM bypass using a physical man-in-the-middle-attack.

This bypass takes the form of a flex PCB with contacts on both sides which align with those on the cartridge and those of the printer. What looks like a single IC in a QFN package is located on the cartridge side, with space for it created inside an apparently milled indentation in the cartridge’s plastic. This allows is to fit flush between the cartridge and HP inkjet printer, intercepting traffic and presumably telling the printer some sweet lies so that you can go on with that print job rather than dash out to the store to get some more overpriced Genuine HP-approved cartridges.

Not that HP isn’t aware or not ticked off about this, mind. Recently they threatened to brick HP printers that use third-party cartridges if detected, amidst vague handwaving about ‘hackers’ and ‘viruses’ and ‘protecting the users’ with their Dynamic Security DRM system. As the many lawsuits regarding this DRM system trickle their way through the legal system, it might be worth it to keep a monochrome laser printer standing by just in case the (HP) inkjet throws another vague error when all you want is to just print a text document.

Continue reading “Man-in-the-Middle PCB Unlocks HP Ink Cartridges”

See The Hands-on Details Behind Stunning Helmet Build

[Zibartas] recently created wearable helmets from the game Starfield that look fantastic, and we’re happy to see that he created a video showcasing the whole process of design, manufacture, and assembly. The video really highlights just how much good old-fashioned manual work like sanding goes into getting good results, even in an era where fancy modern equipment like 3D printing is available to just about anyone.

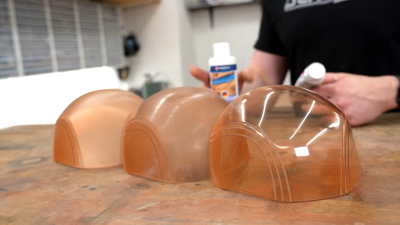
The secret to perfectly-tinted and glassy-smooth clear visors? Lots and lots of sanding and polishing.

The visor, for example, is one such example. The usual approach to making a custom helmet visor (like for Daft Punk helmet builds) is some kind of thermoforming. However, the Starfield helmet visors were poor candidates due to their shape and color. [Zibartas]’s solution was to 3D print the whole visor in custom-tinted resin, followed by lots and lots of sanding and polishing to obtain a clear and glassy-smooth end product.

A lot of patient sanding ended up being necessary for other reasons as well. Each helmet has a staggering number of individual parts, most of which are 3D printed with resin, and these parts didn’t always fit together perfectly well.

[Zibartas] also ended up spending a lot of time troubleshooting an issue that many of us might have had an easier time recognizing and addressing. The helmet cleverly integrates a faux-neon style RGB LED strip for internal lighting, but the LED strip would glitch out when the ventilation fan was turned on. The solution after a lot of troubleshooting ended up being simple decoupling capacitors, helping to isolate the microcontrollers built into the LED strip from the inductive load of the motors.

What [Zibartas] may have lacked in the finer points of electronics, he certainly makes up for in practical experience when it comes to wearable pieces like these. The helmets look solid but are in fact full of open spaces and hollow, porous surfaces. This makes them more challenging to design and assemble, but it pays off in spades when worn. The helmets not only look great, but allow a huge amount of airflow. This along with the fans makes them comfortable to wear as well as prevents the face shield from misting up from the wearer’s breathing. It’s a real work of art, so check out the build video, embedded just below.

Continue reading “See The Hands-on Details Behind Stunning Helmet Build”