RGB Sensor’s New Job: Cryptocurrency Trade Advisor

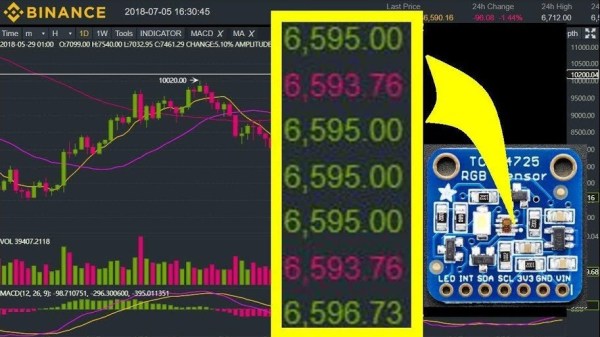
[XenonJohn] dabbles in cryptocurrency trading, and when he saw an opportunity to buy an RGB color sensor, his immediate thought — which he admitted to us would probably not be the immediate thought of most normal people — was that he could point it to his laptop screen and have it analyze the ratio of green (buy) orders to red (sell) orders being made for crypto trading. In theory, if at a given moment there are more people looking to buy than there are people looking to sell, the value of a commodity could be expected to go up slightly in the short-term. The reverse is true if a lot of sell orders coming in relative to buy orders. Having this information and possibly acting on it could be useful, but then again it might not. Either way, as far as out-of-left-field project ideas go, promoting an RGB color sensor to Cryptocurrency Trading Advisor is a pretty good one.

Since the RGB sensor only sees what is directly in front of it, [XenonJohn] assembled a sort of simple light guide. By enclosing the area of the screen that contains orders in foil-lined cardboard, the sensor can get a general approximation of the amount of red (sell orders) versus green (buy orders). The data gets read by an Arduino which does a simple analysis and sends alerts when a threshold is crossed. He dubbed it the Crypto-Eye, and a video demo is embedded below.

Continue reading “RGB Sensor’s New Job: Cryptocurrency Trade Advisor”

RGB Disk Goes Interactive With Bluetooth; Shows Impressive Plastic Work

[smash_hand] had a clear goal: a big, featureless, white plastic disk with RGB LEDs concealed around its edge. So what is it? A big ornament that could glow any color or trippy mixture of colors one desires. It’s an object whose sole purpose is to be a frame for soft, glowing light patterns to admire. The disk can be controlled with a simple smartphone app that communicates over Bluetooth, allowing anyone (or in theory anything) to play with the display.

The disk is made from 1/4″ clear plastic, which [smash_hand] describes as plexiglass, but might be acrylic or polycarbonate. [smash_hands] describes some trial and error in the process of cutting the circle; it was saw-cut with some 3-in-1 oil as cutting fluid first, then the final shape cut with a bandsaw.

The saw left the edge very rough, so it was polished with glass polishing compound. This restores the optical properties required for the edge-lighting technique. The back of the disc was sanded then painted white, and the RGB LEDs spaced evenly around the edge, pointing inwards.

The physical build is almost always the difficult part in a project like this — achieving good diffusion of LEDs is a topic we talk about often. [smash_hands] did an impressive job and there are never any “hot spots” where an LED sticks out to your eye. With this taken care of, the electronics came together with much less effort. An Arduino with an HC-05 Bluetooth adapter took care of driving the LEDs and wireless communications, respectively. A wooden frame later, and the whole thing is ready to go.

[smash_hands] provides details like a wiring diagram as well as the smartphone app for anyone who is interested. There’s the Arduino program as well, but interestingly it’s only available in assembly or as a raw .hex file. A video of the disk in action is embedded below.

Continue reading “RGB Disk Goes Interactive With Bluetooth; Shows Impressive Plastic Work”

Color Sensor From An RGB LED And A Photocell

When you need to quantify the color of an object, you’ve got quite a few options. You can throw a Raspberry Pi camera and OpenCV at the problem and approach it through software, or you can buy an off-the-shelf RGB sensor and wire it up to an Arduino. Or you can go back to basics and build this reflective RGB sensor from an LED and a photocell.

The principle behind [TechMartian]’s approach is simplicity itself: shine different colored lights on an object and measure how much light it reflects. If you know the red, green, and blue components of the light that correspond to maximum reflectance, then you know the color of the object. Their sensor uses a four-lead RGB LED, but we suppose a Neopixel could be used as well. The photosensor is a simple cadmium sulfide cell, which measures the intensity of light bouncing back from an object as an Arduino drives the LED through all possible colors with PWM signals. The sensor needs to be white balanced before use but seems to give sensible results in the video below. One imagines that a microcontroller-free design would be possible too, with 555s sweeping the PWN signals and op-amps taking care of detection.

And what’s the natural endpoint for a good RGB sensor? A candy sorter, or course, of which we have many examples, from the sleek and polished to the slightly more hackish.

Continue reading “Color Sensor From An RGB LED And A Photocell”

Pi Time – A Fabric RGB Arduino Clock

Pi Time is a psychedelic clock made out of fabric and Neopixels, controlled by an Arduino UNO. The clock started out as a quilted Pi symbol. [Chris and Jessica] wanted to make something more around the Pi and added some RGB lights. At the same time, they wanted to make something useful, that’s when they decided to make a clock using Neopixels.

Neopixels, or WS2812Bs, are addressable RGB LEDs , which can be controlled individually by a microcontroller, in this case, an Arduino. The fabric was quilted with a spiral of numbers (3.1415926535…) and the actual reading of the time is not how you are used to. To read the clock you have to recall the visible color spectrum or the rainbow colors, from red to violet. The rainbow starts at the beginning of the symbol Pi in the center, so the hours will be either red, yellow, or orange, depending on how many digits are needed to tell the time. For example, when it is 5:09, the 5 is red, and the 9 is yellow. When it’s 5:10, the 5 is orange, the first minute (1) is teal, and the second (0) is violet. The pi symbol flashes every other second.

There are simpler and more complicated ways to perform the simple task of figuring out what time it is…

We are not sure if the digits are lighted up according to their first appearance in the Pi sequence or are just random as the video only shows the trippy LEDs, but the effect is pretty nice:

Continue reading “Pi Time – A Fabric RGB Arduino Clock”

Beautiful Linear RGB Clock

Yup, another clock project. But here, [Jan] builds something that would be more at home in a modern art museum than in the dark recesses of a hacker cave. It’s not hard to read the time at all, it’s accurate, and it’s beautiful. It’s a linear RGB LED wall clock.

7512951486134540347You won’t have to learn the resistor color codes or bizarre binary encodings to tell what time it is. There are no glitzy graphics here, or modified classic timepieces. This project is minimal, clean, and elegant. Twelve LEDs display the hours, six and nine LEDs take care of the minutes in add-em-up-coded decimal. (It’s 3:12 in the banner image.)

The technical details are straightforward: WS2812 LEDs, an Arduino, three buttons, and a RTC. You could figure that out by yourself. But go look through the log about building the nice diffusing plexi and a very clean wall-mounting solution. It’s the details that separate this build from what’s hanging on our office wall. Nice job, [Jan].

RGB LEDs: How To Master Gamma And Hue For Perfect Brightness

You would think that there’s nothing to know about RGB LEDs: just buy a (strip of) WS2812s with integrated 24-bit RGB drivers and start shuffling in your data. If you just want to make some shinies, and you don’t care about any sort of accurate color reproduction or consistent brightness, you’re all set.

But if you want to display video, encode data in colors, or just make some pretty art, you might want to think a little bit harder about those RGB values that you’re pushing down the wires. Any LED responds (almost) linearly to pulse-width modulation (PWM), putting out twice as much light when it’s on for twice as long, but the human eye is dramatically nonlinear. You might already know this from the one-LED case, but are you doing it right when you combine red, green, and blue?

It turns out that even getting a color-fade “right” is very tricky. Surprisingly, there’s been new science done on color perception in the last twenty years, even though both eyes and colors have been around approximately forever. In this shorty, I’ll work through just enough to get things 95% right: making yellows, magentas, and cyans about as bright as reds, greens, and blues. In the end, I’ll provide pointers to getting the last 5% right if you really want to geek out. If you’re ready to take your RGB blinkies to the next level, read on!

Continue reading “RGB LEDs: How To Master Gamma And Hue For Perfect Brightness”

Tiny Tiny RGB LED Displays

Hackaday.io contributor extraordinaire [al1] has been playing around with small LEDs a lot lately, which inevitably leads to playing around with large groups of small LEDs. Matrixes of tiny RGB LEDs, to be precise.

Where's the LED?
Where’s the LED?

First, he took 128 0404 SMD RGB LEDs (yes, 40 thousandths of an inch on each side) and crammed them onto a board that’s just under 37 mm x 24 mm. He calls the project 384:LED (after all, each of those 128 packages has three diodes inside). A microcontroller and the driver chips are located on a separate driver board, which piggy-backs via pin headers to the LED board. Of course, he had to use 0.05 inch headers, because this thing is really small.

Of course, no project is without its hitches. [al1] bought LEDs with the wrong footprint by mistake, so he had a bunch of (subtly different) 0404 LEDs left over. Time for an 8×8 matrix! 192:LED isn’t just the first project cut in half, though. It’s a complete re-design with a four-layer board and the microcontroller on the back-side. And as befits a scrounge project with lots of extreme soldering, he even pulled the microcontroller off of a cheap digital FM radio. Kudos!

We’re in awe of [al1]’s tiny, tiny hacking skills. Now it’s time to get some equally cool graphics up on those little displays.