This RGB Tree Has Its Roots In A PCB

[Paczkaexpress]’s RGB tree is a mix of clever building techniques and artistic form that come together into quite a beautiful sculpture.

The branches of his tree are made from strands of enameled copper wire capped with an RGB LED and terminated in a female header. The separate wires are all wound and sculpted into the form of a tree. The wire is covered in a very thin layer of plastic, which we highly recommend observing under a microscope, that allow it to maintain a uniform and reflective copper color without shorting, adding to the effect.

The part we found an especially pleasing mix of form and function was how the “roots” of the tree clicked home in the PCB base. The PCB holds the STM32, power components, and an LED Driver. It doesn’t hide how the magic works, and the tree really does get its nutrients from the soil it’s planted in. This would be a fun kit to build. Very clever and you can see the final effect after the break.

Continue reading “This RGB Tree Has Its Roots In A PCB”

RGB Lamp With Micro:Bit Powered Gesture Control

The Micro:bit is a very neat piece of hardware that, frankly, we don’t see enough of. Which made us all the more interested when [Manoj Nathwani] wrote in to tell us about the gorgeous 3D printed RGB LED lamp he created that uses the BBC-endorsed microcontroller to perform basic gesture detection. Purists will likely point out that an Arduino Pro Mini is tagging along to handle interfacing with the LEDs, but it’s still a good example of how quick you can get a project up and running with MicroPython on the Micro:bit.

[Manoj] used eight NeoPixel Sticks, a NeoPixel Ring, and a few scraps of perfboard to construct a three dimensional “bulb” to fill the void inside the printed diffuser. They’re chained together so all the elements appear as a single addressable strip, which made the rest of the project a bit easier to implement. It might not be pretty, but it gets the job done and it’s not like you’ll ever see it again once installed in the lamp anyway.

The Micro:bit and Arduino co-pilot live in the base of the lamp, and the single USB cable to provide power (and the ability to update the device’s firmware) is run out the bottom to give the whole thing a clean and professional look. For those wondering why the Arduino has tagged along, [Manoj] says he couldn’t get the NeoPixel libraries to play nicely with the Micro:bit so he’s using the Arduino essentially as a mediator.

Right now the only gesture that’s detected on the Micro:bit is a simple shake, which tells the Arduino to toggle the light show on and off. But in the future, [Manoj] plans to implement more complex gestures which will trigger different animations. As he explains in the blog post, gesture recognition with the Micro:bit is incredibly simple, so it should be easy to come up with a bunch of unique ways to interface with the lamp.

Color changing LED lamps are a favorite project of hackers, and we’ve seen examples built with everything from glass and copper to laser-cut pieces of wood and veneer. While you might prefer to skip the gesture control for an ESP8266 and UDP, we think this project is another strong entry into this popular genre.

A Chrome Extension For Configuring RGB LEDs

Like pretty much all of us, [Andy Schwarz] loves RGB LEDs. Specifically he likes to put them on RC vehicles, such as navigation lights on airplanes or flashers and headlights on cars. He found himself often rewriting very similar Arduino code for each one of these installations, and eventually decided he could save himself (and all the other hackers in the world) some time by creating a customizable Arduino firmware specifically for driving RGB LEDs.

The software side of this project, which he’s calling BitsyLED, actually comes in two parts. The first is the firmware itself, which is designed to control common RGB LEDs such as the WS2812 or members of the NeoPixel family. It can run on an Arduino Pro Mini with no problems, but [Andy] has also designed his own open hardware control board based on the ATtiny84 that you can build yourself. Currently you need a USBASP to program it, but he’s working on a second version which will add USB support.

With your controller of choice running the BitsyLED firmware, you need something to configure it. For that, [Andy] has developed a Chrome extension which offers a very slick user interface for setting up colors and patterns. The tool even allows you to create a visual representation of your LEDs so you can get an idea of what it’s going to look like when all the hardware is powered up.

RGB LEDs such as the WS2812 are some of the most common components we see in projects today, mainly because they’re so easy to physically interface with a microcontroller. But even though it only takes a couple of wires to control a large number of LEDs, you still need to write the code for it all. BitsyLED takes a lot of the hassle out of that last part, and we’re very interested to see what the hacker community makes of it.

Continue reading “A Chrome Extension For Configuring RGB LEDs”

RGB Word Clock Doesn’t Skimp On The Features

Like most pieces of technology, word clocks seem to be getting better and better every year. As hackers get their hands on better microcontrollers and more capable LED controllers, these builds not only look more polished, but get improved features and functions. Luckily for us, the rise of these advanced modular components means they’re getting easier to build too. For an example of these parallel traits, look no further than VERBIS by [Andrei Erdei].

This colorful word clock is powered by an ESP8266, a 8×8 RGB LED matrix, and a WS2812 RGB LED controller module. [Andrei] used the diminutive ESP-01 which can plug right into the LED controller, and just needs a 3.3 VDC regulator board to complete the very compact electronics package.

To keep the LEDs from interfering with each other, [Andrei] has designed a 3D printed grid which fits over the matrix board. On top of that goes a piece of paper that has the letters printed on it. He mentions that he was able to get good results printing this “stencil” out on an inkjet printer by simply running the same piece of paper through a few times; picking up more black ink each time it went through. Judging by the sharp characters seen in the video after the break, the trick worked well.

With his hardware put together, [Andrei] turned his attention to the software. We really think the project shines here, as his clock not only supports NTP for automatically setting the time over the Internet, but offers a full web interface to control various functions such as the LED colors. You can even change the NTP server and network configuration right from the UI, which is a nice touch compared to just hard coding the values into the code. Even if you don’t use the same hardware, the open source control software is definitely something you should look into if you’re building your own word clock.

We recently covered another easy to build word clock that used an LED matrix and not a whole lot else, but it was quite tiny. This build is a much more reasonable size for a desk, but you’ll probably need to break out the laser cutter if you want to get much bigger.

Continue reading “RGB Word Clock Doesn’t Skimp On The Features”

Gyro Controlled RGB Blinky Ball Will Light Up Your Life

[James Bruton], from the XRobots YouTube channel is known for his multipart robot and cosplay builds. Occasionally, though, he creates a one-off build. Recently, he created a video showing how to build a LED ball that changes color depending on its movement.

The project is built around a series of 3D printed “arms” around a hollow core, each loaded with a strip of APA102 RGB LEDs. An Arduino Mega reads orientation data from an MPU6050 and changes the color of the LEDs based on that input. Two buttons attached to the Mega modify the way that the LEDs change color. The Mega, MPU6050, battery and power circuitry are mounted in the middle of the ball. The DotStar strips are stuck to the outside of the curved arms and the wiring goes from one end of the DotStar strip, up through the middle column of the ball to the top of the next arm. This means more complicated wiring but allows for easier programming of the LEDs.

Unlike [James’] other projects, this one is a quickie, but it works as a great introduction to programming DotStar LEDs with an Arduino, as well as using an accelerometer and gyro chip. The code and the CAD is up on Github if you want to create your own. [James] has had a few of his projects on the site before; check out his Open Dog project, but there’s also another blinky ball project as well.

Continue reading “Gyro Controlled RGB Blinky Ball Will Light Up Your Life”

Trashed TV Gets RGB LED Backlight

It might not be obvious unless you’ve taken one apart, but most of the TVs and monitors listed as “LED” are simply LCD panels that use a bank of LEDs to illuminate them from behind. Similarly, what are generally referred to as “LCDs” are LCD panels that use fluorescent tubes for illumination. To get a true LED display with no separate backlight, you need OLED. Confused? Welcome to the world of consumer technology.

With those distinctions in mind, the hack that [Zenodilodon] recently performed on a broken “LED TV” is really rather brilliant. By removing the dead white LED backlights and replacing them with RGB LED strips, he not only got the TV working again, but also imbued it with color changing abilities. Perfect for displaying music visualizations, or kicking your next film night into high gear with a really trippy showing of Seven Samurai.

In the video after the break, [Zenodilodon] starts his RGB transplant by stripping the TV down to its principal parts. The original LEDs were toasted, so they might as well go straight in the bin alongside their driver electronics. But the LCD panel itself was working fine (tested by shining a laser pointer through it to see if there was an image), and the plastic sheets which diffuse the LED backlight were easily salvaged.

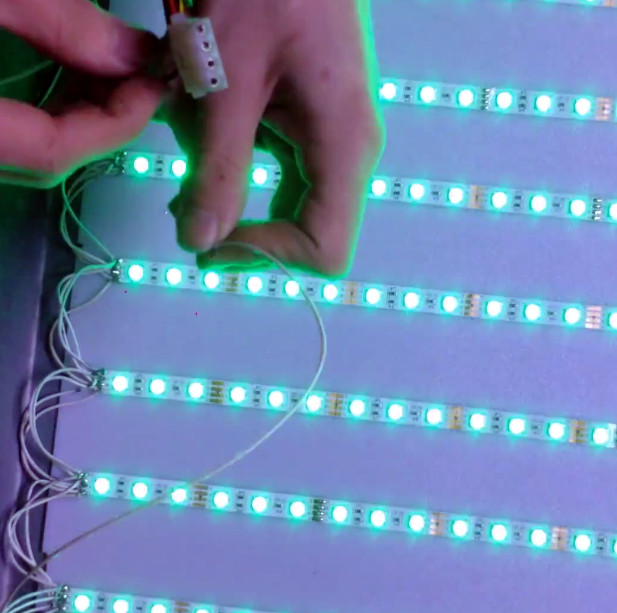
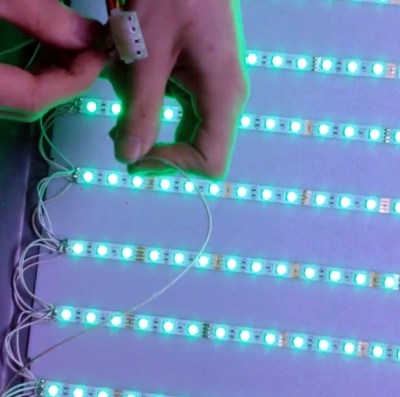
With the old LEDs removed, [Zenodilodon] laid out his new strips and soldered them up to the external controller. He was careful to use all white wires, as he was worried colored wires might reflect the white light and be noticeable on the display. After buttoning the TV back up, he went through a few demonstrations to show how the image looked with the white LEDs on, as well as some interesting effects that could be seen when the LEDs are cycling through colors.

The RGB strips don’t light up the display as well as the original backlight did, as there are some obvious dark spots and you can see some horizontal lines where the strips are. But [Zenodilodon] says the effect isn’t too bad in real-life, and considering it was a cheap TV the image quality was probably never that great to begin with.

On the flip side, if you find an LED TV or monitor in the trash with a cracked screen, it might be worth taking it home to salvage its super-bright white LEDs for your lighting projects.

Continue reading “Trashed TV Gets RGB LED Backlight”

RGB Sensor’s New Job: Cryptocurrency Trade Advisor

[XenonJohn] dabbles in cryptocurrency trading, and when he saw an opportunity to buy an RGB color sensor, his immediate thought — which he admitted to us would probably not be the immediate thought of most normal people — was that he could point it to his laptop screen and have it analyze the ratio of green (buy) orders to red (sell) orders being made for crypto trading. In theory, if at a given moment there are more people looking to buy than there are people looking to sell, the value of a commodity could be expected to go up slightly in the short-term. The reverse is true if a lot of sell orders coming in relative to buy orders. Having this information and possibly acting on it could be useful, but then again it might not. Either way, as far as out-of-left-field project ideas go, promoting an RGB color sensor to Cryptocurrency Trading Advisor is a pretty good one.

Since the RGB sensor only sees what is directly in front of it, [XenonJohn] assembled a sort of simple light guide. By enclosing the area of the screen that contains orders in foil-lined cardboard, the sensor can get a general approximation of the amount of red (sell orders) versus green (buy orders). The data gets read by an Arduino which does a simple analysis and sends alerts when a threshold is crossed. He dubbed it the Crypto-Eye, and a video demo is embedded below.

Continue reading “RGB Sensor’s New Job: Cryptocurrency Trade Advisor”