Tindie Gets Fundraisers For Kickstarting And Group Buys

tindie

The etsy of electronics project, Tindie, has a brand new feature: It’s a Kickstarter-esque endeavor called a Fundraiser that allows you to sell your projects to other electron enthusiasts.

Of course the new Tindie Fundraisers may soon be just another Kickstarter clone for “exciting,” “new,” and “innovative” Arduino dev boards, something we’ve lamented before. We’re really interested in seeing Tindie used as a platform for group buys; a solution to a maker’s special hell where buying one component costs $100, but ten cost $200.

Already there are a few really cool projects up on the Tindie Fundraisers including a breadboardable Parallax Propeller dev board. Yes, someone finally made one that doesn’t cost an arm and a leg.

In addition to the new Fundraisers, [emile] also closed on $500k of seed funding for Tindie. It’s wonderful news for something that is sorely needed by the maker community. Tindie is also hiring, so if you’re a Django/Python wizard go drop everyone’s second favorite robotic dog a line.

244 9 Volt Batteries In Series – Arcing Ensues!

244-9v-batte…n-series

Here’s another hack that we would definitely discourage you from trying at home, 244 9 volt batteries wired in series. There’s really not much more to it than that, but [jersagfast] takes this setup through its paces arcing through air first, a LED light second, and then a CD. The air arc is probably the most impressive, but a CD doesn’t look happy after this kind of abuse either. Around 4:38, a capacitor is abused for yet more arcing.

In theory, 244 9 volt batteries in series should be nearly 2200 volts, but as measured (in sections), it “only” came out to a “measly” 2000 volts. Still plenty of voltage to be harmful or even deadly depending on the current emitted. Passing on this hack at home is strongly encouraged. On the other hand, you should watch the video after the break to see what happens. Much safer. Arcing starts around 1:44!

Continue reading “244 9 Volt Batteries In Series – Arcing Ensues!”

Watermelon Air Boat

watermelon-air-boat

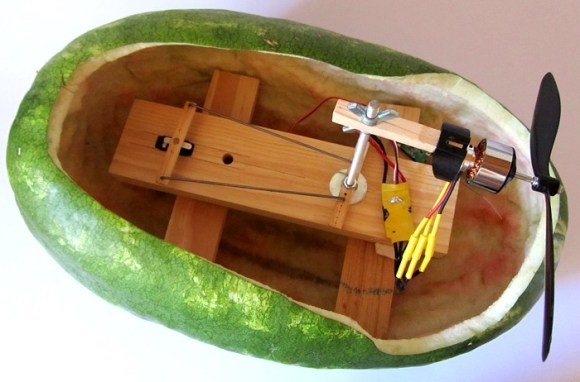
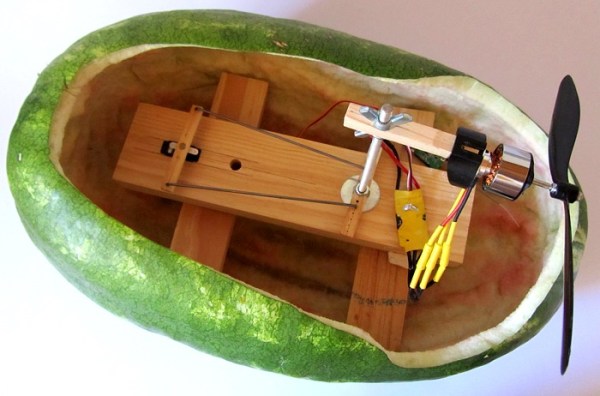
We think you’ll turn a few heads in Central Park if you’re driving a water melon around when everyone else is piloting sailboats. This watermelon is both sea worthy and radio controlled thanks to the work which [Starting Electronics] put into it.

We used this image because it shows you what’s inside of the hull, but you don’t want to miss the thing motoring around an above-ground swimming pool in the clip after the break. The hollowed out shell is quite buoyant and has no problem staying afloat and upright with the addition of a propeller. The parts from a remote control airplane kit have been mounted on a wooden scaffold. This provides plenty of thrust with a servo motor moving turning the prop for directional control. There is no dagger board so the craft is a bit slow to respond to turns. But how responsive do you expect a floating melon to be?

Continue reading “Watermelon Air Boat”

More Details About Laser Cut Gingerbread Houses

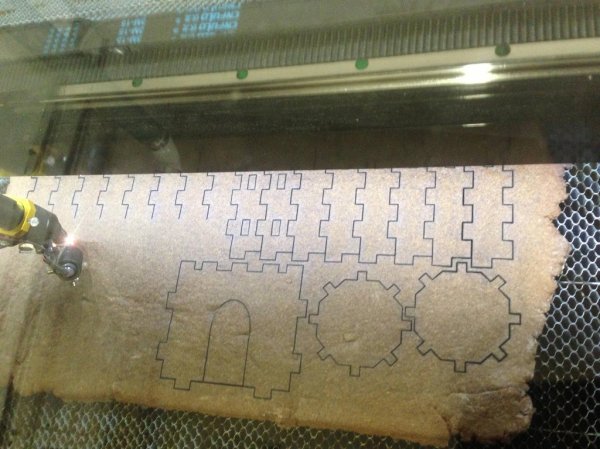
Members of Sector67 tried their hands at laser cut gingerbread houses. The Madison, Wisconsin based hackerspace is using the tabbed box method of assembly for the corners of the structure. They’ve also put up a bunch of information about laser settings and published the recipe used to mix up a sheet of gingerbread. This quite a bit more info than was provided with the project we saw a couple of weeks back.

The initial designs were made in Inkscape and then transferred to Corel Draw before heading to the cutter. They’ve got a 150W machine and found that a speed of 15 worked well when the speed was set to 100, with a corner speed of 60. The raw dough was rolled out to 1/8″ thickness. Possibly the best tip coming out of Sector67 is to lay 1/8″ dowels on either side of the dough. This way the rolling pin will stop when it hits the dowels resulting in the best possible uniform thickness. As reported in the previous project the odor generated while cutting is not the most pleasant. But we love the fusion of lasers with the age old process of building with cookies and decorating with candy.

Silent HTPC Build Is An Art Piece For The Livingroom

silent-htpc-build

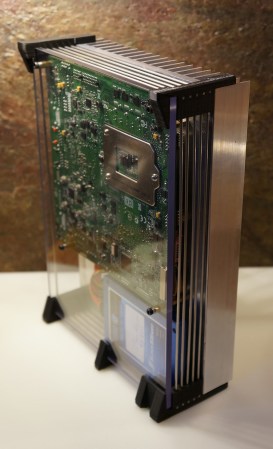
This sexy beast is [DeFex’s] new silent home theater PC. To give you an idea of scale, that motherboard is a Mini ITX form factor. Mounted below it is the solid state drive which is an SLC version chosen because they tend to last longer than the MLC variety. This distinction comes with a price tag that is $100 more expensive.

But we digress. It’s the custom case that really caught our eye with this build. The frame is made of a huge aluminum heat sink. It measures about 7″ by 10″ and sets the final foot print for the computer. An aluminum puck was added to transmit heat from the processor to the heat sink. Holes were drilled and tapped into the heat sink to accept the brass stand offs which hold the motherboard in place.

The near side of the case is a sheet of acrylic. It connects to the rest of the case using 3D printed brackets at each corner. There is an additional bracket on the bottom to hold the hard drive in place. The sides of the case are filled in with bicycle spokes which also find a home in the corner brackets. Now the hard part will be figuring out which orientation looks the best for displaying his fine craftsmanship.

[via Reddit]

Repair Your Ice Maker Motor Without Buying A Whole New Assembly

ice-maker-repair

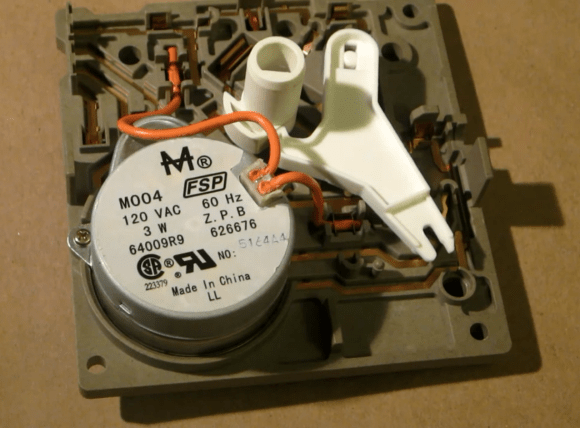
There are a number of things that can go wrong with an automatic ice maker. But one of the more common problems is that the motor which scoops the ice out of the integrated trays can burn out after years of use. [Dave] recently repaired a common ice maker motor and shows us how cheap and easy it can be. See how he did it in the video after the break.

Pictured above is the motor and gear box from the ice maker. Before disassembly he verified that the problem is with the motor by placing a piece of paper in the path of the fingers that move the newly formed ice. After removing the sensor arm and three screws he was able to pull this front portion from the unit. The two wires are clipped as near to the motor as possible and the motor itself comes out with just a twist. After verifying that the gears are not broken he sourced a $2.50 motor replacement by Googling the part number (M004 3W in this case). Once the new unit arrived the motor wires are connect in much the same way that a punch down Ethernet jack makes a connecting with insulated wires.

This is something worth looking into if your ice maker is not working. The manufacturer may suggest replacing the entire unit which can be well north of a hundred bucks… this is a worthwhile gambit to save some cash. Well, we guess you could always build your own non-electrical ice maker.

Continue reading “Repair Your Ice Maker Motor Without Buying A Whole New Assembly”

Tea-bagging An Arduino

tea-bagging-arduino

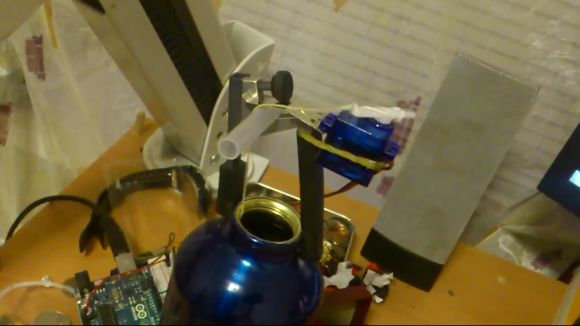
[Dmitry Narkevich] likes a strong cup of tea and his method of getting there is to oscillate the tea bag as it steeps. But why take the time to do this when you can make an Arduino brew your tea for you. As you can see, he rigged up a system to move the tea bag as it steeps in his metal bottle.

The motion is provided by a hobby servo connected to an Arduino. This makes timing the process very simple and we’d imaging it’s only a matter of time before he adds an alarm so he’ll know when it’s ready. But the real hack comes in the apparatus that connects the servo to the bottle. Since he’ll be drinking out of it the assembly needs to be easy to remove and should be able to stand up to the abuse of being clamped on and taken off a few times each day.

The base of the device is a guitar capo. This is meant to gently clamp to the finger board of a guitar using spring tension so it is already covered in rubber which gives it a firm grip on the bottle’s opening. The servo is connected to a metal part from a stapler, and the string drapes over the body of a disposable pen. Don’t miss this in action in the clip after the break.

If you don’t have a servo on hand you could try using the sled from an optical drive.

Continue reading “Tea-bagging An Arduino”