Hackaday’s Duelling Marble Mazes Are Dead

Well, the whole RedBull Creation contest has finally wrapped up. We’re back home and fully recovered from our weekend at MakerFaire. I want to thank the Redbull crew for making the weekend very fun and the crew from Squidfoo for being an awesome team.

Now that all the “thank you” statements are out of the way, lets talk about what happened. Kids trashed our game. Right off the bat we noticed our construction wasn’t going to hold up to the abuse. It was designed, built, and tested in such a short time that we really had no idea how it would hold up under the weight of the masses. As it turns out, we should have gone much, much, more rugged. It was destroyed almost immediately.

Continue reading “Hackaday’s Duelling Marble Mazes Are Dead”
LED Wand Brings Ergonomics To Light Painting

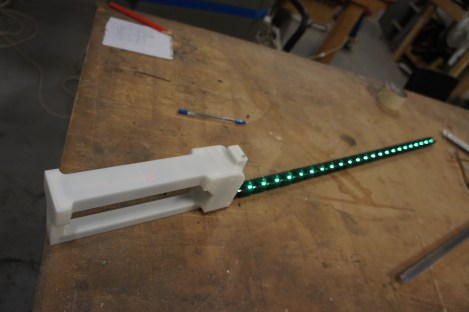
Quit struggling with hastily patched together electronics for your light painting images. Follow [Madox’s] example and build a light painting wand designed with your hand in mind.

You wield it much like a sword, but the only damage it does is to the long-exposure camera pointed its way. The RGB LED strip is controlled by the guts of a tiny little wireless router, a TP-Link TL-WR703N. This lets [Madox] connect using an Android device to upload different images. It also lets you tweak the settings like adjusting the timing between columns to match your exposure settings. The custom handle design provides a home and mounting plan for everything involved. It was 3D printed at the Sydney Hackerspace.

This isn’t the first light painting device running Linux. We’ve actually seen the Raspberry Pi used in much the same way but that final project involved using an entire recumbent tricycle to move the colored lights.

PIC Programming Adapter For The Raspberry Pi

Here’s another offering when it comes to PIC programming from the Raspberry Pi. The design seeks to adapt the GPIO header so that it may be used for programming PIC microcontrollers, but this does involve a bit more than just physically connecting pins to the target chip. Most of the PIC family require a 12V programming level, and this setup makes that possible.

The sets of NPN transistors shown in the schematic fragment above are arranged in darlington pairs. They’re actually switching voltage from the 6V linear regulator built into the system using the Pi’s 3.3V pins. There’s also a 12V regulator, so you’re going to need a power supply that is capable of sourcing more than that.

We’ve seen a similar concept before but this design carries it a step further. There are several status LEDs built into the programmer, and it includes support for detecting which chip is being programmed. So far this covers just four different chips, but we’re sure that it could be adapted to fit your own needs.

[via Reddit]

STM32 Driving A PCIe Video Card

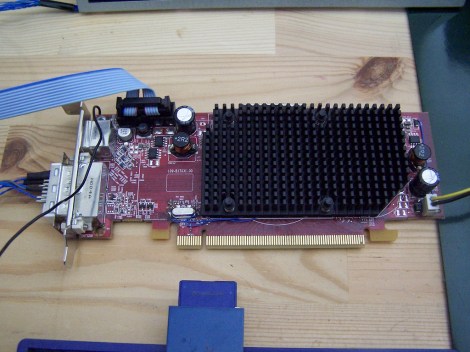
[Gpuhackr] chose his username to explain exactly how he spends his time. For instance, here he’s using an STM32 Discovery board to drive an AMD Radeon HD 2400 graphics card. The ARM microcontroller isn’t actually using the PCIe interface on the card. Instead, [Gpuhackr] has patched into the debugging interface built into the card itself. This isn’t quite as straight forward as it sounds, but if you do the wiring carefully it’s a pretty intersting way to connect an ARM to an LCD monitor.

This project would be almost impossible if it weren’t for the open source code which AMD has released. This lets him implement the card’s 3D rendering features. The demo directly programs the UVD Xtensa CPU which is on the video card. It draws a cube with color gradients on each side. The cube spins while the debug information is overlaid on the screen. In this case the ARM chip/board is really being used as a programmer to upload some custom firmware. But we think a real code-ninja could implement a communications protocol to open up a simple way to drive the card in real-time.

[Thanks uMinded]

USB To RS-232 Adapter Hacked To Use RS485 Instead

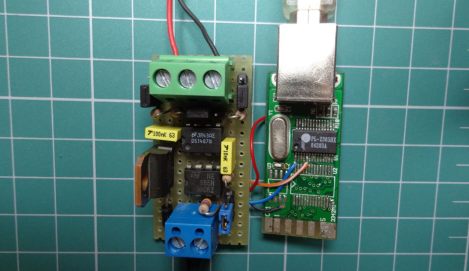
[André Sarmento] needed to connect a computer to an RS-485 bus. A simple converter can be sourced online, but the only thing he could find locally that was even close was a USB to RS-232 converter. He used that component to craft his own USB to RS-485 bridge.

RS-485 is often used for remote sensors as it provides a method of connecting electronics over long distances. The converter which he started with seems to be encased in a hot-glue-like substance. A bit of time with a torch and he was able to get to the components on the board. There are two stages, one which converts RS-232 to TTL, and the other converts TTL to USB. [André] removed the RS-232 chip and patched his own board (shown on the left) into its TTL lines. He was also able to add a few more configuration options, like using an external power source, and having a few jumper-selected resistor options.

Sensor Based Dehumidifier System For Your Home

The apartment [Angus] lives in must be sealed up pretty tight. It was so humid during the winter that there was a mold issue. We usually have the opposite problem, needing to add humidity to the air in the colder months. To combat the issue he bought a small dehumidifier, but wanted to automate the system a bit more than what was built into its meager controls. He combined a set of wireless sensors and remote control outlets to switch the dehumidifier automatically.

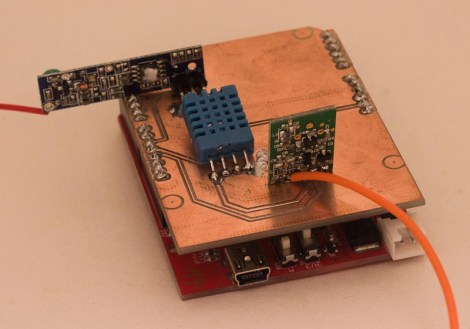
The sensors are from a weather station he bought on eBay. It came with a base station and three remote units, all of which monitor both temperature and humidity. He wanted a system that could compare temperature with dew point and make decisions based on a simple look-up table. An Arduino with a custom milled shield reads these measurements from the sensors and feeds them to a router which is running a cron job script every minute. When that script judges the time and weather conditions warrant a change it tells the Arduino to switch the wireless outlet to which the dehumidifier is connected.