An OpenSCAD Library For All Your CNC Cutting Needs

While there’s always the edge case, there’s a strong likelihood that if you’re using OpenSCAD, you’re probably working on a CAD model that you intend to 3D print at some point. Of course that’s not to say this is all you can do in OpenSCAD, but it’s arguably what it does best. If you wanted to make artistic models, or maybe render what your new kitchen will look like, there are other tools better suited to such tasks.

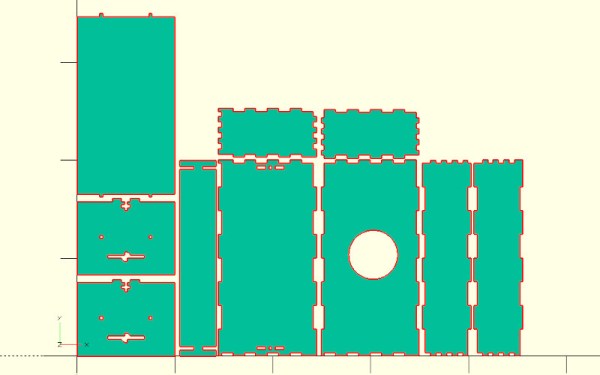
But thanks to lasercut.scad, a library that [Brendan Sleight] has been working on for the last several years, we might have to reconsider our preconceived dimensional notions. Instead of designing parts for 3D printing, his library is all about creating parts intended for subtractive manufacturing. Originally (as the name implies) it was geared towards laser cutting, but the project has since evolved to support CNC routers, vinyl cutters, and pretty much anything else that can follow a DXF file.

This “clip” joint is great for acrylic.

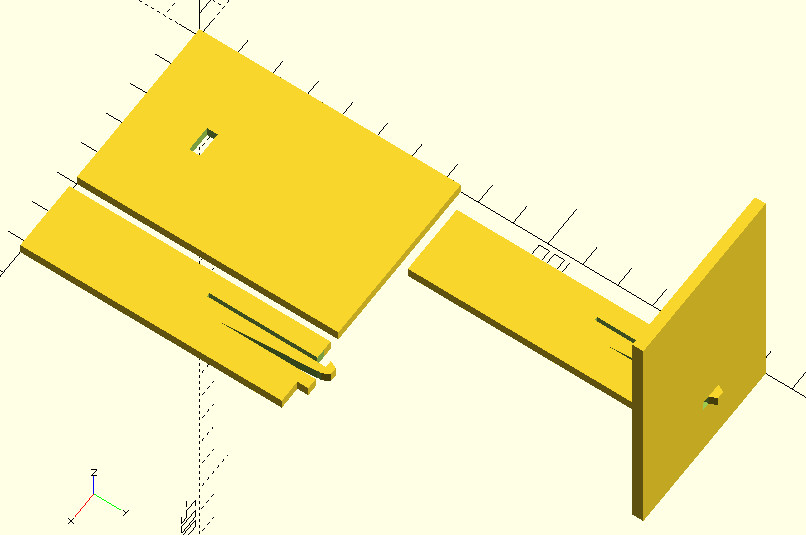
The library has functions for creating the standard tricks used to build things from laser-cut pieces, like finger joints, captive nuts, and assembly tabs. If it was something you once saw holding together an old wooden 3D printer kit back in the day, you can probably recreate it with lasercut.scad. It even supports a pretty wild piece of rotational joinery, courtesy of [Martin Raynsford].

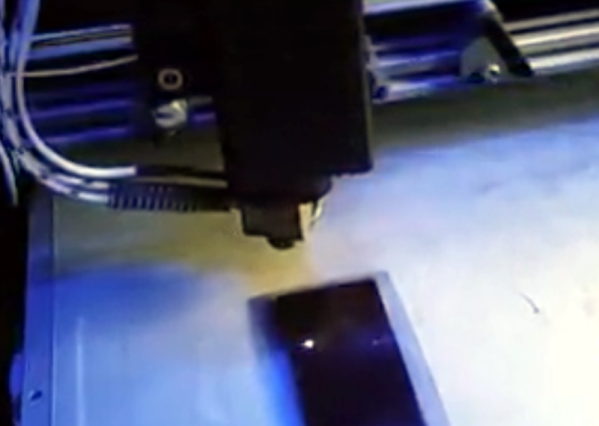
Don’t have a way of concentrating a sufficient number of angry photons at your workpiece? No worries. The library has since been adapted to take into account a parametric kerf width, which lets you dial in how much of a bite your particular tool will take from the material when it does the business. There are even special functions for dealing with very thin cuts, which [Brendan] demonstrates by assembling a box from sheet vinyl.

Of course, those who’ve used OpenSCAD will know there’s not an “Export for CNC” button anywhere in the stock interface. So to actually take your design and produce a file your cutter can understand, [Brendan] has included a Bash script that will run the necessary OpenSCAD incantations to produce a 2D DXF file.

[Brendan] decided to send this one in after he saw the aluminum enclosure OpenSCAD library we covered recently. If you’ve got your own pet project that bends some piece of hardware or software to your will, don’t be shy to let us know.

Astronomical clock

An Astronomical Mechanical Clock, In More Ways Than One

If the workings of a mechanical timepiece give you a thrill, prepare to be blown away by this over-the-top astronomical clock.

The horological masterpiece, which was designed by [Mark Frank] as his “dream clock”, is a riot of brass, bronze, and steel — 1,200 pounds (544 kg) of it, in fact, at least in the raw materials pile. Work on the timepiece began in 2006, with a full-scale mockup executed in wood by Buchannan of Chelmsford, the Australian fabricator that [Mark] commissioned to make his design a reality. We have a hard time explaining the design, which has just about every horological trick incorporated into it.

[Mark] describes the clock as “a four train, quarter striking movement with the fourth train driving the astronomical systems,” which sounds far simpler than the finished product is. It includes 52 “complications,” including a 400-year perpetual calendar, tide clock, solar and lunar eclipse prediction, a planisphere to show the constellations, and even a thermometer. And, as if those weren’t enough, the clock sports both a tellurion to keep track of the Sun-Earth-Moon system and a full orrery out to the orbit of Saturn, including all the major moons. The video below shows the only recently finished masterpiece in operation.

[Mark]’s dream clock has been under construction for the better part of two decades, and we applaud not just his design but his patience. The skeletonized construction reminds us of the Clickspring clock from a few years back; now seems like a great time to go back and binge-watch that whole series again.

Continue reading “An Astronomical Mechanical Clock, In More Ways Than One”

The Current State Of Play In Autonomous Cars

Bluster around the advent of self-driving cars has become a constant in the automotive world in recent years. Much is promised by all comers, but real-world results – and customer-ready technologies – remain scarce on the street.

Today, we’ll dive in and take a look at the current state of play. What makes a self-driving car, how close are the main players, and what can we expect to come around the corner?

Continue reading “The Current State Of Play In Autonomous Cars”

Eric Strebel peeks through his Pfaff 463 industrial sewing machine.

Simple Upgrades Make An Old Industrial Sewing Machine New Again

Well, this is a pleasant surprise: it seems that industrial designer [Eric Strebel] recently got a hold of an industrial sewing machine to tackle the softer side of prototyping. What doesn’t surprise us is that he did some upgrades to make it more user-friendly. Check them out in the video embedded below.

So, what’s the difference between a machine like this and what you might have around the house? Domestic sewing machines have a motor about the size of your fist, and it’s inside the machine’s body. Modern domestics can do light-duty work, but they can’t handle making bags and upholstery or sewing a bunch of layers of any material together. Industrial machines have either clutch or servo motors that are easily five times the size of a domestic’s motor, and are built into the table along with the machine.

Pfaff 463 industrial sewing machine with its new brushless DC servo motor.[Eric] found this Pfaff 463 on Craigslist. It was built somewhere around 1950, and it only does one thing — a single-needle, straight stitch, forward or reverse — but it will do it through damn near anything you want (unlike those computerized hunks of plastic made for home use nowadays). Again, these machines are always built into a table, and they come with a lamp.  While the machine itself may be a workhorse, the light is wimpy, so [Eric] replaced it with a goose-neck LED light that has a magnet for sticking it anywhere light is required around the machine.

No matter the size, electric sewing machines are driven with a foot pedal. On a domestic, the pedal is loose and you just put it on the floor wherever you want, but industrial foot pedals are built into the table frame. [Eric] drilled a bunch of new holes in the side of the pedal so he can move the connecting rod closer to the pivot point. This gives him better control with less footwork.

The biggest, baddest upgrade [Eric] did was to the motor. Although there was nothing wrong with the original  clutch motor, it makes the machine go very fast so that garment workers can fulfill their quotas. Because of this, it’s difficult to control. He upgraded to a brushless DC servo motor for greater precision and easier prototyping. He got really lucky, too, because it mounted directly into the old holes.

We agree wholeheartedly with [Eric]’s sentiment about old sewing machines, or any old machine for that matter. They tend to be overbuilt because planned obsolescence wasn’t a thing yet. If you can’t afford or find an industrial, an old Singer or something similar will likely serve your purpose, as long as you use the right needle.

If you already have an old domestic machine sitting around, you might be able to breathe new life into it with a 3D printer.

Continue reading “Simple Upgrades Make An Old Industrial Sewing Machine New Again”

Tech In Plain Sight: Primitive Engineering Materials

It isn’t an uncommon science fiction trope for our hero to be in a situation where there is no technology. Maybe she’s back in the past or on a faraway planet. The Professor from Gilligan’s Island comes to mind, too. I’d bet the average Hacakday reader could do pretty well in that kind of situation, but there’s one thing that’s often overlooked: materials. Sure, you can build a radio. But can you make wire? Or metal plates for a capacitor? Or a speaker? We tend to overlook how many abstractions we use when we build. Even turning trees into lumber isn’t a totally obvious process.

People are by their very nature always looking for ways to use the things around them. Even 300,000 years ago, people would find rocks and use them as tools. It wasn’t long before they found that some rocks could shape other rocks to form useful shapes like axes. But the age of engineered materials is much younger. Whether clay, metal, glass, or more obviously plastics, these materials are significantly more useful than rocks tied to sticks, but making them in the first place is an engineering story all on its own.

Continue reading “Tech In Plain Sight: Primitive Engineering Materials”

Laser Sees Through Keyhole

Those guys at Stanford must be watching a lot of James Bond movies. Their latest invention is a laser that can image an entire room through a keyhole. We imagine that will show up in a number of spy movies real soon now. You can see the code or watch the video below.

The technique is called NLOS or non-line-of-sight imaging. Previous approaches require scanning a large area to find indirect light from hidden objects. This new approach uses a laser to find objects that are moving. The indirect data changes based on the movement and an algorithm can reverse the measurements to determine the characteristics of the object.

Continue reading “Laser Sees Through Keyhole”

Lasers Make PCBs The Old Fashioned Way

There are many ways to create printed circuit boards, but one of the more traditional ways involves using boards coated with photoresist and exposing the desired artwork on the board, usually with UV light. Then you develop the board like a photograph and etch it in acid. Where the photoresist stays, you’ll wind up with copper traces. Hackers have used lots of methods to get that artwork ranging from pen plotters to laser printers, but commercially a machine called a photoplotter created the artwork using a light and a piece of film. [JGJMatt] sort of rediscovered this idea by realizing that a cheap laser engraver could directly draw on the photoresist.

The laser dot is about 0.2 mm in diameter, so fine resolution boards are possible. If you have a laser cutter or engraver already, you have just about everything you need. If not, the lower-power laser modules are very affordable and you can mount one on a 3D printer. Most people are interested in using these to cut where higher power is a must, but for exposing photosensitive film, you don’t need much power. The 500 mW module used in the project costs about fifty bucks.

Continue reading “Lasers Make PCBs The Old Fashioned Way”