A High Speed, Infinite Volume 3D Printer

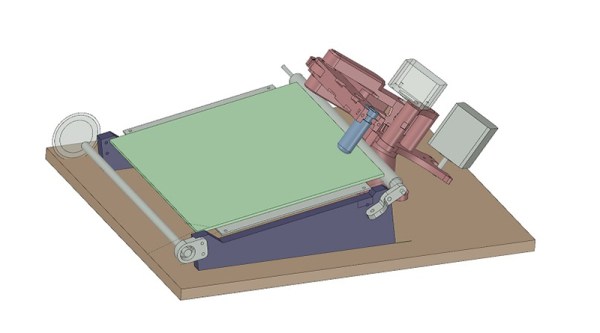
One of the most interesting developments in 3D printing in recent memory is the infinite build volume printer. Instead of a static bed, this type of printer uses a conveyor belt and a hotend set at an angle to produce parts that can be infinitely long in one axis, provided you have the plastic and electricity. For this year’s Hackaday Prize, [inven2main] is exploring the infinite build volume design, but putting a new spin on it. This is a printer with a conveyor belt and a SCARA arm. The goal of this project is to build a printer with a small footprint, huge build volume, no expensive rails or frames, and a low part count. It is the most capable 3D printer you can imagine using a minimal amount of parts.

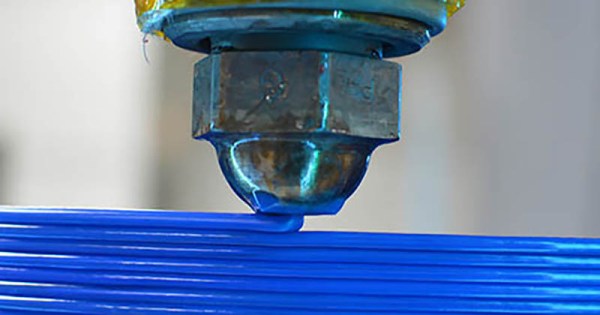
Most of the documentation for this build is hanging around on the RepRap forums, but the bulk of the work is already done. The first half of this build — the SCARA arm — is well-traveled territory for the RepRap community, and where there’s some fancy math and kinematics going on, there’s nothing too far out of the ordinary. The real trick here is combining a SCARA arm with a conveyor belt to give the project an infinite build volume. The proof of concept works, using a conveyor belt manufactured out of blue painter’s tape. These conveyor belt printers are new, and the bed technology isn’t quite there, but improvements are sure to come. Improvements will also be found in putting a small crown on the rollers to keep the belt centered.

All the files for this printer are available on the Gits, and there are already a few videos of this printer working. You can check those out here.

Cutting Edge Of 3D Printing Revealed At Last Weekend’s Midwest RepRap Festival

The last three days marked the 2018 Midwest RepRap Festival. Every year, the stars of the 3D printing world make it out to Goshen, Indiana for the greatest gathering of 3D printers and printing enthusiasts the world has ever seen. This isn’t like any other 3D printing convention — everyone here needs to take the time to get to Goshen, and that means only the people who want to be here make it out.

Over the weekend we covered some amazing hacks and printer builds from MRRF. The ‘BeagleBone On A Chip’ has become a complete solution for a 3D printer controller. This is a great development that takes advantage of the very under-used Programmable Real-Time Units found in the BeagleBone, and will make an excellent controller for that custom printer you’ve been wanting to build. E3D has announced they’re working on an automatic tool-changing printer. It’s a slight derivative of their now-defunct BigBox printer, but is quite possibly the best answer to multi-material filament printers we’ve ever seen. There’s some interest from the community, and if everything goes well, this printer may become a kit, or something of the sort. Filament splicing robots also made an appearance at this year’s MRRF, and the results are extremely impressive. Now you can create multi-color prints with the printer you already own. Is it expensive? Yes, but it looks so good.

This wasn’t all that could be found at MRRF. There were hundreds of printers at the event, and at last count, over 1300 attendees. That’s amazing for a 3D printer convention that is held every year in the middle of nowhere, Indiana. What were the coolest sights and sounds coming out of MRRF this year? Check out the best-of list below.

Continue reading “Cutting Edge Of 3D Printing Revealed At Last Weekend’s Midwest RepRap Festival”

Turning The Beaglebone On A Chip Into A 3D Printer Controller

It’s understood that 3D printers and CNC machines need to control motors, but there are a few other niceties that are always good to have. It would be great if the controller board ran Linux, had support for a nice display, and had some sort of networking. The usual way of going about this is either driving a CNC machine from a desktop, or by adding a Raspberry Pi to a 3D printer.

The best solution to this problem is to just drive everything from a BeagleBone. This will give you Linux, and with a few motor drivers you can have access to the fancy PRUs in the BeagleBone giving you fast precise control. For the last few years, the Replicape has been the board you need to plug a BeagleBone into a few motors. Now, there’s a better, cheaper solution. At the Midwest RepRap Festival this weekend, [Elias Bakken] has unveiled the Revolve, a single board that combines Octavo Systems’ OSD3358 ‘BeagleBone On A Chip’ with silent TMC2130 motor drivers from Trinamic. It’s an all-in-one 3D printer controller board that runs Linux.

The specs for the Revolve are more or less exactly what you would expect for a BeagleBone with a 3D printer controller. The main chip is the Octavo Systems OSB3358, there are six TMC2130 stepper drivers from Trinamic connected directly to the PRUs, 4 GB of eMMC, 4 USB host ports, 10/100 Ethernet, 1080p HDMI out, and enough headers for all the weird and wonderful 3D printers out there. The software is based on Redeem, a daemon that simply turns G-code into spinning motors and switching MOSFETs.

The price hasn’t been set, but [Elias] expects it to be somewhere north of $100, and a bit south of $150. That’s not bad for a board that effectively does everything from online printer monitoring to real-time motion control. There’s no date for the release of this board, but as with most things involving 3D printer, the best place to check for updates is Google+.

E3D Introduces Tool Changing 3D Printer

E3D has introduced their latest answer to multimaterial printing at the Midwest RepRap Festival this weekend. Their research project into a 3D printer with the ability to change toolheads is the latest advancement in multimaterial printing. It’s a work of engineering brilliance, and they’ve already written up their teardown on how this all came to be.

While milling machines and other fancy industrial CNC have had tool changing for decades, and the subject has been pursued by the RepRap community for a few years now, it really hasn’t caught on. The question then is, what is tool changing on a 3D printer good for? The answer is multimaterial printing, and doing it in a way that doesn’t have the downsides of current methods of printing with multiple materials.

There are three current methods of printing in multiple materials. The first is putting two nozzles on the same extruder, but this has the downside of one nozzle interfering with the other. The second is pushing two different kinds of plastic through the same nozzle, such as in the E3D Cyclops, or Prusa’s multimaterial upgrade. This has the downside of cross-contamination, and you can’t print in materials that require different temperature profiles. The third method is simply using multiple carriages on the same machine, such as the lovely stuff from Autodesk or Project Escher. This last method is horrifically complex.

The answer the problem of multimaterial printing is hot-swapping toolheads, but to do this you need precision and repeatability. The folks at E3D have been working on this for years, and I remember seeing some experiments with electro-permanent magnets a few MRRFs ago, but now they finally have a solution. The answer is simply a cam that’s turned by a cheap hobby servo. This is kinematic coupling that allows the carriage to clamp onto a toolhead with 5 μm precision.

Right now, E3D’s experiments in toolchanging 3D printers have culminated in a single 3D printer featuring their toolchange carriage, four toolheads, some amazing linear rails, and a CoreXY configuration. The prints that are coming off of this printer are spectacular. There are four-color Benchies, and the drivetrain of a remote-controlled car with gears printed in Taulman plastic and a driveshaft printed in ABS. The car was a single print made with multiple hotends, demonstrating most of the problems of multimaterial printing disappear with the E3D swapping toolhead printer.

If you’re interested in purchasing one of these printers, E3D currently has a survey for potential buyers and a deposit queue for any future purchases.

Join Hackaday At The Midwest RepRap Festival This Weekend

What time is it? It’s Midwest RepRap Festival time, and it’s happening this weekend in beautiful Goshen, Indiana. It’s free, it’s open to everyone, and it’s the greatest 3D printer convention on Earth.

What’s so great about MRRF? This is where the latest products in the 3D printing space are launched. A few years ago, E3D announced their dual extrusion head at MRRF. This is where the world first got a look at the Bondtech extruder. This is where E3D announced their Titan extruder, and this is where the world got its first look at the Lulzbot Taz 6. If you want to check out the latest 3D printing gear, this is where you go.

How about showcasing what 3D printing can do? Well, how about 3D printed molds for resin casting? There will be 3D printed droids from Star Wars. Want to learn about bioprinting? Sure thing. How about non-Nerf guns? How many filament changes are too many? This is not the limit.

Of course, it wouldn’t be a RepRap festival without the latest new designs for 3D printers. [Nicholas Seward] usually makes it out to MRRF, and he’ll probably be bringing a few of his weird innovations. There are strange RepRaps built for STEM-driven curriculum. Last year, we saw what is probably the greatest advancement in 3D printing in years. The infinite build volume printer is exactly that — it can print an infinitely long beam in one axis. How about a color mixing, CMYKW filament-based printer?

The Midwest RepRap Festival is the greatest 3D printer convention on the planet, and I’d say one of the top two or three cons I go to every year. It’s a fantastic time that you can’t miss. Join us!

Review Of The Moai SLA 3D Printer

It is funny how we always seem to pay the same for a new computer. The price stays the same, but the power of the computer is better each time. It would appear 3D printers may be the same story. After all, it wasn’t long ago that sinking a thousand bucks or more on a 3D printer wouldn’t raise any eyebrows. Yet today you can better printers for a fraction of that and $1,300 will buy you an open source Moai SLA printer as a kit. [3D Printing Nerd] took a field trip to MatterHackers to check the machine out and you can see the results in the video below.

The printer uses a 150 mW laser to make parts up to 130 mm by 130 mm by 180 mm. The laser spot size is 70 micron (compare that to the typical 400 micron tip on a conventional printer). The prints require an alcohol bath after they are done followed by a UV curing step that takes a few hours.

Continue reading “Review Of The Moai SLA 3D Printer”

3D Printering: Printing Sticks For A PLA Hot Glue Gun

When is a hot glue stick not a hot glue stick? When it’s PLA, of course! A glue gun that dispenses molten PLA instead of hot glue turned out to be a handy tool for joining 3D-printed objects together, once I had figured out how to print my own “glue” sticks out of PLA. The result is a bit like a plus-sized 3D-printing pen, but much simpler and capable of much heavier extrusion. But it wasn’t quite as simple as shoving scrap PLA into a hot glue gun and mashing the trigger; a few glitches needed to be ironed out.

Why Use a Glue Gun for PLA?

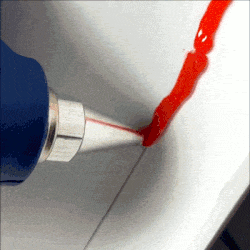
Some solutions come from no more than looking at two dissimilar things while in the right mindset, and realizing they can be mashed together. In this case I had recently segmented a large, hollow, 3D model into smaller 3D-printer-sized pieces and printed them all out, but found myself with a problem. I now had a large number of curved, thin-walled pieces that needed to be connected flush with one another. These were essentially butt joints on all sides — the weakest kind of joint — offering very little surface for gluing. On top of it all, the curved surfaces meant clamping was impractical, and any movement of the pieces while gluing would result in other pieces not lining up.

An advantage was that only the outside of my hollow model was a presentation surface; the inside could be ugly. A hot glue gun is worth considering for a job like this. The idea would be to hold two pieces with the presentation sides lined up properly with each other, then anchor the seams together by applying melted glue on the inside (non-presentation) side of the joint. Let the hot glue cool and harden, and repeat. It’s a workable process, but I felt that hot glue just wasn’t the right thing to use in this case. Hot glue can be slow to cool completely, and will always have a bit of flexibility to it. I wanted to work fast, and I wanted the joints to be hard and stiff. What I really wanted was melted PLA instead of glue, but I had no way to do it. Friction welding the 3D-printed pieces was a possibility but I doubted how maneuverable my rotary tool would be in awkward orientations. I was considering ordering a 3D-printing pen to use as a small PLA spot welder when I laid eyes on my cheap desktop glue gun.

Continue reading “3D Printering: Printing Sticks For A PLA Hot Glue Gun”