IQ Makes Smarter Motors

We think of motors typically as pretty dumb devices. Depending on the kind, you send them some current or some pulses, and they turn. No problem. Even an RC servo, which has some smarts on board, doesn’t have a lot of capability. However, there is a new generation of smart motors out that combine the mechanical motor mechanism with a built-in controller. [Bunnie] looks at one that isn’t even called a motor. It is the IQ position module.

Despite the name, these devices are just a brushless DC motor (BLDC) with a controller and an API. There’s no gearing, so backdriving the motor is permissible and it can even double as a motion sensor. The video below shows [Bunnie] making one module track the other using just a little bit of code.


Continue reading “IQ Makes Smarter Motors”

Solve 2D Math Equations Colorfully

Electronics can be seen as really just an application of physics, and you could in turn argue that physics is the application of math to the real world. Unfortunately, the way most of us were taught math was far from intuitive. Luckily, the Internet is full of amazing texts and videos that can help you get a better understanding for the “why” behind complex math topics. Case in point? [3Blue1Brown] has a video showing how to solve 2D equations using colors. If you watch enough, you’ll realize that the colors are just a clever way to represent vectors and, in fact, the method would apply to complex numbers.

Honestly, we don’t think you’d ever solve equations like this by hand — at least not with the colors. But the intuitive feel this video can give you for how things work is very valuable. In addition, if you were trying to implement an algorithm in software this would be tailor-made for it, although you wouldn’t really use colors there either we suppose.

Continue reading “Solve 2D Math Equations Colorfully”

The Obscure Electronics Tools You Didn’t Know You Needed

The right tool for the job can turn a total headache into a 30-second operation. This is all the more important when you’re trying to streamline an assembly process, and the reason why you’ll find so many strange and wonderful purpose-built tools on any production line. With a nod to that old adage, [EvilMadScientist] have collected the tools you didn’t know you needed – until now.

If you’re wiring big through-hole boards all day, you’ve probably bemoaned the uneven bends on all your resistors. How did the big companies get it right way back when? They used a tool to set the distance of the resistor legs just right. What about DIP ICs? It’s a total pain trying to take them fresh out of the tube and get them to seat in a socket, but there’s a tool to do that too. It’s actually a two-part series, and while we’re sure you’ve all seen a solder sucker before, the fresh take on helping hands is pretty ingenious.

Overall, it’s a combination of little things that, with a bit of cash or a day’s work, you can have in your own lab and once you’ve got them, you won’t ever want to go back. Be sure to tell us about your favourite obscure tools in the comments.

Now that you’ve got your tools to hand, why not wrap them all up in a handy workstation?

A Bar Graph For Beer Fridge Vitals

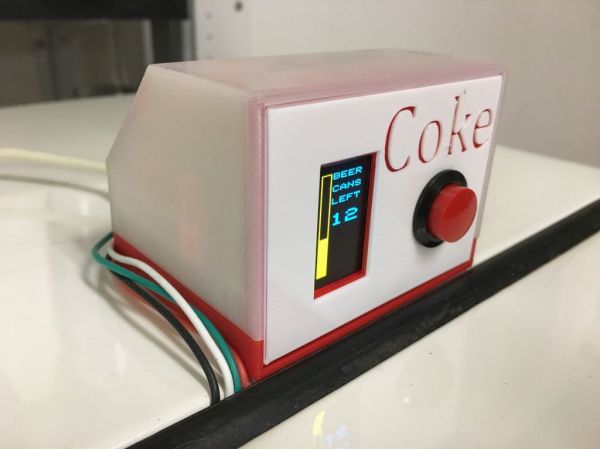
[ChrisN219] has an antique Coke machine that used to hold glass bottles. Now it holds around 30 tall boy cans of his favorite post-work suds. The only problem is that [Chris] has no idea how many cans are in it without opening up the door or keeping tally on a nearby slate board. Enter the Arduino.

He wanted to make something completely non-invasive to the machine (phew!) while using as many parts he already had as possible. The result is a simple circuit that uses an ultrasonic sensor mounted inside the machine to ping the depths, and a Nano in a nifty 3D printed box up top to do some math and display the number of cans remaining as a simple bar graph. The sensor reads one bay, and the code multiplies by two to get the total. It was touch and go there for a minute as he wasn’t sure that the HC-SR04s would get a good response from the cylindrical cans. Not only did they give a good reading, the first test was quite accurate.

[Chris] recently finished Mk. II, which replaces the momentary (and the Coke logo) with a second HC-SR04. The first version required the push of a button to do inventory, but now he simply walks up to the machine and knows at a glance if it’s time to make a beer run.

Okay, so maybe you don’t have cool old Coke machine problems. But surely you can find something that needs pinging, like an inconvenient rain barrel.

It’s A Nixie! It’s A VFD! No, It’s A Custom LED Display In A Tube

Like the look of Nixies but they just seem a little overdone? Or perhaps you just don’t want the hassles of a high-voltage power supply? Then maybe these faux-Nixie LED “tube” displays will find a way into your next clock build.

For his 2018 Hackaday Prize entry, [bobricius] decided that what the world needs is a Nixie that’s not a Nixie. To that end, each display is formed by seven surface-mount LEDs soldered to a seven-segment shaped PCB and slipped into a glass tube. The LEDs are in 4014 packages so they’re only 4 millimeters long, but what they lack in size they make up for in brightness. We’re not sure if it’s a trick of the camera, but the LEDs certainly seem to put off a bluish glow that’s reminiscent of vacuum-fluorescent displays — it’s like a Nixie and a VFD all rolled up in one package.  The current case, which hides the clock circuitry on the lower part of the PCB, is just plastic, but this would look spiffy in a fine wooden case.

Could this be another Nixie tube killer that never was? Perhaps, but wherever it ends up, we like the look of it, and we’re glad it’s one of the early Hackaday Prize entries. Have you got something to enter in the greatest hardware competition on Earth? If not, get cracking!

Cutting Edge Of 3D Printing Revealed At Last Weekend’s Midwest RepRap Festival

The last three days marked the 2018 Midwest RepRap Festival. Every year, the stars of the 3D printing world make it out to Goshen, Indiana for the greatest gathering of 3D printers and printing enthusiasts the world has ever seen. This isn’t like any other 3D printing convention — everyone here needs to take the time to get to Goshen, and that means only the people who want to be here make it out.

Over the weekend we covered some amazing hacks and printer builds from MRRF. The ‘BeagleBone On A Chip’ has become a complete solution for a 3D printer controller. This is a great development that takes advantage of the very under-used Programmable Real-Time Units found in the BeagleBone, and will make an excellent controller for that custom printer you’ve been wanting to build. E3D has announced they’re working on an automatic tool-changing printer. It’s a slight derivative of their now-defunct BigBox printer, but is quite possibly the best answer to multi-material filament printers we’ve ever seen. There’s some interest from the community, and if everything goes well, this printer may become a kit, or something of the sort. Filament splicing robots also made an appearance at this year’s MRRF, and the results are extremely impressive. Now you can create multi-color prints with the printer you already own. Is it expensive? Yes, but it looks so good.

This wasn’t all that could be found at MRRF. There were hundreds of printers at the event, and at last count, over 1300 attendees. That’s amazing for a 3D printer convention that is held every year in the middle of nowhere, Indiana. What were the coolest sights and sounds coming out of MRRF this year? Check out the best-of list below.

Continue reading “Cutting Edge Of 3D Printing Revealed At Last Weekend’s Midwest RepRap Festival”

A Resistor Cutting Robot You Can Build

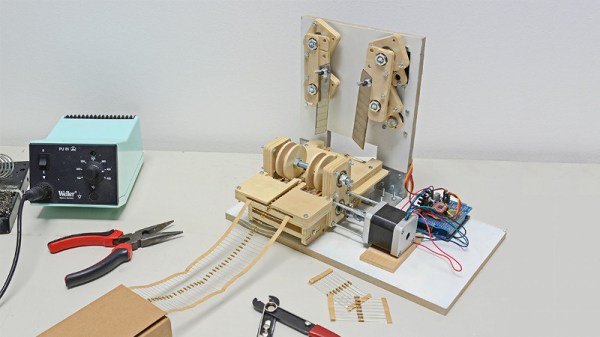
If you’re populating kits, it can get tiring and time consuming. Like all good repetitive processes, it should be automated. As far as cutting resistors goes, this is one way to do it, thanks to [Pablo].

The build is actually cribbed from earlier work by a gang called [oomlout]. Parts for these cutters are made with either lasercut or CNC milled sheet stock. A stepper motor is used to transport the resistor tape, and the cutting blades are moved by standard hobby servos. The use of servos for the blades allows the action to be controlled precisely without having to go to the effort of implementing extra limit switches and circuitry.

Control is by an Arduino Uno, with an A4988 driver controlling the stepper. Servo control is achieved with the Uno’s onboard peripherals. There’s a video below of the machine in operation, which shows it to be a simple and efficient tool for the job.

This build turns an otherwise maddeningly basic chore into a set-and-forget operation. We’ve seen other work in this area before from the [oomlout] team, too. Video after the break.

Continue reading “A Resistor Cutting Robot You Can Build”