Giant POV Tube For Light Painting

writing_in_the_night_with_the_light_scythe

When you really want your feelings known, we always say that bigger is better. [Gavin Smith, aka The Mechatronics Guy] must come from the same school of thought, because there’s absolutely no mistaking what he is trying to say with his latest project.

Inspired by this WiFi signal painter we featured a while back, the LightScythe is a 2 meter long bar composed of multi-color LED strips that he bought from Adafruit. The light bar is controlled by a Seeduino micro controller, which takes direction from his laptop via a pair of XBee units. Once he generates an image from text with ImageMagic, a Python script is used to match the colors as close as possible to the RGB color space. The image is then converted to raw serial data for playback on the Scythe. When he is ready to go, he triggers his camera to take a 10-15 second exposure, during which he walks across the frame, painting his images with the LightScythe.

We always enjoy seeing creative derivations of previous projects we have covered, and the LightScythe does it well. He actually built a pair of these that can work in concert or independently, which we imagine can make for some pretty awesome pictures.

Be sure to check out his Flickr photostream for more examples of what the LightScythe can do.

Handy Board Plays Music With An NES Controller

[Alex Busman] has been working with an old microcontroller board called the Handy Board. Recently, he figured out how to interface an NES controller to play music. With 8 buttons on an NES controller, [Alex] has control over an entire musical scale, so he demonstrates this in his video by covering the Dr. Mario Theme.

The Handy Board is a microcontroller board originally designed in 1995 for LEGO robots. With a 68HC11 μC running at 2MHz and 32KB of RAM, the Handy Board has been superseded by the LEGO Mindstorms NTX NXT, the Handy Board is thankfully still being supported, and is still a great platform to learn embedded design.

It’s great to see a build on relatively obsolete hardware, especially considering this would be a trivial build with an Arduino. We think it’s great [Alex] is learning the ins and outs of ‘difficult’ hardware – it’s a great way to learn something. Check out the walk though of [Alex]’s build after the break.

Continue reading “Handy Board Plays Music With An NES Controller”

Teensy AVRs Used In Penetration Testing

netragard_penetration_testing_mouse

While some people know that you should be wary of USB drives with unknown origins, the same care is rarely, if ever exercised with USB peripherals. The security firm Netragard recently used this to their advantage when performing a penetration test at a client’s facility. When the client ruled out the use of many common attack vectors including social networks, telephones, social engineering, and unauthorized physical access from the test, the team at Netragard knew they would have to get creative.

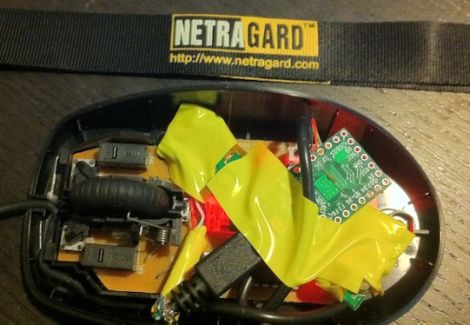
They purchased a Logitech USB mouse and disassembled it in order to add their clever payload. A Teensy uC was programmed to emulate keyboard input, entering commands via the mouse’s USB connection once it had been connected to a computer. Using an undocumented exploit in McAfee’s antivirus suite, they were able to evade detection while their system entered commands to install malware from the flash drive they hid along side the Teensy.

Once the mouse was reassembled, they repackaged it along with some marketing materials to make it look like part of a promotional event. They purchased a detailed list of employees and singled out an easy target, sending their malicious mouse on its way. Within three days, their malware was loaded onto the victim’s computer and their test was deemed a success.

[Thanks, Aaron]

Tweeting Bird Feeder Keeps A Picture Record Of All Visitors

wireless_tweeting_bird_feeder

If you weren’t aware, Adafruit Industries is sponsoring the “Make it Tweet” contest over at Instructables, and this Twitter-enabled bird feeder is [quasiben’s] entry into the competition.

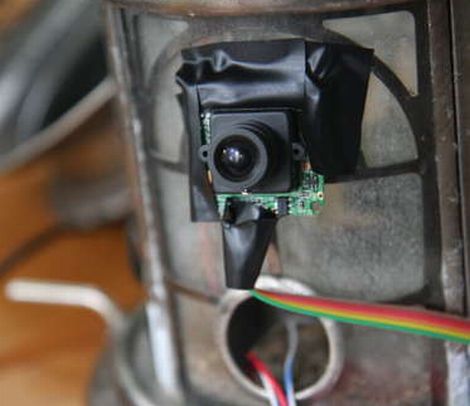
His bird feeder not only sends messages to Twitter, it also sends a picture of each bird to Twitpic. The feeder itself is a standard off the shelf model which has been fitted with a LinkSprite camera. A LilyPad Arduino controls the camera, sending images to his computer via a pair of XBee modules. To detect when a bird has stopped by for something to eat, [quasiben] used an infrared LED and an IR detector. The emitter and detector are positioned at opposing sides of the feeder’s opening, triggering the Arduino to snap a picture whenever the beam is broken. Once the image has been transferred to his computer, it is posted to TwitPic.

We’re pretty sure [quasiben] built this Tweeting bird feeder just because he could, but we think it’s a pretty smart idea for people who don’t necessarily have the free time to gaze out the window into their yard. It’s a great way to keep tabs on all your new winged visitors while on the go.

FPGA MIDI Interface

Hacking and digital music seem to be very much related arts. This very well built hack goes through the process of creating a MIDI synthesizer using a field programmable gate array (FPGA) and several other components.

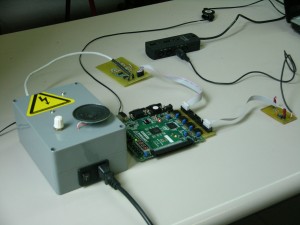
A laptop is used as the MIDI interface which runs through a filter and then to the FPGA. This translated signal then goes through a digital to analog converter and finally to the amplifier and speakers. The FPGA is especially interesting as this chip is an array of logic gates that can be programmed however one wants. In this case, the wavetable principle is used to generate sound.

Although this is no Kaossilator yet, this device is a great start and very functional. If you’ve ever wanted to build your own electronic instrument, check out this hack. Also, check out the video after the break! Continue reading “FPGA MIDI Interface”

Put Your ARM Skills To The Test With The Freescale Make It Challenge

Throw down your mad skills and you might win some cash while you’re at it. [Zeta] tipped us off that Freescale just announced a new challenge. They call it the Make It Challenge and it centers around their 32-bit Kinetis microcontrollers. These are ARM Cortex-M4 chips and if you’re selected to compete they’ll offer their development hardware at a discount for you to get started.

You’ll need to jump through a few hoops. To be considered as a contestant you’ll need to preregister, cruise through some online training, and complete a quiz. From there, just come up with an idea and submit a design paper as the first round of competition. Ten finalists will rise from the group and take their design through to completion for judging in the fall. The top three will get some serious cash ($11,000 for first place) and be treated to an expense paid trip to Austin, Texas.

Circuit Design For Multiple UART Connections

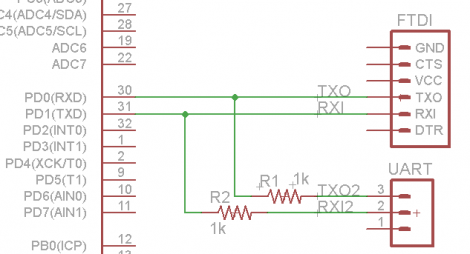
[Bill Porter] has a tip for designing circuits that have multiple connections to a single microcontroller UART. This stemmed from a review of a friend’s circuit design that used the UART in the project, but also called for an FTDI chip in order to reprogram via USB and a bootloader. Unlike the schematic above, the circuit called for straight connections without any resistors. With that design, a conflict will occur if two devices are connected and attempting to communicate at the same time.

The fix is easy. [Bill] discusses how to prioritize the connection by adding the pair of current limiting resistors seen above. This helps to ensure that damage will not occur, and that the FTDI chip will take precedence. Now the external hardware will not preclude the FTDI chip from accessing and programming via the bootloader. The tutorial is intended for those rolling their own boards out of an Arduino-based prototype, but it will work in any situation where you need multiple connections to a single set of UART pins.