Breadboarding A Game Boy From Scratch

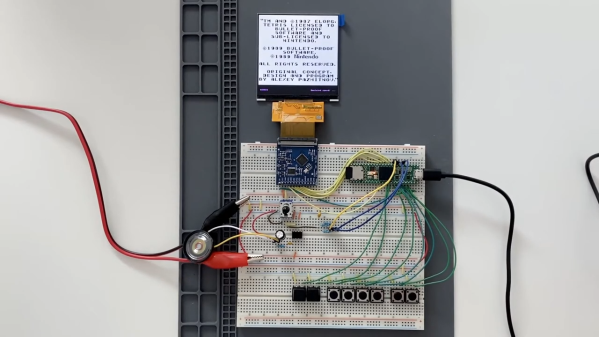
The original Nintendo Game Boy is a stout piece of hardware in a solid plastic enclosure. [Raphael Stäbler] recreated the popular handheld on a breadboard instead, in a fully-functional way, to boot.

[Raphael]’s build doesn’t rely on a real Game Boy CPU or components. Instead it’s emulated with the aid of a Teensy 4.1 microcontroller. [Raphael] coded up an emulator from scratch, instruction by instruction, something he’s documented on his own blog. The Teensy is placed on a breadboard, and hooked up with a series of 8 buttons to serve as the controls. Audio output is via a LM386 acting as a simple audio amp, hooked up with an original Game Boy speaker for more authentic sound. Display is thanks to a FT81x display driver running a small LCD. Games are loaded via an SD card formatted in the FAT32 file system.

While it’s not as ergonomic as the original Nintendo console, it works, and works well! It’s an impressive project to see the Game Boy recreated from scratch inside a powerful microcontroller. We’ve seen other projects go to similar lengths before. Video after the break.

Continue reading “Breadboarding A Game Boy From Scratch”

Arduboy Mini Is A Fresh Take On An 8-bit Favorite

We’ve always been big fans of the Arduboy here at Hackaday. When creator Kevin Bates showed us the original prototype back in 2014, the idea was to use his unique method of mounting components inside routed holes in the PCB to produce an electronic business card that was just 1.6 mm thick. But the Internet quickly took notice of the demos he posted online, and what started as a one-off project led to a wildly successful Kickstarter for a sleek handheld gaming system that used modern components and manufacturing techniques to pay homage to the 8-bit retro systems that came before it.

The original Arduboy prototype in 2014

It’s the sort of hacker success story that we live for around here, but it didn’t end there. After the Kickstarter, the Arduboy community continued to grow, thanks in no small part to Kevin never forgetting the open source principles the product was built on.

He took an active role in the growing community, and when some Arduboy owners started tinkering with adding external storage to their systems so they could hold hundreds of games at a time, he didn’t chastise them for exploring. Instead, he collaborated with them to produce not only a fantastic add-on modification for the original Arduboy, but a new version of the Arduboy that had the community-inspired modifications built in.

Now Kevin is back with the Arduboy Mini, which not only retains everything that made the original a success, but offers some exciting new possibilities. There’s little doubt that he’s got another success on his hands as well as the community’s backing — at the time of this writing, the Kickstarter campaign for the $29 USD Mini has nearly quadrupled its funding goal.

But even still, Kevin offered us a chance to go hands-on with a prototype of the Arduboy Mini so that anyone on the fence can get a third party’s view on the new system. So without further ado, let’s take a look at how this micro machine stacks up to its full-sized counterparts.

Continue reading “Arduboy Mini Is A Fresh Take On An 8-bit Favorite”

Dumping Game Boy Cartridges Via The Link Cable Port

When it comes to vintage consoles like the Game Boy, it’s often nice to be able to dump cartridge ROMs for posterity, for archival, and for emulation. To that end, [Francis Stokes] of [Low Byte Productions] whipped up a rather unique method of dumping Game Boy carts via the link cable port.

The method starts by running custom code on the Game Boy, delivered by flash cart. That code loads itself into RAM, and then waits for the user to swap in a cart they wish to dump and press a button. The code then reads the cartridge, byte by byte, sending it out over the link port. To capture the data, [Francis] simply uses a Saleae logic analyzer to do the job. Notably, the error rate was initially super high with this method, until [Francis] realised that cutting down the length of the link cable cut down on noise that was interfering with the signal.

The code is available on GitHub for those interested. There are other ways to dump Game Boy cartridges too, of course.

Continue reading “Dumping Game Boy Cartridges Via The Link Cable Port”

The Game Boy Color Accessory You’ve Been Waiting For

Sometimes silly projects catch our eye, and we just can’t resist covering them. Over on Hackaday.io, [solderking] realized that there was a glaring omission in the multi-game management hardware for the Game Boy Color. Obviously, it’s too mundane to carry the handheld around with a bunch of games in one’s pocket, and a hardware multi-changer would definitely improve the usability. This convenient, pocket-friendly solution allows you to dock up four cartridges at a time, and with only a little mild inconvenience, spin the whole assembly, lock in a game and load it up. What could be easier?

Constructed from a ridiculous three-tier PCB stack, with a rotating center joint, the assembly is completely passive, with the connections from the selected game cartridge passed down a series of connectors before finally entering the Game Boy via the usual edge connector. The mere fact that this works at all just shows how tolerant (and we guess, slow) older gaming platforms used to be, and just what you can get away with! Still, it’s a fun build, and it does work, which just goes to show that just because you can, then you should.

We’re no strangers to Game Boy hacks. Here’s a useful cartridge to help with developing your first program. If the old platform is just a bit too limited for you, then we’ve got you covered with a hack that wedges an iCE40 FPGA and a Pi Zero inside the case, to give a bit more oomph.

Continue reading “The Game Boy Color Accessory You’ve Been Waiting For”

A two picture montage of a boy wearing a sonic the hedgehog costume with LEDs in them. The left picture is at night with the boy wearing sunglasses and a face mask with the sonic costume head piece lit up. The right picture is during the day with the boy wearing a face mask, holding a plastic pu mpkin bucket for candy and wearing a lit up sonic the hedgehog costume in the front yard of a house.

LEDs Put New Spin On A Sonic The Hedgehog Costume

[Wentworthm] couldn’t say no to his son’s plea for a Sonic the Hedgehog costume for Halloween but also couldn’t resist sprucing it up with LEDs either. The end result is a surprisingly cool light up Sonic the Hedgehog costume.

a picture of a breadboard with an Arduino Nano on it, with wires going out to 3d printed tear dropped shapes that have LED strips in them, with some LED strips on.

After some experimentation, [Wentworthm] ordered two costumes and ended up mixing and matching the head piece of one with the body suit of the other. For the head, [Wentworthm] created six 3D printed “quills” that had slots for the WS2812B LED strips to slide into and diffuse out the sides, with each quill sliding into the folds of the Sonic head “spikes”. Sewn strips of cloth were used to house the LED strips that were placed down the sides of the costume. An additional 3D printed switch housing was created to allow for a more robust interface to the two push buttons to activate the LEDs. An Arduino Nano, soldered to a protoboard, was used to drive the LED strips with a USB battery pack powering the whole project.

[Wentworthm] goes into more detail about the trials and errors, so the post is definitely worth checking out for more detail on the build. Halloween is always a great source of cool costumes and we’ve featured some great ones before, like a light up crosswalk costume to making a giant Gameboy colour costume.

Video after the break!

Continue reading “LEDs Put New Spin On A Sonic The Hedgehog Costume”

Watermelon CNC Uses Lazy Susan

It is the time of year when a lot of people in certain parts of the world carve pumpkins. [Gonkee] is carving a watermelon, which we assume is similar. He decided to make a CNC machine to do the carving for him. The unusual part is the use of two lazy Susans to make a rotary carving machine. You can see the result in the video below.

The hardware is clever and there is software that lets you do drawings, although we were hoping for something that would process gcode or slice STL. That would be a worthy add-on project. There were a few iterations required before the Melon Carver 3000 worked satisfactorily. Seeing a carving tool operating on two circles gives us a lot of ideas. We aren’t sure how sturdy the mounts are, so don’t plan on carving aluminum without some changes, but we suspect it is possible.

Then again, a laser head mounted on the frame would have probably made short work of the melon, and wouldn’t require much mechanical stiffness. It would, however, take a little effort to keep it in focus. So many ideas to try!

Watermelon is a popular hacking medium, apparently. There’s even one that holds a GameBoy.

Honor Your Hacker Heroes

We recently ran an article on a sweet percussion device made by minimal-hardware-synth-madman [Gijs Gieskes]. Basically, it amplifies up an analog meter movement and plays it by slamming it into the end stops. Rhythmically, and in stereo. It’s got that lovely thud, plus the ringing of the springs. It takes what is normally a sign that something’s horribly wrong and makes a soundtrack out of it. I love it.

[Gijs] has been making electro-mechanical musical hacks for about as long as I’ve been reading Hackaday, if not longer. We’ve written up no fewer than 22 of his projects, and the first one on record is from 2005: an LSDJ-based hardware sequencer. All of his projects are simple, but each one has a tremendously clever idea at its core that comes from a deep appreciation of everything going on around us. Have you noticed that VU meters make a particular twang when they hit the walls? Sure you have. Have you built a percussion instrument out of it? [Gijs] has!

Maybe it’s a small realization, and it’s not going to change the world by itself, but I’ve rebuilt more than a couple projects from [Gijs]’ repertoire, and each one has made my life more fun. And if you’re a regular Hackaday reader, you’ve probably seen hundreds or thousands of similar little awesome ideas played out, and maybe even taken some of them on as your own as well. When they accumulate up, I believe they can change the world, at least in the sense of filling up a geek’s life. I hope that feeling comes across when we write up a project. Those of you out there hacking, we salute you!