April Fool’s Day is bad. April Fool’s Day is a terrible, horrible, no good, very bad day. For one day a year, we’re inundated with pieces that can, accurately and without any sense of irony, be called fake news. YouTube is worse. But you know what’s worse than April Fool’s Day? A hundred children playing plastic recorders. But it’s April Fool’s Day, and things must get worse. Here’s a vacuum cleaner playing Africa by Toto.
This is the latest build from [James Bruton] or [Ecks Robots Dot Co Dot UK], who is the king of building just about anything with 3D printers. He’s got a BB8 and some of the cooler Star Wars droids, a Hulkbuster, and openDog. When it comes to confabulating robotics and 3D printers, [James] is the king. But this is April Fool’s Day, and if you’re a big YouTuber, you need to do something annoying. [James] is the king.
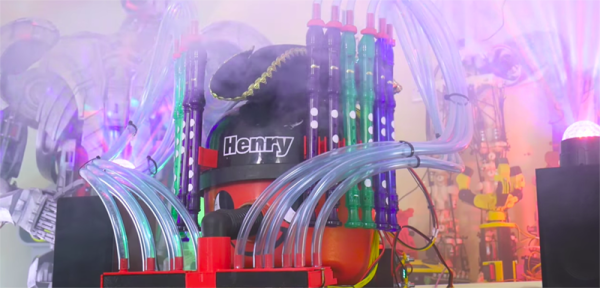
This build uses a Henry vacuum cleaner, a canister vacuum with a silk screened face, because why not, and you’re not truly living until you put googly eyes on your Roomba. Also, all vacuums in England are Hoovers, because reasons. In collaboration with [Mothcub], [James] adapted cheap children’s plastic recorders to a Henry vacuum cleaner with a few 3D printed parts, some servo-controlled valves, and a bit of plastic tubing. While using cheap kid’s recorders as the tone generator in what is effectively a pipe organ is interesting (the stickers over the holes are a great idea), this is something that should not be done ever. This idea should not be replicated. These recorders are not in tune and I don’t know how because they’re just one piece of plastic that came out of the same mold.
The servos, and therefore the entire pipe organ, are controlled via MIDI, which makes this the first DIY MIDI pipe organ we’ve seen. It’s a proof of concept, and a pretty good one. It also sounds terrible. This is proof that cheap plastic recorders don’t sound good. The video is below, and I highly suggest skipping the second half.