Common Enzyme Breaks Down PLA Fast

The global issue of plastic waste has prompted scientists to seek innovative solutions for recycling. Single-use plastics, notorious for their environmental impact, require new methods for efficient and sustainable management. For some common plastics, though, salvation could be at hand, with researchers identifying a common enzyme that can be used to break them down fast.

Researchers at King’s College London have discovered an enzyme used in laundry detergents that can break down PLA plastics within 24 hours, using a little heat as an aid. Normally, this is achieved via composting methods that take weeks or months. This method transforms the plastics back into their original chemical components, offering a rapid and eco-friendly recycling process. The monomers can then be reused for manufacturing new plastic items.

One wonders if this could also be used in another way – perhaps in a multimaterial printer, allowing PLA to be used for supports and then broken down. It’s probably not that necessary, given other degradable materials exist, but it’s something to think about.

This project is a significant leap forward in recycling technology, showcasing the potential for enzymes to revolutionize how we handle plastic waste. It could also be a great way to recycle all those errant deformed Pikachus that keep ending up in your hackerspace’s 3D-printing waste basket. In any case, plastic waste is a problem the world needs to solve, and quickly, because it’s not going anywhere any time soon. Video after the break.

Continue reading “Common Enzyme Breaks Down PLA Fast”

Tricky 3D Printed Joinery Problem? Give Heat Staking A Try

When you just can’t 3D print something as a monolithic part, you’re going to have to join pieces together. In such cases, most of us instinctively include threaded inserts or nut slots in the design, or even reach for a tube of CA glue. But perhaps you should be thinking more along the lines of heat-staking your printed parts together.

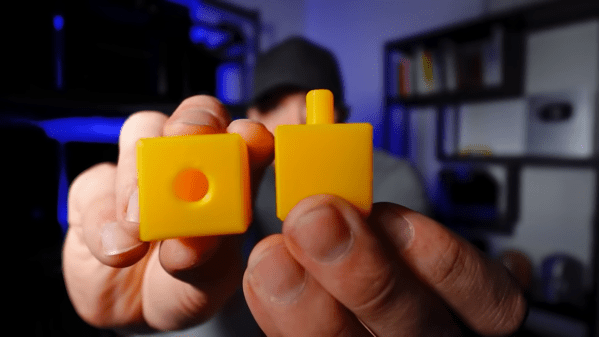
Although you might not be familiar with the term, if you’ve looked inside anything made out of plastic, chances are good you’ve seen a heat-staked joint. As [Richard Sewell] explains, a heat-staked joint is nothing more than the classic mortise-and-tenon made from plastic where the tenon stands proud of the joint face so it can be softened with heat. The tenon spreads out so the joint can’t be pulled apart. A variant on the theme includes a mortise with a generous chamfer so the melted tenon can spread out, providing not only extra resistance to pull-out be also a more flush surface.

To melt the joint, [Richard] simply uses a soldering iron and a little pressure. To spread out both the heat and the force a bit, he uses the barrel of the iron rather than a tip, although we could see a broad chisel tip being used for smaller joints. Either way, a layer of Kapton tape helps keep the iron from getting gunked up with melted plastic. [Richard] lists a host of advantages for this kind of plastic joinery, including eliminating the need for additional hardware. But we think the best feature of this joint is that by avoiding monolithic prints, each aspect of a part can have its layer lines optimized.

While it probably isn’t applicable everywhere, heat-staking looks like a technique to keep in mind. We’d love to see [Stefan] over at CNC Kitchen do some of his testing magic on these joints, like he did for threaded inserts.

An Alternative Orientation For 3D Printed Enclosures

When it comes to 3D printing, the orientation of your print can have a significant impact on strength, aesthetics, and functionality or ease of printing. The folks at Slant 3D have found that printing enclosures at a 45° provides an excellent balance of these properties, with some added advantages for high volume printing. The trick is to prevent the part from falling over when balance on a edge, but in the video after the break [Gabe Bentz]  demonstrate Slant 3D’s solution of minimalist custom supports.

The traditional vertical or horizontal orientations come with drawbacks like excessive post-processing and weak layer alignment. Printing at 45° reduces waste and strengthens the end product by aligning the layer lines in a way that resists splitting across common stress points. When scaling up production, this orientation comes with the added advantage of minimal bed contact area, allowing the printer to auto-eject the part by pushing it off the bed with print head.

Continue reading “An Alternative Orientation For 3D Printed Enclosures”

The Case Against Calibration Cubes

Calibration cubes have long been a staple for testing and adjusting 3D printers, but according to [Stefan] of CNC Kitchen, they’re not just ineffective—they could be leading us astray. In the video after the break he explains his reasoning for this controversial claim, and provides a viable alternative.

Such cubes are often used to calibrate the steps per millimeter for the printer’s steppers, but the actual dimensions of said cube can be impacted by over or under extrusion, in addition to how far the machine might be out of alignment. This can be further exacerbated by measuring errors due to elephant’s foot, over extruded corners, or just inaccuracies in the caliper. All these potential errors which can go unnoticed in the small 20 x 20 mm cube, while still leading to significant dimensional errors in larger prints

So what’s the solution? Not another cube. It’s something called the “CaliFlower” from [Adam] of Vector 3D. This is not a typical calibration model — it’s carefully designed to minimize measurement errors with ten internal and external measuring points with stops for your calipers. The model costs $5, but for your money you get a complete guide and spreadsheet to calculate the required of corrections needed in your firmware or slicer settings.

If you regularly switch materials in your 3D printer, [Stefan] also advises against adjusting steps per millimeter and suggests defining a scaling factor for each material type instead. With this method validated across different materials like PLA, PETG, ABS, and ASA, it becomes evident that material shrinkage plays a significant role in dimensional inaccuracy, not just machine error. While [Stefan] makes a convincing case against the standard calibration cube for dimensional calibration, he notes that is is still useful for evaluating general print quality and settings.

[Stefan] has always done rigorous testing to back his claims, and this video was no different. He has also tested the effects of filament color on part strength, the practicality of annealing parts in salt, and even printing custom filament.

Continue reading “The Case Against Calibration Cubes”

Art of 3D printer in the middle of printing a Hackaday Jolly Wrencher logo

3D Printering: Speed Is So Hot Right Now

Speed in 3D printing hasn’t been super important to everyone. Certainly, users value speed. But some value quality even more highly, and if gaining quality means giving up speed, then so be it. That’s more or less how things stood for a while, but all things change.

The landscape of filament-based 3D printing over the past year or so has made one thing clear: the market’s gotten a taste of speed, and what was once the domain of enthusiasts installing and configuring custom firmware is now a baseline people will increasingly expect. After all, who doesn’t want faster prints if one doesn’t have to sacrifice quality in the process?

Speed vs. Quality: No Longer a Tradeoff

Historically, any meaningful increase in printing speed risked compromising quality. Increasing print speed can introduce artifacts like ringing or ghosting, as well as other issues. Printing faster can also highlight mechanical limitations or shortcomings that may not have been a problem at lower speeds. These issues can’t all be resolved by tightening some screws or following a calibration process.

The usual way to get into higher speed printing has been to install something like Klipper, and put the necessary work into configuring and calibrating for best results. Not everyone who prints wishes to go this route. In 3D printing there are always those more interested in the end result than in pushing the limits of the machine itself. For those folks, the benefits of speedy printing have generally come at too high a cost.

That’s no longer the case. One can now buy a printer that effectively self-calibrates, offers noticeably increased printing speeds over any earlier style machines, and does it at a reasonable price.

Continue reading “3D Printering: Speed Is So Hot Right Now”

Building A Cable-Driven Delta Printer

Most of us have played with a Cartesian-style 3D printer. Maybe you’ve even built a rigid delta. In this case, [Diffraction Limited] decided to a little further away from the norm with a cable-based delta design.

This delta design uses direct cable drives to control the end effector, with preloading rods effectively decoupling the preload from the drive force. Thus, the motors only have to provide enough power to move the end effector around without fighting the tension in the cables. The end effector is nice and light, because the motors remain stationary. With lightly-loaded motors and a lightweight effector, rapid accelerations are possible for faster printing. The video does a great job of explaining how the winch-based actuation system works to move the mechanism quickly and accurately. It’s a pleasure to watch the delta robot bouncing around at high speed as it executes a print.

The video notes that it was a successful build, though difficult to calibrate. The strings also wore out regularly. The truth of the matter is, delta printers are just more fun to watch at work than their less-controversial Cartesian cousins. Video after the break.

Continue reading “Building A Cable-Driven Delta Printer”

3D Printed Screw Compressor Revisited

[Indeterminate Design] tried to 3D print a screw compressor some time ago but wasn’t satisfied with the result. He’s trying it again, and you can check it out in the video below. You can also download the 3D printable files.

This isn’t a 3D-printed keychain. The screw threads have to mesh with a small space between them, and the design is not trivial. Even if you don’t want to build your own, the look inside the engineering behind these devices is interesting, and there is quite a bit of background about how the rotor’s shapes are optimized.

Continue reading “3D Printed Screw Compressor Revisited”