Cheap Big Servo For Robot Arm

[Skyentific] is looking to push the hobbyist robotics state of the art. Motors and their gears, the actuators, are typically the most expensive part. For his build, he realised he needed big servos capable of delivering plenty of torque. Thus, he set about creating a 3D-printed design to get the job done on a budget. (Video, embedded below.)

Stepper motors are the order of the day here, chosen for their low cost compared to brushless solutions, particularly when taking control hardware into account. In this design, the stepper motor drives a sun gear as part of a bigger planetary gearbox with a high gear ratio. Cross-roller bearings are used to allow the servo to effectively handle both radial and axial loads. The servo as a whole is designed to fit neatly into the joints of the robot arm itself, and has external mounting points provisioned as such.

It’s a neat servo that somewhat apes those used on full-sized industrial designs, at least in the sense of being an integrated part of the joints of a robot arm. It also comes in at a relatively-cheap $32 based on the materials used by [Skyentific].

We’ve seen some related work from [Skyentific] before, too – like this interesting cable-driven joint. Video after the break.

Continue reading “Cheap Big Servo For Robot Arm”

Trying And (Mostly) Failing To 3D Print A Hydrofoil

[Sam Barker] had a boring dingy that he wanted to spice up a bit, so he resolved to 3D print a hydrofoil wing for it so that it could fly across the water. (Video, embedded below.)

With a large wing designed and sliced into several pieces, and a total print time of 200 hours, [Sam] was ready to glue the foil wing together when he realized his scale was way off and the wings were far too large for his boat. With some hacking, [Sam] was able to use a single wing across the bottom of the ship. [Tom Stanton] came over to help with fiberglassing, and they were ready for a test.

As you might have guessed from the title, the test wasn’t particularly successful. Swapping the engine on the boat for a more potent motor gave the lift he needed in the front, but without a back foil, it was a wheelie rather than what [Sam] hoped for. Back at home, they printed a second wing and went back for a second test. The boat would start to lift out the water, but the shaft of the engine lifted out of the water, sending him back down. Unfortunately, a downpour cut the test short.

Not to be defeated entirely, [Sam] connected it to a much larger boat once the weather cleared and pulled his dingy along behind. To [Sam’s] credit, they did get some solid foiling, and the ship did lift out of the water until the wings sheared off from the stress. All in all, an entertaining story of engineering while racing against the weather.

We admire [Sam’s] ambition, and if you’re thinking about building a whole hydrofoil, we suggest starting with a smaller RC model and scaling up from there.

Faster IPA Recycling For Your Resin Print Workflow

If you’ve printed with photopolymer resins, you know that you need alcohol. Lots of alcohol. It makes sense that people would like to reuse the alcohol both to be environmentally responsible and to save a little money. The problem is that the alcohol eventually becomes so dirty that you have to do something. Given time, the polymer residue will settle to the bottom and you can easily pour off most of the clean liquid. You can also use filters with some success. But [Makers Mashup] had a different idea. Borrowing inspiration from water treatment plants, he found a chemical that will hasten the settling process. You can see a video of his process below.

The experimentation started with fish tank clarifier, which is — apparently — mostly alum. Alum’s been used to treat wastewater for a long time. Even the ancient Romans used it for that purpose in the first century. Alum causes coagulation and flocculation so that particles in the water wind up sinking to the bottom.

Continue reading “Faster IPA Recycling For Your Resin Print Workflow”

Most FDM Printers Are Also Filament Dryers (with A Little Help)

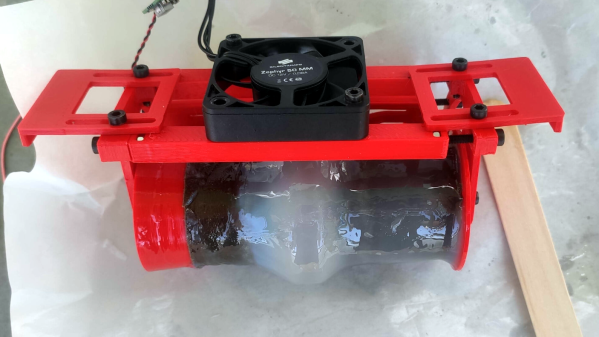
If you’ve printed with an FDM printer, you probably know there are many interrelated factors to getting a good print. One key item is the dryness of the filament. When you first crack your plastic open, it should be dry. Most filament is packed in a sealed bag with desiccant in it. But if you have the filament out for a while, it soaks up moisture from the air and that causes lots of problems. [Design Prototype Test] has built and bought filament dryers before, but now he would like to point out that every FDM printer with a heated bed can act as a filament dryer. You can see the details in the video below.

It turns out that the idea isn’t original, but it doesn’t seem to be one that has caught on. What the video shows though, is to take the idea and run with it. A 3D printed support sits on the bed and accepts a cheap PC fan. The whole affair gets boxed up with cardboard and can dry the filament.

Continue reading “Most FDM Printers Are Also Filament Dryers (with A Little Help)”

Streamline Your SMD Assembly Process With 3D-Printed Jigs

Your brand-new PCBs just showed up, and this time you even remembered to order a stencil. You lay the stencil on one of the boards, hold it down with one hand, and use the other to wipe some solder paste across…. and the stencil shifts, making a mess and smearing paste across the board. Wash, rinse (with some IPA, of course), repeat, and hope it’ll work better on the next try.

openscad window
A PCB jig generated by OpenSCAD

Maybe it’s time to try Stencilframer, a 3D-printable jig generator created by [Igor]. This incredibly useful tool takes either a set of gerbers or a KiCad PCB file and generates 3D models of a jig and a frame to securely hold the board and associated stencil. The tool itself is a Python script that uses OpenSCAD for all 3D geometry generation. From there, it’s a simple matter to throw the jig and frame models on a 3D printer and voilĂ !– perfectly-aligned stencils, every time.

This is a seriously brilliant script. Anyone whose gone through the frustration of trying to align a stencil by hand should be jumping at the opportunity to try this out on their next build. It could even be paired with an Open Reflow hot plate for a fully open-source PCB assembly workflow.

Continue reading “Streamline Your SMD Assembly Process With 3D-Printed Jigs”

This $0 Filament Drybox Needs Nearly No Parts

All 3D printer filament benefits from being kept as dry as possible, but some are more sensitive to humidity than others. The best solution is a drybox; a sealed filament container, usually with some desiccant inside. But in a pinch, [Spacefan]’s quick and dirty $0 drybox solution is at least inspiring in terms of simplicity.

The only added part is this 3D-printed fitting.

[Spacefan]’s solution uses a filament roll’s own packing materials and a single 3D-printed part to create a sealed environment for a single roll. The roll lives inside a plastic bag (potentially the same one it was sealed in) and filament exits through a small hole and 3D-printed fitting that also uses a bit of spare PTFE tubing. The box doubles as a convenient container for it all. It doesn’t have as much to offer as this other DIY drybox solution, but sure is simple.

While we appreciate the idea, this design is sure to put a lot of friction on the spool itself. It will be a lot of extra work to pull filament off the spool, which needs to turn inside a bag, inside a box, and that extra work will be done by the 3D printer’s extruder, a part that should ideally be working as little as possible. The re-use of materials is a great idea, but it does look to us like the idea could use some improvement.

What do you think? Useful in a pinch, or needs changes? Would adding a spindle to support the spool help? Let us know what you think in the comments.

A functioning model of the Wunderwaffe DG-2 from Call of Duty: Zombies.

DIY Wunderwaffe And Others Make Up This Open-Source Arsenal

Unless you stay up all night and have a dozen printers going, it’s probably way too late to make one of these beautiful prop weapons designed by [Andrew] of The Ray Gun Project in time for Halloween. Most of them are from Call of Duty: Zombies, though there is an awesome little disco grenade from Fortnite as well.

All of the projects are fantastic, but we chose to highlight the Wunderwaffe DG-2 from COD: Zombies because, well, vacuum tubes. For those unfamiliar with the ‘waffe’s operation, those vacuum tubes act as ammo magazines. Once they’re empty, you power them down with that big red switch and eject them one at a time with the lever, just like in the game.

Inside is a Feather M0 Express that runs the RGB LEDs and uses a Hall effect sensor to read magnets in the quick-change ammo magazine. You can see how it works in the demo video after the break.

There are BOMs for several of the prop weapons, along with assembly drawings and support forums for anyone who wants to build their own. Don’t feel like gathering all the bits and bobs yourself? [Andrew] is selling hardware packs for the ray gun, but you’ll have to scrounge the parts yourself if you want to build the Wunderwaffle.

Are you a Grinch who wants to keep kids off of your lawn? Scare ’em off with a giant NERF gun.

Continue reading “DIY Wunderwaffe And Others Make Up This Open-Source Arsenal”