Fractal Vise Holds Odd-Shaped Objects Tight

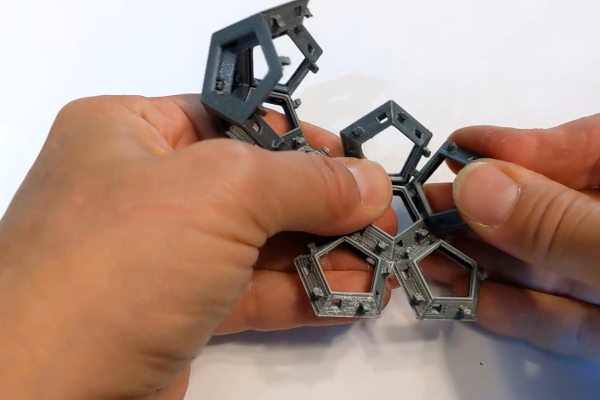
A regular vice is great if you want to clamp rectangular objects, but it can fall down a little with more complex shapes. Inspired by an ancient vise [Chris Borge] whipped up his own 3D-printed fractal clamping tool.

The inspiration for this one comes from the [Hand Tool Rescue] video that shows of the clever mechanism. The vice uses a series of interlocking parts that can freely articulate to grip the object of interest via several protruding fingers. In reproducing the design, [Chris] had some issues initially with the joints, but settling on a dovetail similar to that of the original metal vice which got things working nicely.

[Chris] notes that while the design works, it could still use some refinement. Silicone or rubber tips on the fingers could give the vice better grip, and there remain some flexural issues that could be improved. Overall, however, it’s a useful table vice for small jobs on weird shaped things. We’ve seen 3D-printed vices before, particularly in the PCB vice space, but the grip scheme user here is totally unique.

Continue reading “Fractal Vise Holds Odd-Shaped Objects Tight”

3D Printed Copper Rocket Nozzle Costs Under Two Grand

You don’t think of hobby-grade 3D printing as a good method for creating rocket nozzles. But [Mister Highball] managed to create a copper nozzle using a common printer, a kiln, and some special copper-bearing filament.

The copper filament is about 90% metal. Virtual Foundry recommends preheating it before printing and you have to sinter it in an oven to remove the plastic and leave a solid metal piece which will, of course, shrink.

Continue reading “3D Printed Copper Rocket Nozzle Costs Under Two Grand”

3D Printed Parts Make For A Quick Electric Scooter Build

Sometimes, walking even a short distance can grow boring if it’s a part of your regular routine. [Alexandre Chappel] found himself in just such a position, so elected to quickly whip up a scooter to get around on.

The build is very much of the “parts laying around the shop” genre. An old skateboard deck was fitted with nice rubber scooter wheels and a set of handlebars thanks to a series of 3D printed parts. Unfortunately, the first revision had problems with flex in the skateboard deck, which isn’t designed to take the full weight of an adult human standing on one leg. Another skateboard deck was pressed into service, reinforced with a metal pipe for added strength.

From there, [Alexandre] set about creating a front-wheel-drive system using a power drill, several shaft extensions, and a right-angle drive. Clamped to the handlebar tube, the drill’s trigger is controlled via a twist throttle linked up by a string.

It’s not the easiest scooter to ride, with a bit too much torque from a standing start and somewhat scary handling characteristics at times. However, we’re sure with some practice and some tweaks, [Alexandre] will have a useful ride on his hands. If you prefer something wilder, however, consider this walking scooter build. Video after the break.

Continue reading “3D Printed Parts Make For A Quick Electric Scooter Build”

How To Make A Collapsible Container Without Breaking Down

How hard could it be to make a collapsible silicone container? Turns out, it’s really, really hard — collapsible containers have rigid guidelines. Just ask [Eric Strebel], who failed dozens of times before finally getting it right (video, embedded below).

[Eric] started with an SLA-printed two-part mold and a silicone formulation with a Shore durometer of A 40 — this is the measure of hardness for silicone, polymers, and elastomers in the sense that the piece will resist indentation. The first twenty-four attempts all came out looking great, but not a single one of them would collapse and stay collapsed.

Eventually, [Eric] went back to the drawing board and played with the angles of the flex points, the thickness of the living hinges, and the wall thicknesses, which have to be strong enough to stay collapsed.

For attempt #25, [Eric] took the part out of the mold about three hours in and tried curing it in the collapsed state. Persistence paid off, and the part finally collapses and stays that way. Get yourself some popcorn and check out the fail-fest after the break. You know what we always say — fail fast, fail often.

[Eric] has made many molds both from silicone and for silicone. Some of them are really big!

Continue reading “How To Make A Collapsible Container Without Breaking Down”

A New Spin On Empty Filament Spools For Part Storage

Empty spools from 3D printer filament are the kind of thing that begs to be repurposed, and one option is [3d-printy]’s vertical filament spool parts drawer design. The way this solution works is by using the spool to hold twelve vaguely pie-shaped drawers that can be individually unlocked and removed entirely, which makes accessing their contents (or dumping them out) much easier. This method requires the spools to be oriented vertically, so it ends up handling a bit like a Rolodex.

One downside of the design is that it requires two inserts to be installed on the inside of the spool walls, which act as guide rails and lock points for the drawers. Another is that managing a vertical spool can be a bit awkward, given its lack of flat surfaces. Happily, there is an option for a matching stand that not only provides a flat base, but keeps any accidentally-unlocked drawers from falling out and spilling their contents.

The project files are OpenSCAD files, which allows easy customization for different spool manufacturers and dimensions, and [3d-printy] provides measurements for some common ones. Another nice element of this design is that no single part uses more than 30 grams of filament, which makes printing them an attractive way to use up the last bits of filament rolls.

We’ve seen drawer-style storage for filament spools before, but haven’t seen a design quite like this one before. Watch an overview of the drawer design as well as the spool holders in the videos, embedded below.

Continue reading “A New Spin On Empty Filament Spools For Part Storage”

Machine Extrudes Filament

We’ve seen a lot of homebrew filament extruders, but [Stefan] at CNC Kitchen shows off a commercial desktop filament extruder in his latest video, which you can see below. The 3DEVO extruder is pretty slick but at around $7,000-$8,000 we probably won’t rush out and buy one. We might, though, get some ideas from it for our next attempt to build something similar.

In concept, any machine that creates filament is pretty straightforward. Melt pellets and push them out of a nozzle. Cool the filament and wind it up. Easy, right? But, of course, the problems are all in the details. Die swell, for example, means you can’t just assume the nozzle’s hole size will give you the right size filament. Continue reading “Machine Extrudes Filament”

PetBot: Turn PET Bottles Into Filament

Recycling plastic into filament normally involves chopping it into tiny pieces and pushing it through a screw extruder. [JRT3D] is taking a different approach with PetBot, which cuts PET bottles into tape and then turns it into filament. See the videos after the break.

Cutting the tape and extrusion happens in two completely separated processes on the same machine. A PET bottle is prepared by cutting off the bottom, and the open rim is pushed between a pair of bearings, where a cutter slices the bottle into one long strip, as a driven spool rolls it up. The spool of tape is then moved to the second stage of the machine, which pulls the tape through a hot end very similar to that on a 3D printer. While most conventional extruders push the plastic through a nozzle with a screw, the PetBot only heats up the tape to slightly above its glass transition temperature, which allows the driven spool to slowly pull it through the nozzle without breaking. A fan cools the filament just before it goes onto the spool. The same stepper motor is used for both stages of the process.

We like the simplicity of this machine compared to a conventional screw extruder, but it’s not without trade-offs. Firstly is the limitation of the filament length by the material in a single bottle. Getting longer lengths would involve fusing the tape after cutting, or the filament after extrusion, which is not as simple as it might seem. The process would likely be limited to large soda bottle with smooth exterior surfaces to allow the thickness and width of the tape to be as consistent as possible. We are curious to see the consistency of the filaments shape and diameter, and how sensitive it is to variations in the thickness and width of the tape. That being said, as long as you understand the limitations of the machine, we do not doubt that it can be useful. Continue reading “PetBot: Turn PET Bottles Into Filament”