Forgettable Computer, Great Keyboard. Now Available In USB

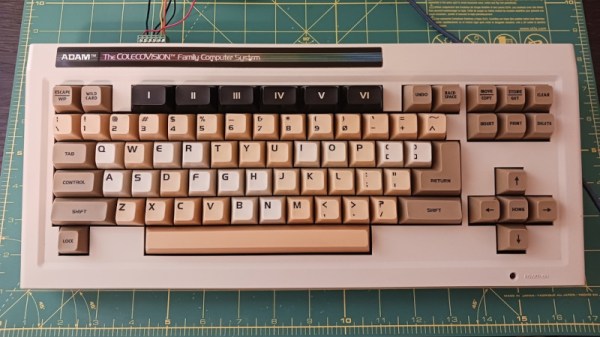
The Coleco Adam is one of the great might-have-beens of the 8-bit home computer era, with an impressive bundle and on-paper spec let down by bugs, hardware issues, and poor availability. It’s something of a footnote today but it seems Coleco did get something right as it had a great keyboard. [Nick Bild] has one, and he’s brought it into the 21st century with a USB interface.

The interfacing is courtesy of a Teensy microcontroller board as in so many other keyboard projects, but what makes this extra-interesting is the way the Coleco keyboard speaks to the world. Instead of merely being a matrix peripheral as were so many of its contemporaries, Coleco created their own custom serial bus for Adam desktop peripherals called AdamNet, and thus the keyboard contains its own 6801 microcontroller to perform the interfacing. The Teensy then is a USB-to-AdamNet interface, and could we’re guessing be made to talk to other Coleco peripherals if they exist.

You can see the keyboard in action below the break, and as you can see it fits quite nicely into 2023.  We’ve not featured much about the Adam before here at Hackaday, but the ColecoVision console which sits at its heart has even seen a new version.

Continue reading “Forgettable Computer, Great Keyboard. Now Available In USB”

Build A DIY Space Mouse For A More Efficient CAD Workflow

When you find yourself doing a lot of work in 3D modelling, you occasionally wish for something more capable than the humble two-dimensional mouse. A space mouse is a great tool in this regard, and [Salim Benbouziyane] was inspired to build his own.

[Salim] started his work with research, by watching a teardown of a Connexion Space Navigator 3D mouse. This informed him of the basic functionality and the workings inside. The commercial product appears to use an optical sensor setup, but [Salim] decided to go with a magnetic sensor setup instead due to the parts he had on hand. Namely, a 3-axis magnetometer which seemed perfect for the task.

The build uses a motion platform mounted on six springs which translates and rotates in three dimensions as required. The magnetometer is mounted on the platform above a stationary set of neodymium magnets. Thus, when the platform, and thus sensor, moves, the magnetometer’s output can be used to determine the motion of the platform and translate that into useful viewport commands for CAD software. A RP2040 is charged with reading the magnetometer and acting as a USB HID device. It’s all wrapped up in a neat 3D-printed housing.

For now, it’s a little simpler in its operation than a full 6 DOF Spacemouse, but it nonetheless has helped [Salim]’s workflow improve. A good peripheral like this can be a real boon on the desktop; we’ve seen a few DIY projects in this realm for just that reason. Video after the break.

Continue reading “Build A DIY Space Mouse For A More Efficient CAD Workflow”

Custom Keyboard Built For Diablo 3 Action

Custom mechanical keyboards are a great way to show off your passion and skill for electronics and design. They’re also perfect when you need to optimize your setup for a certain game or piece of software. [Pakequis] did just that with his Bad Thing of the Edge mechanical keyboard build.

[Pakequis] occasionally plays Diablo 3 on a tiny 7-inch laptop, which as you might expect, doesn’t have a keyboard conducive to gaming. Thus, he designed a mechanical keyboard with a series of important actions mapped to keys for the left hand. Naturally, that was an opportunity to have fun with the keycaps, which all feature graphics for their relevant in-game functions. The prototype was built with surplus keys from an old PTZ camera controller, but the final version runs Cherry MX switches. There are also a set of RGB LEDs with a variety of fun effects. The whole thing is run by a Raspberry Pi Pico, which is perfectly suited for building custom USB HID devices.

Hackers build custom keyboards for all kinds of reasons, like ergonomics, style, or just sheer absurdist fun.

Continue reading “Custom Keyboard Built For Diablo 3 Action”

Adapter Lets Digital Gamepads Work On The Tandy Color Computer

The Tandy Color Computer came with analog joysticks, quite unlike most computers and consoles of the early 1980s. Many games of the era actually worked best with digital input, so [Gadget Reboot] whipped up a converter board to allow Nintendo gamepads to work with the computer.

The build relies on an earlier breakout board that [Gadget Reboot] built in order to read early Nintendo gamepads and output a digital 5 V signal. Meanwhile, the Tandy Color Computer is expecting variable o-5 V signals from the X and Y axis pots in its standard joysticks. To convert the gamepad button presses into voltages for the CoCo, the build uses a CD4066 analogue switch IC. When no controller buttons are pressed, the 4066 is set up to output 2.5 V on both the X and Y axes. Pressing up or down, or left or right on the D-pad, outputs 0 V or 5 V respectively as required. This essentially lets the controller’s D-pad act as a digital joystick for a computer that never actually had one.

It’s a neat hack that might make playing certain games on the Color Computer significantly easier. It’s also just neat to interface a different controller to the old hardware. In the early 80s, computers were simple enough that this could all be achieved with a minimum of dumb circuitry.

Continue reading “Adapter Lets Digital Gamepads Work On The Tandy Color Computer”

Illustrated Kristina with an IBM Model M keyboard floating between her hands.

Keebin’ With Kristina: The One With The Mouse-cropad

Okay, so you built a macropad or even a keyboard. What now? Well, most people use some kind of mouse to go along with it, but no one uses a mouse like this creation by [Joe_Scotto].

This is the mouse no one asked for, and yet I think it’s pretty awesome for something that’s supposed to be a joke. Maybe it’s in the great execution, I don’t know. I will ignore the suggestion that MX Browns are part of the joke, however. *cries in OG tactility*

Essentially, this is a macropad that uses QMK mouse keys to emulate a mouse. The build itself couldn’t be more straightforward — it’s six MX browns wired up to six pins on a Pico, and they all share a common ground. Keep the joke going by commissioning one from [Joe] or building it yourself.

Via [r/cyberdeck]

News: Microsoft Discontinues Natural Keyboard

Image via Wikipedia

It’s often people’s first ergonomic keyboard — some variation of Microsoft’s Natural keyboard, that 90s split that took up so much real estate on the desk with it’s built-in wrist rest.

I’ll admit that despite using one for years at the office, I went back to whatever clicky rectangles I could get from the IT department. Then came the pain, and I got a Logitech Wave. Then came the surgery, and the Kinesis Advantage.

Well, now it seems that after 30 years and several ergonomic models, Microsoft are exiting the keyboard game. While I don’t personally understand why when there are so many fans, [Jeff Atwood] believes it’s because keyboards are exploding in popularity and tons of people are building their own. While that may be true, there are legions of normies trying to stave off carpal and cubital tunnel syndrome and have absolutely no interest in building anything, much less a keyboard. So, get these things while they’re hot, I guess.

Continue reading “Keebin’ With Kristina: The One With The Mouse-cropad”

A blue PCB remote control

The Remoteduino Nano Is A Tiny IR Remote That’s Truly Universal

Universal remotes are extremely convenient if they work correctly. But setting them up can be quite a hassle: often, you need to browse through long lists of TV models, key in the codes on the remote with just a blinking LED as confirmation, and then pray that the manufacturer included the correct codes for all your equipment. IR isn’t a very complicated technology, however, so it’s perfectly possible to roll your own universal remote, as [sjm4306] shows in his latest project, the Remoteduino Nano. It’s a fully programmable IR remote that gives you maximum flexibility when emulating the codes for those obscure A/V systems scattered around your home.

The remote runs on an ATmega328p in a tiny QFN package, which drives a standard 5 mm IR LED through a transistor. Eight buttons are available to the user, which can be freely mapped to any desired code. A five-pin header is included to program the ATmega through its serial port. However, this was mainly done to help debug – a user who only needs to program the device once would typically use a pogo-pin-based adapter instead.

Currently, codes can only be programmed through the serial port, but there’s also an IR receiver present that can be used to copy codes from an existing remote. [sjm4306] hasn’t implemented this feature in software yet, but will probably do so in a future update of the project’s Arduino sketch. If you’re impatient, you can also have a go at it yourself since all code and the board’s Gerber files are freely available for download.

Its tiny size makes the Remoteduino Nano a convenient tool to keep in your drawer if you like to tinker with A/V systems and keep losing those remotes. The Nano is actually an improved version of the original Remoteduino project that [sjm4306] developed a couple of years ago. The problem of a truly universal remote is one that dates back several decades, however.

Continue reading “The Remoteduino Nano Is A Tiny IR Remote That’s Truly Universal”

It’s Never Too Late To Upgrade Your ZX81 Keyboard

Sir Clive Sinclair’s ZX81 was a phenomenal sales success as one of the cheapest machines available in the early 1980s, but even its most fervent admirers will admit that it suffered heavily from the Sinclair economy drive. In particular that membrane keyboard was notorious for its lack of feedback, and a popular upgrade back in the day was a replacement keyboard. Now we can bring you what might be the ultimate in ZX replacement keyboards, in the form of [Brian Swetland]’s mechanical ZX81 keyboard.

The familiar 40-key layout is all there, using Cherry MX key switches and a beautiful set of custom-printed keycaps. There’s little more to a ZX keyboard than the matrix wiring, and in this case it’s all incorporated on a PCB. None of these techniques were readily available to individuals back in the ’80s, so a large piece of perfboard, key switches from an old terminal keyboard, and Letraset would have had to suffice.

We have to admit liking this project a lot, in fact we’re even tempted by a set of these keycaps for a regular keyboard just for old time’s sake. If you’re interested in the ZX81 then take a look at how we used one to help us through the pandemic.