Thinnest Keyboard Uses Cherry DIY Doubleshot Method

As with any other community, it takes all kinds to make the keyboard world go ’round. Some like them thicc — more backing for the clacking and all — but some like them sleek and prefer the slimmest possible keyboard. For now and the foreseeable future, the go-to method for making whisper-thin keebs is to use Kailh Choc switches, because that’s about all that’s out there.

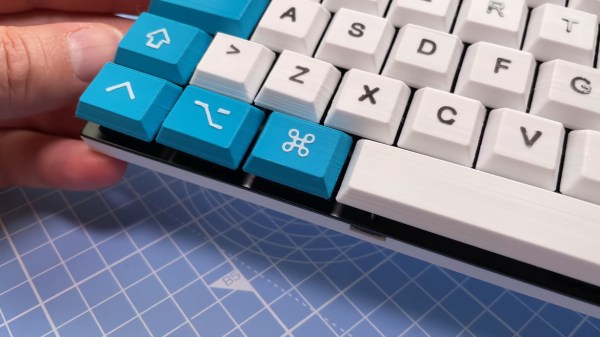
But chocs aren’t for everyone, and there are plenty of die-hard Cherry fans out there that want it both ways. Being one among them, [Khmel] set about designing the lowest-profile possible keyboard (and caps) that uses standard Cherry-sized keyswitches. Shut up and take your money? Well, okay, but the case and keycap files are all available on Thingiverse, so.

The whole video is great, and at less than 2½ minutes long, it’s definitely worth your time. There are a few little gems of wisdom sprinkled throughout, like printing keycaps standing up on their backsides (like where they would have a little flash dot if they were factory-molded). This gives them a nice texture thanks to the layer lines. But the real reason we’re here today is this DIY method for making doubleshot keycaps with little fuss that [Khmel] just tosses out there toward the end.

Trust us, there’s a piece of glass there.

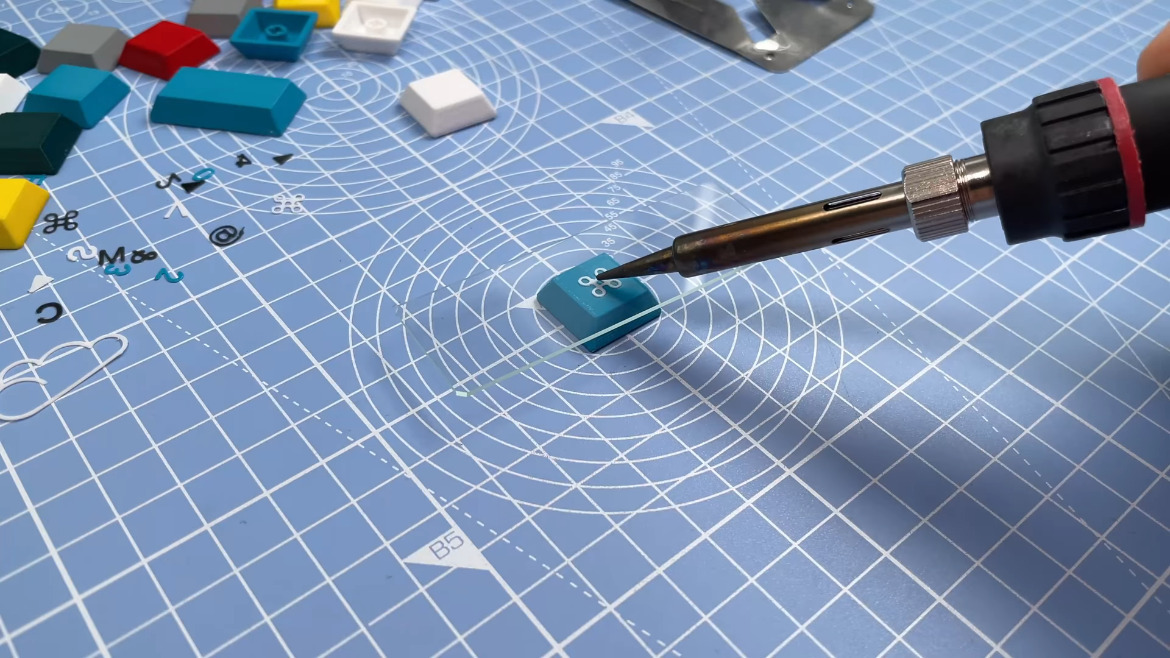
Traditionally, doubleshot keycaps are made with two layers of plastic — one for the legend, and one for the rest. This produces a quite durable keycap and (used to be the norm), but the expensive process gave way to laser-etched and pad-printed keycap legends in the ’90s. [Khmel] was able to fake the look by printing legends at 0.25 layer height and then fusing each one to its respective keycap by laying a thin piece of glass (think microscope slide) on top and applying a soldering iron for a few seconds. Classy!

Tweezing tiny legends not really your kind of tedium? Here’s a method for DIY waterslide decals instead.

Continue reading “Thinnest Keyboard Uses Cherry DIY Doubleshot Method”

Mods Make A Stock Keyboard Your Own

Trust me, you don’t have to build your own keyboard from the deskpad up to be happy or feel like one of the cool kids. Sure, it doesn’t hurt, but not everyone is able to or even wants to start from next to nothing. Take [Roger] for example. [Roger] started with a stock mechanical keeb — the Ultimate Hacking Keyboard (UHK) — which can be outfitted with magnetic add-on modules such as a thumb key cluster, trackball, trackpoint, and touch pad, and made it his own.

While the stock board that you choose may not be so option-laden, there are plenty of other things one can do to customize things, and [Roger] did basically all of them. The Kailh browns that the UHK came with were too loud, so [Roger] swapped them out for Zilent V2 Silent tactiles and dampened the case with plenty of neoprene foam.

[Roger] frequently switches between two keyboard layouts, which got confusing at times. But instead of boring blank keycaps, he scrounged around until he found a cool set. (We do like the way they look with the wood wrist rests.) Speaking of those wrist rests, the right one is carved out and hiding a 10,000 mAh power bank, because [Roger] also made the UHK wireless using one of those often-out-of-stock BT-500 Bluetooth adapters. This allows him to switch between two PCs with a keyboard shortcut.

Think you want to go split, but not sure about key wells and column stagger and all that jazz? Something like the UHK is a good place to start, because it takes the familiar brick wall layout and breaks it into two pieces. No idea what you want? Check out the split keyboard finder.

Pico Chording Keyboard Is Simultaneously Vintage And New

On paper, chording — that’s pressing multiple keys to create either a single character or a whole word — looks like one of the best possible input methods. Maybe not the best for speed, at least for a while, but definitely good for conserving the total number of keys. Of course, fewer keys also makes for an easier time when it comes to building keyboards (as long as you don’t have to code the chording software). In fact, we would venture to guess that the hardest part of building your own version of [CrazyRobMiles]’s Pico Chord Keyboard would be teaching your fingers how to work together to chord instead of typing one at a time.

[CrazyRobMiles] took inspiration from the Cykey chording design used for the Microwriter and later, the Microwriter Agenda that also featured a qwerty blister keyboard. Both featured small screens above the six keys — one for each finger, and two for the thumb. While the original Microwriter ran on an 8-bit microprocessor, Pico Chord Keyboard uses — you guessed it — the Raspberry Pi Pico.

We love that [CrazyRobMiles] went with four 14-segment displays, which gives it a nice old school feel, but used transparent keycaps over Kailh switches. This is actually important, because not only do the LEDs show what mode you’re in (alpha vs. numeric vs. symbols), they also teach you how to chord each letter in the special training game mode. Be sure to check it out in the video after the break.

Isn’t it cool that we live in a world of relatively big keyboards with few keys and tiny keyboards with all the keys?

Continue reading “Pico Chording Keyboard Is Simultaneously Vintage And New”

Audio Eavesdropping Exploit Might Make That Clicky Keyboard Less Cool

Despite their claims of innocence, we all know that the big tech firms are listening to us. How else to explain the sudden appearance of ads related to something we’ve only ever spoken about, seemingly in private but always in range of a phone or smart speaker? And don’t give us any of that fancy “confirmation bias” talk — we all know what’s really going on.

And now, to make matters worse, it turns out that just listening to your keyboard clicks could be enough to decode what’s being typed. To be clear, [Georgi Gerganov]’s “KeyTap3” exploit does not use any of the usual RF-based methods we’ve seen for exfiltrating data from keyboards on air-gapped machines. Rather, it uses just a standard microphone to capture audio while typing, building a cluster map of the clicks with similar sounds. By analyzing the clusters against the statistical likelihood of certain sequences of characters appearing together — the algorithm currently assumes standard English, and works best on clicky mechanical keyboards — a reasonable approximation of the original keypresses can be reconstructed.

If you’d like to see it in action, check out the video below, which shows the algorithm doing a pretty good job decoding text typed on an unplugged keyboard. Or, try it yourself — the link above implements KeyTap3 in-browser. We gave it a shot, but as a member of the non-mechanical keyboard underclass, it couldn’t make sense of the mushy sounds it heard. Then again, our keyboard inferiority affords us some level of protection from the exploit, so there’s that.

Editors Note: Just tried it on a mechanical keyboard with Cherry MX Blue switches and it couldn’t make heads or tails of what was typed, so your mileage may vary. Let us know if it worked for you in the comments.

What strikes us about this is that it would be super simple to deploy an exploit like this. Most side-channel attacks require such a contrived scenario for installing the exploit that just breaking in and stealing the computer would be easier. All KeyTap needs is a covert audio recording, and the deed is done.

Continue reading “Audio Eavesdropping Exploit Might Make That Clicky Keyboard Less Cool”

Toast Keyboard Raises A Glass To Short Index Fingers

Custom keyboards? They’re totally great. And we can keep telling you this, but you really won’t feel it until you try a few and find one or two that are right for you. If you’re already on board, we wonder: is there any limit to what custom keyboards can provide in terms of a good, comfortable time for your fingers, wrists, arms, shoulders, and neck? We think not, and as time goes on, there is more and more evidence to support this.

Take [vpzed]’s Toast keyboard for example. The beauty of customization is that as with any other human input problem, you’ll discover many more people who share your misery once you present a solution. In this case, it is the portion of the population whose index fingers are shorter than their ring fingers (which is evidently men in general). This is known as the 2D:4D ratio and is decided during gestation. At first, the phenomenon was thought to be due to high testosterone exposure in the womb, but subsequent studies have debunked this belief.

Toast aims to sate the need for a keyboard layout that accounts for a significantly shorter 2D than 4D by way of aggressively staggering the index finger’s key positions and staggering the columns overall. As you might imagine, there are no inner keys for length-challenged index fingers to grasp at — that would just be cruel. But there is another pinky column on each hand, which bring the key total to 34. We like the square boards, and frankly wish they were bread-shaped.

Not enough keys for you? Take a look at this many-keyed monoblock split with a numpad in the middle.

via KBD

Hand-Built Metal Mouse Is Beautifully Engraved

Computer mice, like computers themselves, used to be built almost solely in hideous beige designs. These days, things are a bit more stylish, but they’re still largely following a simple plastic formula. [Uri Tuchman] decided to build a fancy metal engraved computer mouse for a little more style on the desktop.

The build starts by gutting a simple three-button scroll mouse, as there’s really no sense in reinventing the wheel where the electronics is concerned. The PCB inside is pulled out and assembled on a brass baseplate, along with standoffs and supports for the mouse wheel as needed. It’s paired with a hefty brass enclosure with a nice gentle slope to sit well in the hand. Or, as well as it can, given the square  metal edges of the finished product.

The build is full of fun details, like [Uri] trying to form a hex shaft by hand, and the work that goes into the engraving is similarly impressive. In any case, it’s a build that would pair wonderfully with a proper steampunk keyboard. Alternatively, if you hate the idea of having to do all that engraving by hand, think about building your own CNC machine. Video after the break.

Continue reading “Hand-Built Metal Mouse Is Beautifully Engraved”

Physical Control Panel Elevates Flight Sim Experience

Like so many of us, [pgsanchez] has been bitten by the flight simulator bug. It’s a malady that can only be treated, but never cured — and like so many hobbies, it has a nasty tendency to spawn more hobbies. A software developer by trade, [pgsanchez] is also adept with Arduino and electronics, and his blog post about the PGS-2 Flight Simulator Control Panel demonstrates his fine abilities well, as does the video below the break.

A player of Digital Combat Simulator, he grew tired of having to remember awkward key combinations to control the simulator. Flying a jet, even in a simulator, can require quick thinking bound with quick reflexes, so having a button to press, a switch to flip, or a knob to turn can be vastly superior to even the simplest keyboard based command.

An Arduino interfaces the buttons to the computer, and a white acrylic case is employed to keep all the parts flying in formation. Yes, a white case — with great care taken to allow the case to be backlit. The effect is excellent, and it looks like the panel would be right at home in the Sukhoi Su-25T that it’s designed to control in the game.

We appreciated the attention to detail in the panel, as even the gear status lights and flap indicators match those in the simulator, a nice touch! What more could [pgsanchez] build? We’d like to see! If you’re into flight sims and the like, you might be interested in this fully 3D printed flight sim controller.

Continue reading “Physical Control Panel Elevates Flight Sim Experience”