Simple, Self-Contained LoRa Repeater In About An Hour

[Dave Akerman]’s interest in high-altitude projects means he is no stranger to long-range wireless communications, for which LoRa is amazingly useful. LoRa is a method of transmitting at relatively low data rates with low power over long distances.

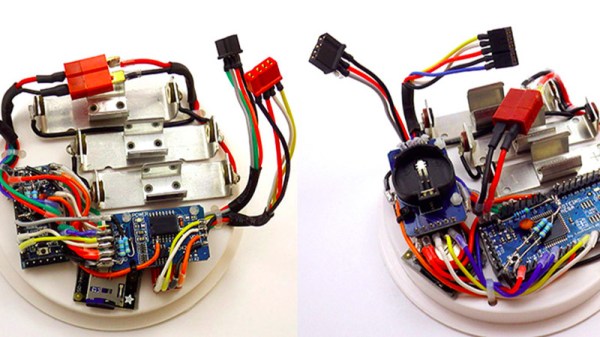
Despite LoRa’s long range, sometimes the transmissions of a device (like a balloon’s landed payload) cannot be received directly because it is too far away, or hidden behind buildings and geography. In these cases a useful solution is [Dave]’s self-contained LoRa repeater. The repeater hardware is simple, and [Dave] says that if one has the parts on hand, it can be built in about an hour.

The device simply re-transmits any telemetry packets it receives, and all that takes is an Arduino Mini Pro and a small LoRa module. A tiny DC-DC converter, battery, and battery charger rounds out the bill of materials to create a small and self-contained unit that can be raised up on a mast, flown on a kite, or carried by a drone.

The repeater’s frequency and other settings can even be reprogrammed (using a small windows program) for maximum flexibility, making the little device invaluable when going hunting for landed payloads like the one [Dave] used to re-create a famous NASA image using a plastic model and a high-altitude balloon. Check out the details on the GitHub repository for the project and start mashing “add to cart” for parts at your favorite reseller.

A Physical Knob For Browser Tabs

If you’re like most of us, you have about twenty browser tabs open right now. What if there were a way to move through those tabs with a physical interface? That’s what [Zoe] did, and it’s happening with the best laptop ever made.

The hardware for this build is simply an Arduino and a rotary encoder, no problem there. The firmware on the Arduino simply reads the encoder and sends a bit or two of data over the serial port. This build gets interesting when you connect it to a Firefox extension that allows you to get data from a USB or serial port, and there’s a nice API to access tabs. Put all of this together, and you have a knob that will scroll through all your open tabs.

This build gets really good when you consider there’s also a 3D printed mount, meant to attach to a Thinkpad X220, the greatest laptop ever made. At the flick of a knob, you can scroll through all your tabs. It’s handy if you’re reading three or four or five documents simultaneously, or if you’re just editing video and trying to go through your notes at the same time. A great invention, and we’re waiting for this to become a standard device on keyboards and mice. Check out the video below.

Continue reading “A Physical Knob For Browser Tabs”

A Chrome Extension For Configuring RGB LEDs

Like pretty much all of us, [Andy Schwarz] loves RGB LEDs. Specifically he likes to put them on RC vehicles, such as navigation lights on airplanes or flashers and headlights on cars. He found himself often rewriting very similar Arduino code for each one of these installations, and eventually decided he could save himself (and all the other hackers in the world) some time by creating a customizable Arduino firmware specifically for driving RGB LEDs.

The software side of this project, which he’s calling BitsyLED, actually comes in two parts. The first is the firmware itself, which is designed to control common RGB LEDs such as the WS2812 or members of the NeoPixel family. It can run on an Arduino Pro Mini with no problems, but [Andy] has also designed his own open hardware control board based on the ATtiny84 that you can build yourself. Currently you need a USBASP to program it, but he’s working on a second version which will add USB support.

With your controller of choice running the BitsyLED firmware, you need something to configure it. For that, [Andy] has developed a Chrome extension which offers a very slick user interface for setting up colors and patterns. The tool even allows you to create a visual representation of your LEDs so you can get an idea of what it’s going to look like when all the hardware is powered up.

RGB LEDs such as the WS2812 are some of the most common components we see in projects today, mainly because they’re so easy to physically interface with a microcontroller. But even though it only takes a couple of wires to control a large number of LEDs, you still need to write the code for it all. BitsyLED takes a lot of the hassle out of that last part, and we’re very interested to see what the hacker community makes of it.

Continue reading “A Chrome Extension For Configuring RGB LEDs”

Driving A 16×2 LCD With Voltage Modulation

The basic 16×2 LCD is an extremely popular component that we’ve seen used in more projects than we could possibly count. Part of that is because modern microcontrollers make it so easy to work with; if you’ve got an I2C variant of the display, it only takes four wires to drive it. That puts printing a line of text on one of these LCDs a step or two above blinking an LED on a digital pin on the hierarchy of beginner’s electronics projects.

What’s that? Even four wires is too many? In that case, you might be interested in this hack from [Vinod] which shows how you can drive the classic 16×2 with data and power on the same pair of wires. You’ll still need a microcontroller “backpack” for the LCD to interpret the modulated voltage, but if you’ve got an application for a simple remote display, this is definitely worth checking out.

The basic idea is to “blink” the 5 V line so quick that a capacitor on the LCD side can float the electronics over the dips in voltage. As long as one of the pins of the microcontroller is connected to the 5 V line before the capacitor, it will be able to pick up when the line goes low. With a high enough data rate and a large enough capacitor as a buffer, you’re well on the way to encoding your data to be displayed.

For the transmitting side, [Vinod] is using a Python script on his computer that’s sending out the text for the LCD over a standard USB to UART converter. That’s fed into a small circuit put together on a scrap of perfboard that triggers a MOSFET off of the UART TX line.

We actually covered the theory behind this technique years ago, but it’s always interesting to see somebody put together a real-world example. There might not be too many practical uses for this trick in the era of dirt-cheap microcontrollers bristling with I/O, but it might make a fun gag at your hackerspace.

Continue reading “Driving A 16×2 LCD With Voltage Modulation”

Vintage Camera Flash Turned OLED Desk Clock

After covering a few of his builds at this point, we think it’s abundantly clear that [Igor Afanasyev] has a keen eye for turning random pieces of antiquated hardware into something that’s equal parts functional and gorgeous. He retains the aspects of the original which give it that unmistakable vintage look, while very slickly integrating modern components and features. His work is getting awfully close to becoming some kind of new art form, but we’re certainly not complaining.

His latest creation takes an old-school “Monopak” electronic flash module and turns it into a desk clock that somehow also manages to look like a vintage television set. The OLED displays glowing behind the original flash diffuser create an awesome visual effect which really sells the whole look; as if the display is some hitherto undiscovered nixie variant.

On the technical side of things, there’s really not much to this particular build. Utilizing two extremely common SSD1306 OLED displays in a 3D printed holder along with an Arduino to drive them, the electronics are quite simple. There’s a rotary encoder on the side to set the time, though it would have been nice to see an RTC module added into the mix for better accuracy. Or perhaps even switch over to the ESP8266 so the clock could update itself from the Internet. But on this build we get the impression [Igor] was more interested in playing with the aesthetics of the final piece than fiddling with the internals, which is hard to argue with when it looks this cool.

Noticing the flash had a sort of classic TV set feel to it, [Igor] took the time to 3D print some detail pieces which really complete the look. The feet on the bottom not only hold the clock at a comfortable viewing angle, but perfectly echo the retro-futuristic look of 50s and 60s consumer electronics. He even went through the trouble of printing a little antenna to fit into the top hot shoe, complete with a metal ring salvaged from a key-chain.

Late last year we were impressed with the effort [Igor] put into creating a retro Raspberry Pi terminal from a legitimate piece of 1970’s laboratory equipment, and more recently his modern take on the lowly cassette player got plenty of debate going. We can’t wait to see what he comes up with next.

Continue reading “Vintage Camera Flash Turned OLED Desk Clock”

Arduboy Goes Thin And Flexible For Portable Gaming

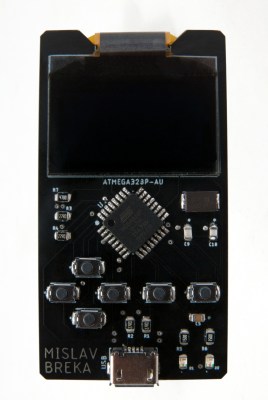
We all have a gaming system in our pocket or purse and some of us are probably reading on it right now. That pocket space is valuable so we have to budget what we keep in there and adding another gaming system is not in the cards, if it takes up too much space. [Kevin Bates] budgeted the smallest bit of pocket real estate for his full-size Arduboy clone, Arduflexboy. It is thin and conforms to his pocket because the custom PCB uses a flexible substrate and he has done away with the traditional tactile buttons.

Won’t a flexible system be hard to play? Yes. [Kevin] said it himself, and while we don’t disagree, a functional Arduboy on a flexible circuit makes up for practicality by being a neat manufacturing demonstration. This falls under the because-I-can category but the thought that went into it is also evident. All the components mount opposite the screen so it looks clean from the front and the components will not be subject to as much flexing and the inputs are in the same place as a traditional Arduboy.

cost = low, practicality = extremely low, customer service problems = high

     ~[Kevin Bates]

These flexible circuit boards use a polyimide substrate, the same stuff as Kapton tape, and ordering boards is getting cheaper so we can expect to see more of them popping up. Did we mention that we currently have a contest for flexible circuits? We have prizes that will make you sing, just for publishing your flex PCB concept.

Continue reading “Arduboy Goes Thin And Flexible For Portable Gaming”

Telephone Plays The Songs Of Its People

Music, food, and coding style have one thing in common: we all have our own preferences. On the other hand, there are arguably more people on this planet than there are varieties in any one of those categories, so we rarely fail to find like-minded folks sharing at least some of our taste. Well, in case your idea of a good time is calling a service hotline for some exquisite tunes, [Fuzzy Wobble] and his hold music jukebox, appropriately built into a telephone, is just your guy.

Built around an Arduino with an Adafruit Music Maker shield, [Fuzzy Wobble] uses the telephone’s keypad as input for selecting one of the predefined songs to play, and replaced the phone’s bell with a little speaker to turn it into a jukebox. For a more genuine experience, the audio is of course also routed to the handset, although the true hold music connoisseur might feel disappointed about the wide frequency range and lack of distortion the MP3s used in his example provide. Jokes aside, projects like these are a great reminder that often times, the journey really is the reward, and the end result doesn’t necessarily have to make sense for anyone to enjoy what you’re doing.

As these old-fashioned phones gradually disappear from our lives, and even the whole concept of landline telephony is virtually extinct in some parts of the world already, we can expect to see more and more new purposes for them. Case in point, this scavenger hunt puzzle solving device, or the rotary phone turned virtual assistant.

Continue reading “Telephone Plays The Songs Of Its People”