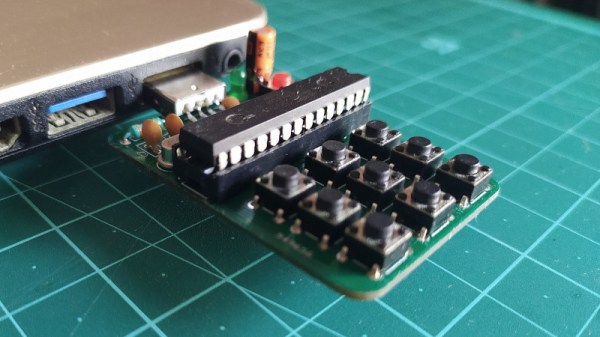
Learn Arduino In Time And In Tune For Christmas

If you’re one of the lucky ten thousand today who still haven’t tried programming electronics with the Arduino platform, this detailed guide by [Dafna Mordechai] should hopefully give you enough incentive to pick it up now and make a simple bit of Christmas-themed decoration with it.

The guide isn’t exactly aimed at complete ground-up beginners but it does give some pointers on where to look up whatever information you don’t have in order to follow along. Other than that, it’s very simple and has well-detailed steps, showing you how to turn a breadboard into a simple animated arrangement of LEDs in the shape of a Christmas tree, along with a piezo buzzer playing “Jingle Bells”. If you’ve never done this sort of stuff before, [Dafna] explains in pretty good detail which part of the code does what, making it pretty simple if you want to play around with it and customize it to your taste.

Once you’ve gotten the hang of the basics of Arduino, why not try a project that’s a little more elaborate? Without having to stray too far from your comfort zone, you can easily build a kid’s toy full of switches and lights or even a very extra clock that has no shortage of lights and dials.

Busy Box Beats Baby’s Boredom

We would love to be a fly on the wall Christmas morning to see [Wilksyonreddit]’s kid tear the paper off of this adult-level busy box. Can you imagine the unbridled glee? It should certainly make the arduous six-month build worth the trouble. Here’s hoping the walls are sturdy, because we predict they will be bounced off of.

This gift that keeps on giving has an Arduino MEGA clone inside and a couple of shift registers to deal with all those buttons and switches. In addition to all the buttons, switches, and the number pad, there are two 3D-printed touch sensor pads that can detect little fingers up to four inches away. Although he’s already built a few games and activities for it, [Wilksy] posted this in r/duino looking for more ideas. There’s a lot to work with here on baby’s first nuclear missile launch console, both input- and output-wise. We humbly suggest 4D Simon, though we must admit to fantasizing about MIDI controllers.

Hidden inside this Christmas present is an Easter egg we think you’ll appreciate. Enter the right code, and the box becomes a treasure trove of Back to the Future sound effects and audio clips. Video’s after the break, McFly.

This box would make a great Kerbal Space Program controller, too, like this one.

Continue reading “Busy Box Beats Baby’s Boredom”

Sleek, Sophisticated Skittle Sorter

Sorting candy by color is a classic problem that has its roots in the contract riders of rock stars who were just trying to make sure that more important contractual obligations were not being overlooked by concert venues. Through the years, candy sorting has become a classic problem for hobbyists to solve in various ways. After a false start a few years back, [little french kev] was compelled to dust off those plans and make the most compact sorter possible.

This minimalist beauty uses an Arduino Nano and RGB sensor to assess the color. At the top, a small servo rotates an arm inside the hopper that both shakes the Skittles and sets them up single file before the sensor. Another small servo spins the tube rack around to catch the rainbow. There’s an RGB LED in the base that bathes the tube from below in light that matches the Skittles. Check out the series of gifs on [little french kev]’s personal project site that show how each part works, and then watch the build video after the break.

Did you know you can roll your own color sensor from an RGB LED and a photocell? If you don’t think candy is so dandy, you could always color-sort your LEGO.

Continue reading “Sleek, Sophisticated Skittle Sorter”

3D Print Your Way To A Glass Cockpit Simulator

Today’s commercial aircraft are packed to the elevators with sensors, computers, and miles and miles of wiring. Inside the cockpit you’re more than likely to see banks of LCDs and push buttons than analog gauges. So what’s that mean for the intrepid home simulator builder? Modern problems require modern solutions, and this 3D printed simulator is about as modern as it gets.

Published to Thingiverse by the aptly named [FlightSimMaker], this project consists of a dizzying number of 3D-printed components that combine into a full-featured desktop simulator for the Garmin G1000 avionics system. Everything from the parking brake lever to the push buttons in the display bezels was designed and printed: over 200 individual parts in all. Everything in this X-Plane 11 compatible simulator is controlled by an Arduino Mega 2560 with the SimVim firmware.

To help with connecting dozens of buttons, toggle switches, and rotary encoders to the Arduino, [FlightSimMaker] uses five CD74HC4067 16-channel multiplexers. The display is a 12.1 inch 1024 x 768 LCD panel with integrated driver, and comes in at the second most expensive part of the build behind the rotary encoders. All told, the estimated cost per display is around $250 USD.

Even if you aren’t looking to build yourself a high-tech flight simulator, there’s plenty of ideas and tips here that could be useful for building front panels. We particularly like the technique used for doing 3D-printed lettering: the part is printed in white, spray painted a darker color, and then the paint is sanded off the faces of the letters to reveal the plastic. Even with a standard 0.4 mm nozzle, this results in clean high-contrast labels on the panel with minimal fuss.

Of course, while impressive, these panels are just the beginning. There’s still plenty more work to do if you want to build an immersive simulation experience. Including, in the most extreme cases, buying a Boeing 737 cockpit.

It’s About Time We Saw Another Infinity Mirror Clock

Have you made an infinity mirror yet? They’re pretty much a rite of passage project at this point. But unlike that DIY power supply, most of them serve no function beyond looking cool (not that there’s anything wrong with that). Might as well make it do something, right?

[How Do You – DIY] has a built a few mirrors because he likes experimenting with the effects of different reflective surfaces in various positions. This time, he’s built a clock from the ground up. Basic infinity mirror rules apply here, though he used semi-transparent reflective film on both sides for greater effect and put an adjustable warping bar in the back so the trail curves toward the center. The actual timekeeping is done by an Arduino Nano.

The RGB LEDs on his strip were a few millimeters too far apart for his liking, so he added a few dozen hours to the build by cutting it apart and painstakingly placing them all around the wood frame. Then he Dremeled a groove for each set of three wires that link the LEDs so that they sit flush. The final product is beautiful, and it’s a shame that this LED-holding frame is hidden away inside the equally well-crafted aluminium frame.

Don’t waste another minute — sweep past the break to check out the build video. If it’s a portable and functional conversation piece you want, make a set of infinity mirror coasters.

Oh, and did we mention that we’re running a clock contest? Hint, hint.

Continue reading “It’s About Time We Saw Another Infinity Mirror Clock”

An Arduino And An Enigma All Rolled Into One

This hacker has been wanting to design an Enigma machine simulator for a while, but didn’t take the leap until they realized there was a compact Arduino with a surplus of I/O.

The logs go through all sort of variations on the machine. Everything from a plug board variation similar to the original to a 16 segment LED tester are covered. In one of the posts you can even see it decode a real U-Boat message. 

The earlier revisions are housed in very attractive laser cut cases but the latest designs employ an even more elegant casing solution. The simulator uses 16 segment displays and momentary push buttons for the keys. At its core is a 2560 Pro mini. The write-up contains a lot of detail about the code behind the Enigma and is interesting to read.  Interestingly, the PCB was designed in Fritzing, the EDA software many love to hate.

We love the craftsmanship and attention going into this project and can see it turning into a very appealing kit as it goes through its design cycles.

Programmable Wrist Synth Pushes The Envelope

Synths are a ton of fun no matter how good or bad they sound. Really, there are no bad-sounding ones, it’s just that some are more annoying to listen than others to if you’re not the one making the beep boops. [Clem] had built a tiny LDR-based synth into a watch case a few years back and took it to many a Maker Faire, where it delighted and annoyed until it ultimately broke.

Naturally, it was time to make a new version that’s more capable. Whereas the first one was Atari-punk-console-meets-light-Theremin, this one has a bunch of inputs and can be programmed on the fly to record and play back bendable tones. It’s driven by an Arduino MKR, and the inputs are managed by an impressively squash bug-wired shift register. [Clem] used beefy switches this time in the hopes that this one will last longer. We think the slide pots are a great touch, as are the candy-colored knobs printed in PMMA.

Our favorite part is that [Clem] took advantage of the random states the microcontroller pins are in when it’s first powered on. If you don’t want to program any notes, you can use the ones generated at boot and just play around with those. Be sure to check out the build video after the break.

We’ve seen our share of synths, but few as delicious-looking as KELPIE from this year’s Hackaday Prize.

Continue reading “Programmable Wrist Synth Pushes The Envelope”