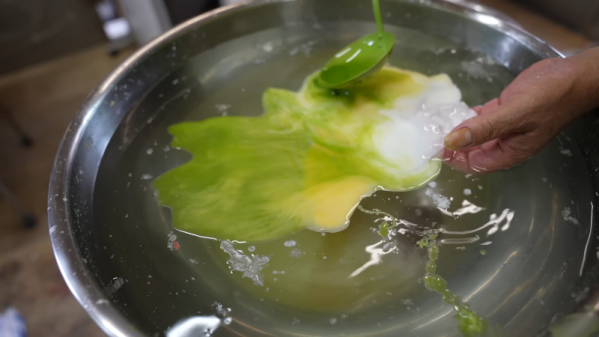
A small electronic board next to colorful stylized speaker

Soundscape Sculpture Is Pleasing Art For Your Ears

Artist and self-described “maker of objects” [Daric Gill] is sharing some of the world’s most pleasing and acoustically interesting soundscapes with museum patrons in his latest work, ‘The Memory Machine: Sound‘.

Now featured at the Center of Science and Industry museum, the interactive stereo soundscape generator resembles three decorated ‘tree trunks’, suspended high above the exhibition floor. When visitors approach the artwork, they are treated to a randomly selected soundscape sample.

The build, which is described in blog form here, teases just some of the sixty soundscape samples that can be heard. These include the noisy chattering of crowds underneath the Eiffel Tower in Paris, the mellow melodies of a meadow high in the Swiss Alps, and the pumping atmosphere of a baseball match played in Yankee Stadium, New York City.

Only the middle trunk reveals the electronic soul of the installation – an Adafruit M4 Feather Express, Music Maker Featherwing and a motion sensor. The flanking trunks house the speakers and amplifier. The motion sensor triggers the microcontroller, which then plays a randomly selected sample from an SD card.

[Daric] went to great lengths to reuse discarded materials, and even cannibalized parts from other sculptures to see his vision through. This focus underpins a substantial amount of woodworking and machining that went into this build, so the full video is certainly worth a watch to see the whole project come together.

Make sure to check out our coverage of other funky installations, like this mesmerizing ceiling decoration.

Continue reading “Soundscape Sculpture Is Pleasing Art For Your Ears”

Several people at a museum exhibit about magnetism

Hands-On Museum Exhibit Brings Electromagnetism To Life

Magnets, how do they work? Although the quantum mechanics behind ferromagnetism are by no means easy, a few simple experiments can give you a good grasp of how magnets attract and repel each other, and show how they interact with electric phenomena. [Niklas Roy] built an exhibit for the Technorama science museum in Switzerland that packs a bunch of such electromagnetic experiments in a single package, appropriately called the Visitors Magnet.

The exhibit consists of a big magnet-shaped enclosure that contains a variety of demonstrators that are all powered by magnets. They range from simple compasses to clever magnetic devices we find in the world around us: flip-dot displays for instance, on which you can toggle the pixels by passing a magnet over them. You can even visualize magnetic field lines by using magnetic viewing film, or turn varying fields into audio through a modified telephone receiver.

Another classic demonstrator of electromagnetism is a color CRT monitor, which here displays a video feed coming from a camera hanging directly overhead. Passing a magnet along the screen makes all kind of hypnotizing patterns and colors, amplified even more by the video feedback loop. [Niklas] also modified the picture tube with an additional coil, connected to a hand-cranked generator: this allows visitors to rotate the image on the screen by generating an AC current, neatly demonstrating the interaction between electricity and magnetism.

The Visitors Magnet is a treasure trove of big and small experiments, which might not all withstand years of use by museum guests. But that’s fine — [Niklas] designed the exhibit to be easy to maintain and repair, and expects the museum to replace worn-out experiments now and then to keep the experience fresh. He knows a thing or two about designing engaging museum exhibits, with a portfolio that includes vector image generators, graffiti robots and a huge mechanical contraption that plays musical instruments.

Continue reading “Hands-On Museum Exhibit Brings Electromagnetism To Life”

An ATX motherboard sits on a grey surface with the I/O in the foreground. Behind the I/O is a large image of Tux, the Linux penguin, taking up most of the PCB and winding its way around different components on the board. Tux is part of the PCB itself, with his feet, beak, and outline in gold, body in black silkscreen, and belly in green soldermask.

Designing Aesthetically-Pleasing PCBs

We’ve seen our share of custom PCBs here on Hackaday, but they aren’t always pretty. If you want to bring your PCB aesthetics up a notch, [Ian Dunn] has put together a guide for those wanting to get into PCB art.

There are plenty of tutorials about making a functional PCB, but finding information about PCB art can be more difficult. [Ian] walks us through the different materials available from PCB fabs and how the different layer features can affect the final aesthetic of a piece. For instance, while black and white solder mask are opaque, other colors are often translucent and affected by copper under the surface.

PCB design software can throw errors when adding decorative traces or components to a board that aren’t connected to any of the functional circuitry, so [Ian] discusses some of the tricks to avoid tripping up here. For that final artistic flair, component selection can make all the difference. The guide has recommendations on some of the most aesthetically pleasing types of components including how chips made in the USSR apparently have a little bit of extra panache.

If you want to see some more on PCB art, check out this work on full-color PCBs and learn the way of the PCB artist.

Robotic Acrobot Aces The Moves

[Daniel Simu] is a performance artist, among many other things, and does acrobatic shows, quite often with a partner “flyer”. Training for his acts gets interrupted if his flyer partner is not available due to travel, injury or other reasons. This prompted him to build Acrobotics — a robotic assistant to make sure he can continue training uninterrupted.

He has some electronics and coding chops, but had to teach himself CAD so that he could do all of the design, assembly and programming himself. Acrobotics was developed as part of a Summer Sessions residency at V2_ (Lab for the Unstable Media) at Rotterdam in 2022.

The design is built around a mannequin body and things are quite simple at the moment. There are only two rotational joints for the arms at the shoulder, and no other articulations. Two car wiper motors rotate the two arms 360 deg in either direction. Continuous rotation potentiometers attached to the motors provide position feedback.

An ESP32 controls the whole thing, and the motors get juice via a pair of BTS7960 motor drivers. All of this is housed in a cage built from 15 mm aluminium extrusion and embedded in the torso of the mannequin. [Daniel] doesn’t enlighten us how the motor movements are synchronized with the music, but we do see a trailing cable attached to the mannequin. It’s likely the cable could be for power delivery, as well as some form of data or timing signals.

He’s working on the next version of the prototype, so we hope to see improved performances soon. There’s definitely scope for adding a suite of sensors – an IMU would help a lot to determine spatial orientation, maybe some ultrasonic sensors, or a LiDAR for object detection or mapping, or additional articulated joints at the elbows and wrists. We gotta love “feature creep”, right ?

Check out the two videos after the break – in the first one, he does an overview of the Acrobotics, and the second one is the actual performance that he did. Robot or not, it’s quite an amazing project and performance.
CAVEAT : We know calling this a “robot” is stretching the definition, by a lot, but we’re going to let it slip through.

Continue reading “Robotic Acrobot Aces The Moves”

Celebrating A Decade Of Bootleg Hackaday Merch

A listener of the podcast recently wrote in to tell us that, in the process of trying to purchase a legitimate Hackaday t-shirt, they discovered this 2012 Instructable from [yeltrow] that covers how you can cheaply crank out your own Wrencher shirts via screen printing.

Now historically, as long as you’re not trying to make a buck off of our name, we’ve never felt the need to stop folks from putting our logo on their projects. So we’re not too concerned that somebody was making Wrencher shirts, especially since they were almost certainly for their own personal use. Though the fact that [yeltrow] apparently described the project as a “Hackster-Style shirt” to try and avoid using our name ended up being a prophetic 4D chess meta-joke that you couldn’t make up if you tried. Continue reading “Celebrating A Decade Of Bootleg Hackaday Merch”

Fifteen Flat CRTs And A Bunch Of Magnets Make For Interactive Fun

If you were a curious child growing up when TVs were universally equipped with cathode ray tubes, chances are good that you discovered the effect a magnet can have on a beam of electrons. Watching the picture on the family TV warp and twist like a funhouse mirror was good clean fun, or at least it was right up to the point where you permanently damaged a color CRT by warping the shadow mask with a particularly powerful speaker magnet — ask us how we know.

To bring this experience to a generation who may never have seen a CRT display in their lives, [Niklas Roy] developed “Deflektron”, an interactive display for a science museum in Switzerland. The CRTs that [Niklas] chose for the exhibit were the flat-ish monochrome tubes that were used in video doorbell systems in the late 2000s, like the one [Bitluni] used for his CRT Game Boy. After locating fifteen of these things — probably the biggest hack here — they were stripped out of their cases and mounted into custom modules. The modules were then mounted into a console that looks a little like an 80s synthesizer.

In use, each monitor displays video from a camera mounted to the module. Users then get to use a selection of tethered neodymium magnets to warp and distort their faces on the screen. [Niklas] put a lot of thought into both the interactivity of the exhibit, plus the practical realities of a public installation, which will likely take quite a beating. He’s no stranger to such public displays, of course — you might remember his interactive public fountain, or this cyborg baby in a window.

Continue reading “Fifteen Flat CRTs And A Bunch Of Magnets Make For Interactive Fun”

A wall clock made from wires and electronic components

Form Follows Function In This Circuit Sculpture Clock

Electronic components are strictly functional objects: their appearance is determined by the function they’re meant to fulfil. But that doesn’t mean there’s no beauty in them. In fact, a whole discipline called circuit sculpture exists that aims to make beautiful shapes out of nothing more than electronic components and wires. Today we can show you [Maarten Tromp]’s latest work in this field: a wall-mounted clock that he’s christened the Clock Sculpture.

The clock’s main structure consists of two concentric rings made from galvanized steel wire, held together by twelve spokes. All components are soldered directly onto those two rings, with no additional mechanical support. Steel isn’t the greatest material for soldering to, but [Maarten] managed to make it work with a high-wattage soldering iron and a bit of plumbers’ flux.

The overall design is simple but clever: the outer ring holds 60 LEDs to indicate the minutes, with every fifth LED always illuminated dimly in order to provide a background reference in dark conditions. There are 24 LEDs on the inner ring to indicate the twelve hours as well as the “half-hours” in between. Without these, the dial would look a bit odd at 30 minutes past the hour.

Detail of a circuit sculpture clockA mains transformer, plus a single diode, a buffer capacitor and a 7805 regulator form a simple DC power supply, with its negative terminal connected to the steel frame. Time is kept by an ATtiny13A that counts mains frequency pulses. There’s no way to adjust the time: you’ll have to plug in the clock exactly at noon or midnight in order to synchronize it with the outside world. A crude method perhaps, but one that fits well with the clock’s bare-bones aesthetic.

The individual LEDs are driven by a set of twelve 74HC595 shift registers, all mounted dead-bug style between the two rings. Signals and power are carried between the chips by inconspicuous grey wires taken from old IDE cables; this gives the clock a clean, uncluttered appearance. [Maarten] has had the sculpture clock in his office for several months and while it apparently took some time to get used to, he claims it’s easy to read in bright and dark conditions.

Circuit sculpture has formed the basis for several stunning clock projects: this Tie Fighter-shaped clock for instance, or this insanely complex LED clock. Our 2020 Circuit Sculpture contest yielded many breathtaking designs, too.