Haunted Dollhouse Microcontroller Networking For World Maker Faire

master-slave-networks

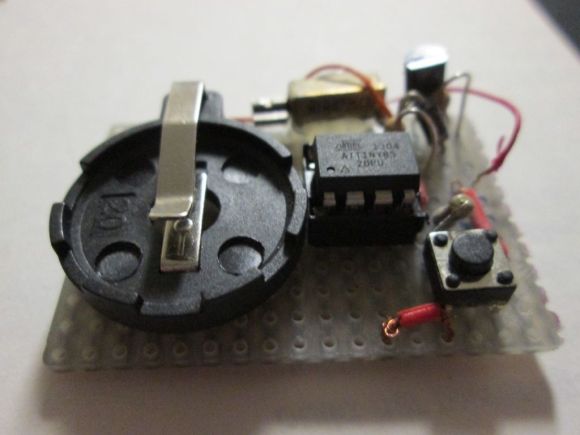
It’s pretty awesome to get see the number of projects presented at World Maker Faire. But we still love digging into the gritty details that only an in-depth build post can deliver. Here we get both. You can see the circuits pictured above in the Circuit Castle exhibit at WMF this weekend, and you can read about how the microcontroller network was built in [Jim’s] article.

As the title states, this is a network built for a dollhouse. Each slave device performs a different task; adding color, sound, motion, and interactivity using some sensors.  The post discusses the i2c (or TWI to get around licensing issues as [Jim] mentions) communications used to talk to the ATtiny85 chips on the slave boards. Because the eight-pin package leaves few I/O pins to work with an ATtiny84 was also added. It brings 14-pins to the party, including multiple ADC inputs for reading sensors.

If this ends up being too much of a read for you jog to the “Update 9/17/13” to get the general overview of progress. Like any project on a timeline, not everything works quite as well as they would have liked it to. But it’s the journey that makes something like this so fun — a fully working project would signal an end to the enjoyment, right?

[via Workshop 88]

A Really, Really Tiny Microcontroller Board

Here’s something very cool from the wonderful world of Adafruit: The Trinket, an Arduino compatible microcontroller platform that’s not only small enough to fit in your pocket, it’s small enough to lose in your pocket.

Like the similarly specced Digispark, the Trinket features an ATTiny85 microcontroller with 5 IO pins. Unlike the Digispark, the Trinket is a bit more substantial, featuring 3.3 and 5 Volt regulators along with a real USB port and mounting holes. As this is based on the ‘tiny85, it’s possible to connect this up to I2C and SPI sensors and peripherals

One thing to note about the Trinket is the fact that it’s so cheap. Either version of the Trinket goes for about $8, inexpensive enough to simply leave in a project when you’re done with it. Given the cool stuff we’ve already seen created with the Digispark, including a homebrew stepper motor and an Internet meme and lame pun assessment tool, we can’t wait to see what’s made with the Trinket,

Couch To 5K With 1K To Spare

In a market full of Fitbits, Misfits, and Fuelbands, it’s easy to get carried away with sophisticated personal fitness tracking technology.  That’s why [André] took a totally different approach with his super simple run tracking device, the C25K machine.

C25K stands for “Couch to 5k” which is a slimmed down exercise schedule designed to gradually bring people who have otherwise no exercise routine up to a level of fitness where they can run a 5k in just 9 weeks.  To keep participants from wearing themselves out too early, the routine specifies a sequence of running and walking periods to be completed in series on specific days.  Though simpler than most fitness plans, it’s still a lot to keep track of especially when you’re sweating so hard you can barely see your stopwatch.

André found a solution using a bare-bones circuit based on the ATTiny2313.  After loading the C25k calendar into its firmware (which takes up less than half of its 2K of flash), he needs only to toggle the dipswitch to select the appropriate day of the program, and the little device (scarcely larger than a key fob) will beep to let him know to switch from running to walking or back again.

Definitely a great project for any hobbyist looking for a geeky way to get in shape.

Lots Of Seven Segment Displays With A Single ATtiny

7seg

These days they’ve been replaced with character LCD displays or even brightly colored graphical displays, but if you’re trying to display data on one of your projects, there’s nothing like the classic red glow of a red seven segment display. [five volts] got his hands on a few ancient segmented displays, but controlling even one took up more microcontroller pins than he was ready to spare. The solution to this problem was to use a shift register and control multiple segment displays with an 8 pin microcontroller.

[volts] is using an ATtiny13 to control six seven segment displays. Each display is mounted on a hand-etched board, with a shift register and a handful of resistors soldered to the back. By having the microcontroller shift bits down the line, [volts] created an extremely easy to interface 6-digit segment display, and the entire device can be expanded even more.

The board files and schematics are available on [volt]’s project page. A great project if you’re just starting out to etch your own boards.

Business Card Draws [ch00f]’s Logo

[ch00f] is at it again, expanding the horizons of the art of PCB business cards. This one draws his logo on any computer over a USB port.

The physical design of the card is heavily inspired by [Frank Zhao]’s card; both use an ATtiny85 and the V-USB package to handle the USB protocol and communications. Instead of typing words into a text editor like [Frank]’s, [ch00f]’s card draws the ch00ftech logo in MS Paint or other image editor.

There was a problem with simply emulating the mouse to draw a logo on the screen, though; because different computers have different mouse settings for acceleration, the ch00ftech logo was nearly always distorted. [ch00f] fixed that by emulating an absolute input device, basically turning his business card into a single-function pen tablet.

The logo was traced by hand and put into a few arrays in the firmware. Surprisingly, the logo didn’t take up much space – only 4k of the tiny85’s flash is used. There’s a lot more space for a more complicated drawing, but for now the simple ch00ftech logo (video after the break) will do.

Continue reading “Business Card Draws [ch00f]’s Logo”

ShuttAVR Can Snap A Pic Or Serve As An Intervalometer

shuttAVR-intervalometer-hack

This project started as a simple microcontroller replacement on this IR camera remote control PCB. But the soldering job went rather badly for [Balthamos] so he changed things up and designed his own simple AVR remote shutter release and intervalometer.

The DIP chip seen with most of its legs bent backwards is the ATtiny25 which makes the system work. It’s patched into the traces for the battery connections, button (on the other side of the board) and the IR LED he’s pinching with his left hand. Point it at a Cannon camera and push the button to snap a photo. But as you can see in the clip after the break it also serves as an intervalometer; letting him take several pictures with a user-defined pause between each. That mode is selected by first pressing and holding the button. Once released the chip waits for a second button press to register the delay. The new circuit still fits in the original case after just a bit of alteration to it.

Continue reading “ShuttAVR Can Snap A Pic Or Serve As An Intervalometer”

LED Marquee Uses Discrete Through-hole Lights

through-hole-led-marquee

[Michael] built his own LED marquee using individual diodes. Despite his choice to forego the 8×8 or 5×7 modules we often see in these projects, his decision to spin a dedicated PCB saved him a lot of trouble during assembly. Sure, he still had to solder 180 leads on the 9×18 grid of lights, but at least he didn’t have to deal with wiring up the complex display layout.

The chip driving the display is an ATtiny24. You can see that it’s an SMD package and spans one row of the through hole LED footprint. There are way too few pins to drive a multiplexed display of this size. Instead of adding a separate driver IC he decided to design the display to use Charlieplexing. We didn’t see a schematic for the project, but judging from the board images all of the I/O pins are used by either the display itself, or the serial connection provided by that right angle pin header.