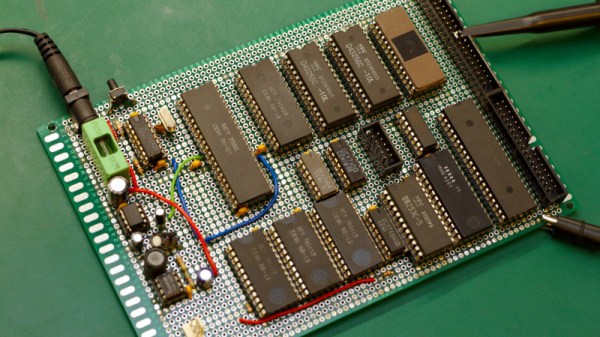
Printed Part Gets Classic Truck Rolling

When working on classic vehicles, and especially when modifying them outside of their stock configurations, things can get expensive. It’s a basic principle in economics: the rarer something is the more money somebody can charge you for it. But if you’ve got the skills and the necessary equipment, you can occasionally save yourself money by custom-fabricating some parts yourself.

After changing the gear ratio in his 1971 Ford F100, [smpstech] needed to adjust his speedometer to compensate. Unfortunately, a commercial speedometer reducer and the new cables to get it hooked up to his dash would have run into the hundreds of dollars, so he decided to try designing and 3D printing his own gearbox. The resulting development process and final product are a perfect example of how even a cheap desktop 3D printer, in the hands of a capable operator, can do a lot more than print out little toy boats.

The gearbox contains a large ring gear driven by a smaller, offset, spur gear. This compact inline package drops the speed of the input shaft by 25.5%, which [smpstech]  mentions is actually a bit slower than necessary, but it does give him some wiggle room if he decides to change his tire size.

Even if you’re not looking for a speedometer reducer for a nearly 50 year old truck, there are some lessons to be learned here in regards to 3D printed car parts. The first version of his gearbox, while functional initially, ended up looking like a deflated balloon after being exposed to the temperatures inside the F100’s engine bay. His cheapo PLA filament, which is probably fine for the aforementioned toy boats, simply wasn’t the right material for the job.

[smpstech] then reprinted the gadget in HTPLA, which needs to be annealed after printing to reach full strength. Usually this would involve a low-temperature bake in the oven, but he found that simmering the parts in a pot of water on the stove gave him better control over the temperature. Not only did the HTPLA version handle the under-hood conditions better, it was also strong enough that he was able to use a standard die on the connections for the speedometer cables to create the threads instead of having to model and print them. Definitely a material to keep an eye on if regular PLA isn’t cutting it for you.

This isn’t the first time we’ve seen 3D printed parts used to get a vintage vehicle back on the road. Building these custom parts would have been possible without a 3D printer, of course, but it’s a good example of how the technology can make these types of repairs faster and easier.

[via /r/functionalprint]

Mouse Trap Game Used As An Actual Mouse Trap

Just when you thought you had explored all the weird stuff on YouTube, along comes [Shawn Woods] with his channel dedicated to testing different types of mouse traps. His weekly videos demonstrate the construction and ultimate effectiveness of everything from primitive traps that can be made in the field from sticks and rocks to 3D printed creations sent in from viewers. But his latest video might just be the weirdest one yet, as he found a way to use the classic “Mousetrap” board game to capture an actual rodent.

Well, sort of. For one, [Shawn] admits the “trap” is completely impractical and is just for fun. Which should be pretty obvious considering the thing is enclosed in a box the size of a small refrigerator. Second, the lucky rodent that gets to test drive this Milton Bradley-powered gadget is actually the family’s pet chinchilla which is obviously rather calm and we dare say accustomed to these sort of shenanigans.

The key to the whole contraption comes via two traditional mousetraps, one on either end of the game’s more fanciful rendition of the same device. The first trap is used to pull the crank which gets the board game going when the mouse steps on the pad (a piece of wood with padding prevents the bar from actually hitting the animal). The game goes through its nostalgic routine featuring metal balls rolling down tracks and figurines on jumping boards, eventually triggering the second real mouse trap. In this case, the trap pulls a rope which closes a door at the opening of the box.

Assuming your target rodent is very patient and not startled by the cacophony of plastic machinery, the whole thing works perfectly. To use the parlance of his channel, this is what’s known as a “Live Catch” trap as it doesn’t hurt the mouse and lets you easily remove them after the fact. Which is the least you could do after humiliating it like this.

While likely the most unique, it surely isn’t the only mouse trap we’ve ever covered here at Hackaday. This clever soda bottle trap can be built cheaply and easily, but if you want something expensive and complex you can always use a Raspberry Pi.

[Thanks to Pete for the tip.]

Continue reading “Mouse Trap Game Used As An Actual Mouse Trap”

Help Save Some Of Australia’s Computer History From The Bulldozers

When multiple tipsters write in to tell us about a story, we can tell it’s an important one. This morning we’ve received word that the holding warehouse of the Australian Computer Museum Society in the Sydney suburb of Villawood is to be imminently demolished, and they urgently need to save the artifacts contained within it. They need Aussies with spare storage capacity of decent size to help them keep and store the collection, and they only have a few days during which to do so.

The ever-effusive Dave from EEVblog has posted a video in which he takes a tour, and like us he’s continually exclaiming over the items he finds. An EAI analog computer, a full set of DEC PDP-11 technical documentation, a huge Intel development system, Tektronix printers, huge DEC racks, memory cards for VAXen, piles and piles of boxes of documentation, and much, much more.

So, if you are an Aussie within reach of Sydney who happens to have a currently-unused warehouse, barn, or industrial unit that could house some of this stuff, get in touch with them quickly. Some of it may well be junk, but within that treasure trove undoubtedly lies a lot of things that need to be saved. We’d be down there ourselves, but are sadly on the other side of the world.

Continue reading “Help Save Some Of Australia’s Computer History From The Bulldozers”

Lasercut Gears – A Learning Experience

Lasercutters are fantastic tools: they’re highly useful for making flat things, or even flat things that you later bend! This makes them particularly well suited for making gears out of flat stock. [sharvfish] needed to get his hands dirty with producing some gears for his automaton, and decided to share what he learned in the process.

The gears in question are cut out of MDF board, which is readily usable on all but the feeblest lasercutters you’ll find in the average makerspace. The first problem faced was when producing gears with low tooth counts – depending on the exact geometry used, teeth with lower counts can tend to jam easily. For [sharvfish]’s gears, 6 teeth seems to be just a touch too small to work well. Other issues cropped up around the kerf of the cuts affecting the gear mesh and the use of pins to improve the coupling of the gears to the shaft, which [sharvfish] expands upon in the video. There’s also a cheeky cephalopod cameo, too.

It’s always interesting to see the unique challenges faced in the undertaking of a project; we could see six more lasercut projects this week, and we’d likely see six unique problems the builders faced as well. It’s a great insight into the build process and it’s great when makers share their journey as well as the finished product. Video after the break.

Wondering what lasercut gears can do for you? Check out this build that rotates an entire television.

Continue reading “Lasercut Gears – A Learning Experience”

Crowdfunding: !Sinclair !ZX Vega To Lose The Sinclair Name

It’s not a good time to be a backer of the crowdfunded Sinclair ZX Vega retro console. After raising a record sum on Indiegogo, a long series of broken promises and missed dates, and a final loss of patience from the crowdfunding site, it has emerged that the owner of the Sinclair and ZX brands is to withdraw the right to use them from the console.

The Vega itself should have been a reasonable proposition, a slick handheld running the FUSE Spectrum emulator rather than Z80 hardware, and from Retro Computers Limited, a company that boasted a 25% ownership from Sinclair Research and thus Sir Clive himself. The sorry tale of its mishandling will probably in time provide enough information for a fascinating book or documentary in itself, but one thing that has come to light in the BBC’s reporting is the fate of those Sinclair brands. They famously passed to Amstrad in the 1980s, a move that gave us the Spectrum +2 and +3 with decent keyboards and built-in tape and disk drives, but long after the last Spectrum had rolled off the production line they passed with Amstrad’s set-top-box business to the satellite broadcaster Sky, who are now responsible for pulling the plug.

This is a general news story as much as a hardware story as there is little by way of a hack to be found beyond the realisation that you could almost certainly roll your own with a Raspberry Pi, a copy of FUSE, and a 3D-printed case. But it’s a fitting follow-up to our previous reporting, and unless something unexpected happens in the Retro Computers boardroom it’s probably the last we’ll hear of the product. In an unexpected twist though they are reported to have shipped a few Vegas to backers in recent days, and we’ll leave the final word to the BBC’s quote from [David Whitchurch-Bennett], one of those recipients.

“The buttons are absolutely awful, You have to press so hard and they intermittently stop working unless you apply so much pressure.”

From where we’re sitting, remembering the dubious quality of some of the keyboards on original Spectrum products, we think that it might have more in common with the original than anyone is willing to admit.

Add-On Board Brings Xbox 360 Controllers To N64

Many of the games released on the Nintendo 64 have aged remarkably well, in fact a number of them are still considered must-play experiences to this day. But the years have not been so kind to the system’s signature controller. While the N64 arguably defined the console first person shooter (FPS) genre with games like “Goldeneye” and “Perfect Dark”, a modern gamer trying to play these classics with the preposterous combination of analog and digital inputs offered by the N64 controller is unlikely to get very far.

Of course, you could play N64 games in an emulator and use whatever controller you wish. But where’s the challenge in taking the easy way out? [Ryzee119] would much rather take the insanely complex route, and has recently completed work on an add-on board that let’s you use Xbox 360 wireless controllers on Nintendo’s 1996 console. He’s currently prepping schematics and firmware for public release, with the hope that support for additional USB controllers can be added by the community.

Nintendo historians may recall that the N64’s controllers had an expansion port on the bottom where you would connect such accessories as the “Rumble Pak” and “Controller Pak”. The former being an optional force feedback device, and the latter a rather oddly named memory card for early N64 games which didn’t feature cartridge saves. Only “90’s Kids” will recall the struggle of using the “Rumble Pak” when a game required the “Controller Pak” to save progress.

Thankfully [Ryzee119] has solved that problem by adding battery backed storage to his adapter along with some clever code which emulates the “Controller Pak”. Similarly, the “Rumble Pak” is emulated by the Xbox 360 controller’s built-in force feedback and a bit of software trickery. Specific button combinations allow for enabling and disabling the various virtual accessories on the fly.

But the best part of this modification might be how unobtrusive the whole thing is. Not only does it allow you to still use the original controllers and accessories if you wish, but it only requires soldering a handful of wires to the console’s motherboard. Thanks to the surprising amount of dead space inside the system’s case, it’s not even a challenge to fit the board inside. You do need to use the official USB Xbox 360 controller receiver, but even here [Ryzee119] opted to put a USB port on the board so you could just plug the thing in rather than having to cut the connector off and trying to solder it to the board yourself.

It probably won’t come as a surprise that this isn’t the first time [Ryzee119] has fiddled with the internals of a classic Nintendo system. We’ve previously covered his fantastic custom PCB to fit a Raspberry Pi Zero into a GameBoy Advance.

[Thanks to Gartral for the tip.]

Building The Terminator’s Arm

The Cyberdyne Systems Series 800 Terminator is a highly capable robot that happens to look an awful lot like Arnold Schwarzenegger. It boasts an advanced metallic endoskeleton, which has been the inspiration for many DIY prop builds over the years. [KenToonz] has decided to take on just such a project and invites viewers along for the ride. (YouTube, embedded below.)

The project is a particularly interesting one, as it involves the recreation of a robotic imitation of a human hand and arm. Thankfully, due to the hard work of dedicated individuals, blueprints of the original movie item are available online. These aren’t fully functional, per se, but give the aspiring builder a strong basis to get the look and feel right, while leaving room for modifications for those who wish to build something that moves and operates in the expected way. [KenToonz] intends to do exactly that, and contemplates the installation of various springs and other mechanisms to enable the joints to extend and retract properly.

[KenToonz] starts from the fingers, working back towards the forearm before beginning to add the various interstitial pieces that make it all work together as an assembly. The machining involved covers everything from small metal pieces of the digits to producing custom springs for the moving parts. We can’t wait to see the finished product once it’s all finished!

We’ve seen some great prop builds before, too – like this tricorder worthy of Mr Spock.

Continue reading “Building The Terminator’s Arm”