A Meteorite Gift Box

[Justin Cole] was looking for the perfect birthday gift from for his wife. After some pondering, the answer fell from the sky in the form of a meteorite. The problem was how to present it. They don’t exactly make meteorite gift boxes, so [Justin] decided to build one of his own design. The box has a Russian space age theme reflecting the meteorite’s country of origin. The theme also made it a perfect entry for Hackaday’s Sci-Fi contest.

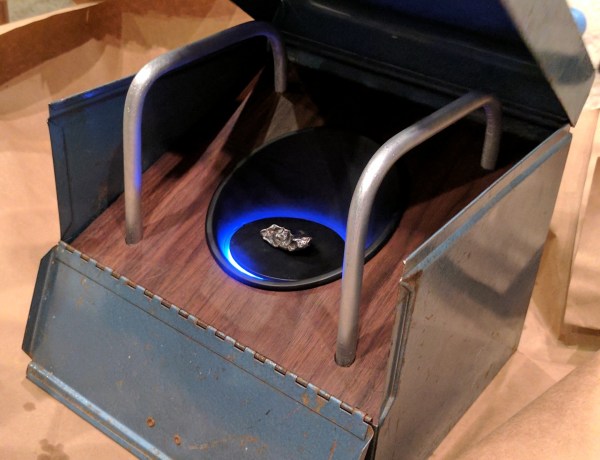
The gift box started life as an old steel film reel box. Some of us may still have boxes like this in our basements, protecting old 8mm family movies. [Justin] modeled the box in Solidworks, then added in his custom modifications. An angled walnut platform forms the stage. In the center of the stage is a 3D printed cone. The meteorite itself sits on a platform in the middle of the cone. A magnet keeps the iron meteorite in place.

A Neopixel ring provides indirect lighting below the meteorite. The ring is controlled by an Arduino, which also drives a couple of vibration motors. The motors create a hum in time to the changing colors of the ring. The whole package creates a neat way to present a rock from space.

We really like that [Justin] didn’t go over the top with sound effects, smoke, or bright lights. More importantly, [Justin’s] wife loved it, and couldn’t wait to share a video of the box with her friends.

It’s not to late to get in on the Hackaday Sci-Fi contest action. You have until Monday evening to enter your own creation.

The Fab Lab Next Door: DIY Semiconductors

You think you’ve got it going on because you can wire up some eBay modules and make some LEDs blink, or because you designed your own PCB, or maybe even because you’re an RF wizard. Then you see that someone is fabricating semiconductors at home, and you realize there’s always another mountain to climb.

We were mesmerized when we first saw [Sam Zeloof]’s awesome garage-turned-semiconductor fab lab. He says he’s only been acquiring equipment since October of 2016, but in that short time he’s built quite an impressive array of gear; a spin-coating centrifuge, furnaces, tons of lab supplies and toxic chemicals, a turbomolecular vacuum pump, and a vacuum chamber that looks like something from a CERN lab.

[Sam]’s goal is to get set up for thin-film deposition so he can make integrated circuits, but with what he has on hand he’s managed to build a few diodes, some photovoltaic cells, and a couple of MOSFETs. He’s not growing silicon crystals and making his own wafers — yet — but relies on eBay to supply his wafers. The video below is a longish intro to [Sam]’s methods, and his YouTube channel has a video tour of his fab and a few videos on making specific devices.

[Sam] credits [Jeri Ellsworth]’s DIY semiconductor efforts, which we’ve covered before, as inspiration for his fab, and we’re going to be watching to see where he takes it from here. For now, though, we’d better boost the aspiration level of our future projects.

Continue reading “The Fab Lab Next Door: DIY Semiconductors”

Bring Saturday Mornings Back To Life With This Cartoon Server

It was an American ritual for over four decades: wake up early on Saturday morning, prepare a bowl of sugar, and occupy the couch for four glorious hours of cartoons. The only interruptions came when the least-significant sibling had to be commanded to get up to change the channel to one of the two other networks, or when your mom decided to vacuum the TV room. It was a beautiful ritual, but now it’s gone.

Or is it? If you really want to recapture your misspent youth, you can try this Raspberry Pi multi-channel cartoon server with retro TV display. [FozzTexx] started with a yard sale 13″ Zenith set, which languished in his shop for want of a mission. When he found a four-channel video modulator, he knew he had the makings of the full channel-changing Saturday morning experience.

Four Raspberry Pis were configured to serve up four separate streams of cartoons from his Plex server, and after a late Friday night of hacking the whole thing together, each stream was ready to go live at 7:00 AM on Saturday. [FozzTexx] thought of everything — from the pre-“broadcast day” test pattern to actual commercials spliced into the cartoons to the static between the channels, it’s all there in low-definition glory. He even printed up faux TV Guide pages! You can watch a brief demo on [FozzTexx]’ Twitter feed, or you can watch the entire 2-hour Periscope feed if you’re feeling nostalgic.

[FozzTexx] chose UHF channels for his “stations,” so if you want to replicate this build it may pay to bone up on analog TV tuner basics. Or if it’s just the retro look you’re going for, this custom case inspired by a 40s TV might be nice to check out.

Continue reading “Bring Saturday Mornings Back To Life With This Cartoon Server”

MicroVox driven by Arduino Uno

MicroVox Puts The 80’s Back Into Your Computer’s Voice

[Monta Elkins] got it in his mind that he wanted to try out an old-style speech synthesizer with the SC-01 (or SC-01A) chip, one that uses phonemes to produce speech. After searching online he found a MicroVox text-to-speech synthesizer from the 1980s based around the chip, and after putting together a makeshift serial cable, he connected it up to an Arduino Uno and tried it out. It has that 8-bit artificial voice that many of us remember fondly and is fairly understandable.

The SC-01, and then the SC-01A, were made by Votrax International, Inc. In addition to the MicroVox, the SC-01 and SC-01A were used in the Heath Hero robot, the VS-100 synthesizer add-on for TRS-80s, various arcade games such as Qbert and Krull, and in a variety of other products. Its input determines which phonemes to play and where it shines is in producing good transitions between them to come up with decent speech, much better than you’d get if you just play the phonemes one after the other.

microvox-manualThe MicroVox has a 25-pin RS-232 serial port as well as a parallel port and a speaker jack. In addition to the SC-01A, it has a 6502 under the hood. [Monta] was lucky to also receive the manual, and what a manual it is! In addition to a list of the supported phonemes and words, it also contains the schematics, parts list and details for the serial port which alone would make for fun reading. We really liked the taped-in note seen in this screenshot. It has a hand-written noted that says “Factory Corrected 10/18/82”.

Following along with [Monta] in the video below, he finds the serial port’s input buffer chip datasheet online and verifies the voltage levels. Next he opens up the case and uses dips switches to set baud rate, data bits, parity, stop bits and so on. After hooking up the speakers, putting together a makeshift cable for RX, TX and ground, and writing a little Arduino code, he sends it text and out comes the speech.

Continue reading “MicroVox Puts The 80’s Back Into Your Computer’s Voice”

A Full Speed, Portable Apple //e

A while back, [Jorj] caught wind of a Hackaday post from December. It was a handheld Apple IIe, emulated on an ATMega1284p. An impressive feat, no doubt, but it’s all wrong. This ATapple only has 12k of RAM and only runs at 70% of the correct speed. The ATapple is impressive, but [Jorj] knew he could do better. He set out to create the ultimate portable Apple IIe. By all accounts, he succeeded.

This project and its inspiration have a few things in common. They’re both assembled on perfboard, using tiny tact switches for the keyboard. The display is a standard TFT display easily sourced from eBay, Amazon, or Aliexpress. There’s a speaker for terribad Apple II audio on both, and gigantic 5 1/4″ floppies have been shrunk down to the size of an SD card. That’s where the similarities end.

[Jorj] knew he needed horsepower for this build, so he turned to the most powerful microcontroller development board he had on his workbench: the Teensy 3.6. This is a 180 MHz ARM Cortex M4 running a full-speed Apple IIe emulator. Writing a simple 6502 emulator is straightforward, but Apple IIe emulation also requires an MMU. the complete emulator is available in [Jorj]’s repo, and passes all the tests for 6502 functionality.

The project runs all Apple II software with ease, but we’re really struck by how simple the entire circuit is. Aside from the Teensy, there really isn’t much to this build. It’s an off-the-shelf display, a dead simple keyboard matrix, and a little bit of miscellaneous circuitry. It’s simple enough to be built on a piece of perfboard, and we hope simple enough for someone to clone the circuit and share the PCBs.

A 6502 Retrocomputer In A Very Tidy Package

One of the designers whose work we see constantly in the world of retrocomputing is [Grant Searle], whose work on minimal chip count microcomputers has spawned a host of implementations across several processor families.

Often a retrocomputer is by necessity quite large, as an inevitable consequence of having integrated circuits in the period-correct dual-in-line packages with 0.1″ spaced pins. Back in the day there were few micros whose PCBs were smaller than a Eurocard (100 mm x 160 mm, 4″ x 6.3″), and many boasted PCBs much larger.

[Mark Feldman] though has taken a [Grant Searle] 6502 design and fitted it into a much smaller footprint through ingenious use of two stacked Perf+ prototyping boards. This is a stripboard product that features horizontal traces on one side and vertical on the other, which lends itself to compactness. Continue reading “A 6502 Retrocomputer In A Very Tidy Package”

An Electronic 90V Anode Battery

One of the miracle technological gadgets of the 1950s and 1960s was the transistor radio. Something that can be had for a few dollars today, but which in its day represented the last word in futuristic sophistication. Of course, it’s worth remembering that portable radios were nothing new when the transistor appeared. There had been tube radios in small attaché cases, but they had never really caught the imagination in the same way. They were bulky, like all tube radios they had to warm up, and they required a pair of hefty batteries to work.

If you have a portable tube radio today, the chances are you won’t be able to use it. The low voltage heater battery can easily be substituted with a modern equivalent, but the 90V anode batteries are long out of production. Your best bet is to build an inverter, and if you’re at a loss for where to start then [Ronald Dekker] has gone through a significant design exercise to produce a variety of routes to achieve that goal. It’s a page that’s a few years old, but still a fascinating read.

A problem with these radios lies with their sensitivity to noise. They are AM receivers from an era with a low electrical noise floor, so they don’t react well to high-frequency switch-mode power supplies. Thus, the inverters usually tasked for projects like this are low-frequency, at 50Hz as this is a European project, to mimic one source of electrical noise that would have been an issue for the designers in the 1950s.

We are taken through transformer selection and a variety of discrete inverter designs using multivibrators, investigating how to maximize efficiency through careful manipulation of switch-on and switch-off times. Then a PIC microcontroller design is presented, and finally a CMOS ring counter.

The final converter is mounted in a diecast box and covered with a printed card shell to mimic a period battery. If you weren’t intimately familiar with battery tube radios, you might mistake it for the real thing.

We’ve featured one of [Ronald]’s designs before, though only in passing. His Nixie PSU was used in this rather frightening clock with no PCB.