Raspberry Pi NAS Makes Itself At Home In Donor PC

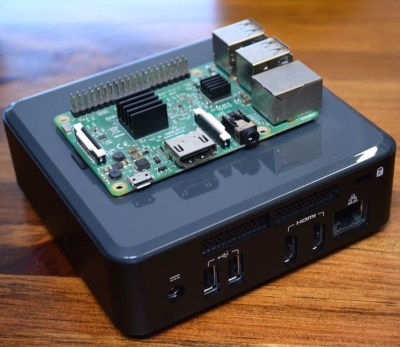
It’s safe to say that most of us have at least one Raspberry Pi hanging from a USB cable someplace, silently hammering away at some unglamorous task that you’d rather not do on a “real” computer. With as cheap as they are, it’s not like there’s a big concern about where it sets up shop. But if you’re like [Jeremy S. Cook] and want your $35 Linux computer to be a permanent member of the family, then his tips on turning an old PC into a gloriously overkill Pi NAS may be of interest.

The main component [Jeremy] salvages from the old Lenovo desktop PC is, obviously, the case itself. Stripped of its original components, the case gives him plenty of room to mount the Pi as well as a couple of hard drives and a powered USB hub. To prevent the bottom of the Raspberry Pi from shorting out against the metal computer case, he designed and 3D printed a mount for it. Everything else is held down with hook and loop fastener, making it quick and easy to move things around and make adjustments.

While it might not be strictly necessary, [Jeremy] also took the time to salvage the computer’s old heatsink. Being far too large to fit on the Pi as-is, he ran a line down the back of it with his mill and snapped it in half. He uses a bit of thermal tape to hold the bisected heatsink onto the Pi’s SoC, with a couple pieces of electrical tape to make sure it doesn’t short out on anything.

Raspberry Pi NAS builds are exceptionally popular, and we’ve seen more than we can count over the years. You can build one out of parts from IKEA, and if you don’t mind plastic, you can always 3D print the whole thing. If you really want to go minimal, you can even hang some files on the network with little more than a Pi Zero stuck into a USB port.

Continue reading “Raspberry Pi NAS Makes Itself At Home In Donor PC”

Amstrad Portable Gets A Modern LCD Transplant

Playing classic games on the real hardware is an experience many of us enjoy, but sometimes the hardware is just a bit too retro for modern sensibilities. A case in point is the miserable monochrome LCD that was originally installed in the Amstrad PPC640 portable 8086 PC that [Drygol] recently picked up. He decided that his portable Amstrad sessions would be far more enjoyable if he swapped it out for a display that didn’t have 30+ years on the clock.

To quell the complaints of any of the vintage hardware aficionados out there, it’s worth mentioning that the original LCD was actually damaged and needed to be replaced anyway. Granted [Drygol] could have tried to find a contemporary panel to replace it with, but looking at the incredible before and after shots of the modded PPC640, it’s hard to argue he didn’t make the right decision by throwing a modern display into the otherwise largely original computer.

Getting the new LCD’s PCB ready for installation.

[Drygol] says he picked up a cheap 4:3 LCD TV on eBay, and as luck would have it, found that the new panel dropped perfectly into the original frame. Getting it buttoned back up required the removal of the RF can and all the female connections on the TV’s PCB, plus he had to cut some holes in the back of the display enclosure to mount the LCD’s controls, but overall it looks very stock.

Of course, getting the new LCD display in the original frame was only half the battle, it still needs to be connected up to the computer somehow. To get everyone playing nicely with each other, [Drygol] is using a commercially available MDA/CGA/EGA to VGA converter that is installed where the batteries would have gone originally. Wired to the PPC640’s external monitor connector, it allows him to drive the new display without having to use the original LCD interface.

[Drygol] has made something of a name for himself by performing some of the most impressive restorations and modifications of retro hardware in recent memory. From the unbelievable work that went into repairing a smashed Atari 800XL case to his gorgeous custom Amiga A500, his projects are sure to please the retro hardware lovers in the audience.

Continue reading “Amstrad Portable Gets A Modern LCD Transplant”

LEGO And Minecraft Team Up For Custom Gaming PC Case

There are probably few parents who haven’t watched their kids sitting on the floor, afloat on a sea of LEGO pieces and busily creating, and thought, “If only they could make a living at that.” But time goes on and kids grow up, and parents soon sing the same refrain as the kids sit transfixed by the virtual equivalent of LEGO: Minecraft.

Finding a way to monetize either LEGO or Minecraft is a bit difficult for the young enthusiast; combining both obsessions into a paying proposition would be a dream come true. [Mike Schropp] did it, and this Minecraft-themed LEGO computer case was the result. Intel wanted a LEGO case for their new NUC mini-PC motherboard, and as a sponsor of the Minefaire event, the case needed to be Minecraft themed.

[Mike] chose the block that any Enderman would choose: the basic grass block. Each of the ten cases he made for the show had about 1000 of the smallest LEGO pieces available, to recreate the texture of the grass block in all its faux 8-bit glory. The 4″ x 4″ (10cm x 10cm) 8th Gen NUC board was a great fit for the case, which included slots for ventilation and SD card access, plus pop-out covers to access the board’s ports. It’s not exactly a screamer, but playing Minecraft on a grass block made from LEGO bricks is probably worth the performance hit.

We’ve seen [Mike]’s work a time or two here, most recently with a full-scale LEGO rack-mount server. Our hats off to him for another fun and creative build, and for proving that you’re never too old to LEGO. Or Minecraft.

Proprietary Fan Blows, Gets PWM Upgrade

Proprietary components are the bane of anyone who dares to try and repair their own hardware. Nonstandard sizes, lack of labeling or documentation, and unavailable spare parts are all par for the course. [Jason] was unlucky enough to have an older Dell computer with a broken, and proprietary, cooling fan on it and had to make some interesting modifications to replace it.

The original fan had three wires and was controlled thermostatically, meaning that a small thermistor would speed up the the fan as the temperature increased. Of course, the standard way of controlling CPU fans these days is with PWM, so he built a circuit which essentially converts the PWM signal from the motherboard into a phantom thermistor. It’s even more impressive that it was able to be done with little more than a MOSFET and a Zener diode.

Unfortunately, there was a catch. The circuit only works one way, meaning the fan speed doesn’t get reported to the motherboard and the operating system thinks the fan has failed. But [Jason] simply disabled the warning and washed his hands of that problem. If you don’t want to use a CPU fan at all, you can always just dunk your entire computer in mineral oil.

A Visual Infrared Thermometer That Runs Off Your Laptop

A common measurement for circuits is heat dissipation inspection. While single point thermometers do the trick, they can be quite annoying to use. Meanwhile, a thermal imaging camera is often out of the budget for hobbyists. How about building your own visual thermometer for cheap? That’s what [Thomas Fischl] decided to do, using an infrared thermal sensor array (MLX90640) connected through a PIC16LF1455 to a host computer. The computer handles the temperature calculation and visualization of hot spots, gathered from data collected by the IR pixel.

The interface board, USB2FIR, has full access to MLX90640 memory and can handle bulk transfer for faster data transmission of the raw sensor data collected by the pixel. A USB driver is needed to access the board – once the data is fetched, the visualizations can be created from a Matplotlib and TKinter GUI showing frame data and a real time heat map with minimum, maximum, and central temperature.

The hardware isn’t complicated, since the board relies on several ICs for processing the sensor data and immediately sends over the data to be processed externally. With some modifications – a 3D-printed enclosure, for instance – this can easily be made into a discreet tool for heat detection.

A DIY Retrocomputer Programmed In Pure Rust

Can you generate VGA and handle a PS/2 keyboard with a Cortex-M4 in Rust? That’s precisely what [theJPster] wanted to find out with Monotron, a 1980s style home computer programmed in pure Rust.

In order to run embedded Rust without a working operating system, some tools are necessary: an LLVM back-end for generating machine code, a target file for specifying memory sizes and other configs, and a pre-compiled libcore as a substitute for a compiler when running an operating system. Rust takes the place of C running on top of the board support package (BSP) and hardware abstraction layer (HAL), and peripheral access crates (PACs) that specify the hardware and allow the code to be portable across different chips.

The implementation generates a 800 x 600 VGA video signal at 60 Hz, displays text on a 48 character by 36 line display, displays color graphics using color lookup (stored in flash memory), and runs applications that take less than 24 KiB for all data. Monotron also generates 8-bit audio with PWM and sports a synthesizer that uses a three-channel wavetable allowing it to make sounds with square waves, sine waves, sawtooth waves, and create white noise.

So far, the Monotron has been able to work with an Atari joystick, a PS/2 keyboard, and has outputs to VGA, MIDI, SD card, and audio. Next up for the Monotron: writing a programming language (tentatively named Monotronian), adding support for Sega Megadrive pads, displaying sprites, and many more exciting developments.

Continue reading “A DIY Retrocomputer Programmed In Pure Rust”

CPU Showdown For Pancakes

If you ask people how they rate as a driver, most of them will say they are better than average. At first, that seems improbable until you realize one thing: people judge themselves by different criteria. So Sally thinks she’s a good driver because she goes fast. Tom’s never had a wreck. Alice never gets lost. You can see the same effect with CPUs. Some are faster or have more memory bandwidth or more instruction issues per cycle. But [Andrew] and [Scharon] at Tom’s Hardware wanted to do the real test of a CPU. How well can it cook pancakes? If you want to know, see the video below.

While your CPU might be great for playing video games, it has a surprisingly small cooking surface, so the guys needed a very small pan. The pan had grooves in it, so they slathered it with thermal grease. We doubt that’s food-grade grease, either. Continue reading “CPU Showdown For Pancakes”