Raspberry Pi Laptop Uses The Official Touchscreen

We’ve seen a variety of home-made laptops using the Raspberry Pi and other single board computers over the years. Usually, they combine off-the-shelf USB keyboards and trackpads with HDMI monitor panels, and cases made from layered laser cut sheet, or 3D printed plastic.

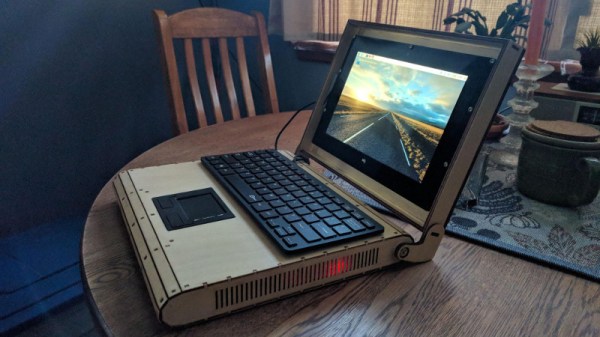
[Surferboy]’s Raspberry Pi laptop is the latest effort to come before us, and its claim to fame is the use of the official Raspberry Pi 7″ touchscreen as a display. Full instructions and 3D printer files are available on Thingiverse so you can have a go at replicating it if a portable Pi is your thing.

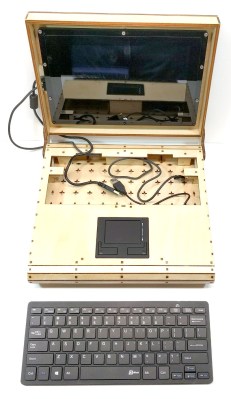
He’s taken the bold step of not attempting to place all the Pi’s interfaces next to the outside of the case. Instead, he’s desoldered the Ethernet and USB ports. The USB connections were wired directly to the keyboard, display, and a couple of external ports on the right-hand side of his case. This leaves the finished laptop with no Ethernet. However, losing ethernet is a worthy tradeoff for the thinner package.

[Surferboy] also brought the GPIO header to a female socket on the rear of the unit. It’s unclear exactly what battery he uses except for a reference to the battery from his keyboard. Since a keyboard battery will be too small for Pi and display we are guessing a larger pack will be necessary.

Though the Ethernet port and battery issue would probably be a dealbreaker here this has the makings of a useful and compact laptop, it will be interesting to see if it is picked up and refined by the community.

Quite a few early Pi laptops used the Motorola Lapdock, a mobile-phone-into-netbook peripheral. Some others we’ve featured have been a bit chunky, but sometimes they can be objects of beauty.

Via Recantha.co.uk.

Olimex Announces Their Open Source Laptop

A few months ago at the Hackaday | Belgrade conference, [Tsvetan Usunov], the brains behind Olimex, gave a talk on a project he’s been working on. He’s creating an Open Source Hacker’s Laptop. The impetus for this project came to [Tsvetan] after looking at how many laptops he’s thrown away over the years. Battery capacity degrades, keyboards have a fight with coffee, and manufacturers seem to purposely make laptops hard to repair.

Now, this do it yourself, Open Source Hardware and hacker-friendly laptop is complete. The Olimex TERES I laptop has been built, plastic has been injected into molds, and all the mechanical and electronic CAD files are up on GitHub. This Open Source laptop is done, but you can’t buy it quite yet; for that, we’ll have to wait until Olimex comes back from FOSDEM.

The design of this laptop is completely Open Source. Usually when we hear this phrase, the Open Source part only means the electronics and firmware. Yes, there are exceptions, but the STL files for the PiTop, the ‘3D printable Raspberry Pi laptop’ are not available, rendering the ‘3D printable’ part of PiTop’s marketing splurge incongruent with reality. If you want to build a case for the Open Source laptop to date, [Bunnie]’s Novena, random GitHub repos are the best source. The Olimex TERES I is completely different; not only can you simply buy all the parts for the laptop, the hardware files are going up too. To be fair, this laptop is built with injection molded parts and will probably be extremely difficult to print on a standard desktop filament printer. The effort is there, though, and this laptop can truly be built from source.

As far as specs go, this should be a fairly capable laptop. The core PCB is built around an Allwinner ARM Cortex-A53, sporting 1GB of DDR3L RAM, 4GB of eMMC Flash, WiFi, Bluetooth, a camera, and an 11.6″ 1366×768 display. Compared to an off-the-shelf, bargain-basement consumer craptop, those aren’t great specs, but at least the price is consummate with performance: The TERES I will sell for only €225, or about $250 USD. That’s almost impulse buy territory, and we can’t wait to get our hands on one.

ENIAC: The Way We Were

When I first got interested in computers, it was all but impossible for an individual to own a computer outright. Even a “small” machine cost a fortune not to mention requiring specialized power, cooling, and maintenance. Then there started to be some rumblings of home computers (like the Mark 8 we recently saw a replica of) and the Altair 8800 burst on the scene. By today’s standards, these are hardly computers. Even an 8-bit Arduino can outperform these old machines.

As much disparity as there is between an Altair 8800 and a modern personal computer, looking even further back is fascinating. The differences between the original computers from the 1940s and anything even remotely “modern” like an Altair or a PC are astounding. If you are interested in that kind of history, you should read a paper entitled “Electronic Computing Circuits of the ENIAC” by [Arthur W. Burks].

These mid-century designers used tubes and were blazing new ground. Part of what makes the ENIAC so different is that it had a different design principle than a modern computer. It was less a general purpose stored-program computer and more of a collection of logic circuits that could be configured to solve problems — sort of a giant vacuum tube FPGA, if you will. It used some internal representations that proved to be suboptimal which also makes it seem strange. The EDSAC — a later device — was closer to what we think of as a computer. Yet the ENIAC was a major step in the direction of a practical digital computer.

Cost and Size

eniac
Programming the ENIAC in 1951 (±4 years)
[Image Source: Public Domain]
The size of ENIAC is hard to imagine. The device had about 18,000 tubes, 7,000 diodes, 70,000 resistors, 10,000 capacitors, and 6,000 switches. There were 5 million hand-soldered joints! ([Thomas Haigh] tells us that while this is widely reported, the real number was about 500,000.) Physically, it stood 10 feet tall, 3 feet deep, and 100 feet long. The tube filaments alone required 80 kW of power. Even the cooling system consumed 20 kW. In total, it took 150 kW to run the beast.

The cost of the machine was about $487,000. Almost a half-million dollars in 1946 is plenty. But that’s nearly seven million dollars in today’s money. What was worth that kind of expenditure? The military built firing tables for shell trajectories. From the [Burks] paper:

“A skilled computer with a desk machine can compute a 60-second trajectory in about twenty hours…”

Keep in mind that in 1946, a computer was a person. [Burks] goes on to say that a differential analyzer can do the same job in 15 minutes. ENIAC, on the other hand, could do it in 30 seconds and with a greater precision than the differential analyzer.

Continue reading “ENIAC: The Way We Were”

Don’t Mess With Texas – The TI-99/4A Megademo

The demoscene is a hotbed of masterful assembly programming, particularly when it comes to platforms long forgotten by the passage of technology and time. There’s a certain thrill to be had in wringing every last drop of performance out of old silicon, particularly if it’s in a less popular machine. It’s that mindset that created Don’t Mess With Texas – a glorious megademo running on the TI-99/4A.

Entered in the oldskool demo contest at Syncrony 2017, the demo took out the win for [DESiRE], a group primarily known for demos on the Amiga – a far more popular platform in the scene. The demo even includes a Boing Ball effect as a cheeky nod to their roots. Like any good megademo, the different personalities and tastes brings a huge variety of effects to the show – there’s a great take on vintage shooters a la Wolfenstein in there too. [jmph] shared a few more details on the development process over on pouet.net.

The TI-99/4A wasn’t the easiest machine to develop for. It’s got a 16-bit CPU hamstrung by an 8-bit bus, and only 256 bytes of general purpose RAM. Despite the group’s best attempts, the common 32K RAM expansion present in the floppy drive controller is a requirement to run the demo. Just to make things harder, the in-built BASIC is too slow for any real use and there’s no function to allow the use of in-line assembly instructions. The group had to resort to a cartridge-based assembler to get the job done.

In the machine’s favour, it has a great sound chip put to brilliant use – the demo’s soundtrack will take you right back to the glory days of chiptune. It’s also got strong graphics capabilities for the era on par with, if not better than, the Commodore 64. The video subsystem in the TI works so hard that it’s the only DIP in the machine that gets a heatsink! The demo does a great job of pushing the machine to its limits in this regard.

If you’re suddenly feeling a strong attraction to the TI-99/4A, don’t worry – it’s got a cult following all its own. You can even find USB adapters & IDE controllers if you want to build a fully loaded rig, or play a stunning port of Flappy Bird if that tickles your fancy.

[Thanks to Gregg for the tip!]

The DIY Luggable PC

If you haven’t gone laptop shopping recently, you’re in for a big shock when you do. Recent consumer laptops are thin, powerful, surprisingly inexpensive, and Apple’s latest MacBook Pros even have a fantastic ‘Touch Bar’ – a touch-sensitive OLED display where the function keys should be. The greatest laptops ever made are available right now, and they don’t cost much, either.

Unfortunately, the laptop as a platform is inherently a compromise. If you want a discrete CPU, or if you simply want to choose your own parts, you’re relegated to a desktop build. The middle ground between extensibility and portability isn’t really covered by case manufacturers, and even the rare ‘LAN party’ cases rarely have a handle.

[Roger] is taking steps to solve this problem. He’s designed a 3D printable luggable PC. Yes, now you can have a GTX 1080 and a 22-core Xeon in a form factor you can carry around. It’ll fit in the overhead bin on your next flight, and yes, the monitor is included.

The construction of this DIY luggable PC should be familiar to anyone who built a 3D printer in 2011. It’s made out of threaded rods, with brackets for an LCD panel, ATX power supply, motherboard, and SSDs. Since this is effectively a modular system, you can load this case up with hardware. The included monitor in [Roger]’s build is taken from an old laptop and driven through an eBay “LCD Controller Board”.

While a luggable PC might be a very niche use case, it is still one that’s vastly underserved. I recently built a new battlestation, and after searching for a case like this for a few months, I eventually gave up, caved in, and bought whatever Linus told me to buy. You simply cannot buy an ATX case that has a monitor bolted to the side, and [Roger]’s build is the first DIY solution we’ve seen.

All the files to replicate this project are linked to on the [Roger]’s Hackaday.io project, and this would be an excellent basis for a community-based project to build an Open Hardware luggable PC enclosure. A few days ago, [Roger] brought this PC out to the Hackaday LA January meetup. He brought to the meetup on the train, providing more than enough evidence this is a truly portable PC. Check out the pics from the meetup below.

Build Your Own P-Brain

I don’t think we’ll call virtual assistants done until we can say, “Make me a sandwich” (without adding “sudo”) and have a sandwich made and delivered to us while sitting in front of our televisions. However, they are not completely without use as they are currently – they can let you know the time, weather and traffic, schedule or remind you of meetings and they can also be used to order things from Amazon. [Pat AI] was interested in building an open source, extensible, virtual assistant, so he built P-Brain.

Think of P-Brain as the base for a more complex virtual assistant. It is designed from the beginning to have more skills added on in order to grow its complexity, the number of things it can do. P-Brain is written in Node.js and using a Node package called Natural, P-Brain parses your request and matches it to a ‘skill.’ At the moment, P-Brain can get the time, date and weather, it can get facts from the internet, find and play music and can flip a virtual coin for you. Currently, P-Brain only runs in Chrome, but [Pat AI] has plans to remove that as a dependency. After the break, [Pat AI] goes into some detail about P-Brain and shows off its capabilities. In an upcoming video, [Pat AI]’s going to go over more details about how to add new skills. Continue reading “Build Your Own P-Brain”

AT To XT Keyboard Adapter

If you got an old PC/XT stored somewhere in basement and want to use a newer keyboard, here’s a little project you might like. [Matt] built an AT2XT keyboard adapter on a prototype board using an AT to PS/2 keyboard cable. An AT2XT keyboard adapter basically allows users to attach AT keyboards to XT class computers, since the XT port is electronically incompatible with PC/AT keyboard types. For those retro computing fans with a lot of old PCs, this trick will be great to connect the XT machines to a KVM (keyboard/Video/Mouse) switch.

[Matt] found schematics for the project on the Vintage Computer Federation Forum, but used a PIC12F675 instead of the specified PIC12F629. He does provide the .hex file for his version but unfortunately no code. You could just burn the .hex file or head up to the original forum and grab all files to make your own version. The forum has the schematics, bill of materials, PCB board layout and firmware (source code and .hex), so you just need to shop/scavenge for parts and get busy.

And if you are felling really 31337, you can make a PS/2 version of the binary keyboard to justify the use of your new adapter.

[via DangerousPrototypes]