Tracing A Scene An Old-Fashioned Way

Taking a picture is as simple as tapping a screen. Drawing a memorable scene, even when it’s directly in front of you, is a different skill entirely. So trace it! Well, that’s kind of hard to do without appropriate preparation.

[bobsteaman]’s method is to first whip up a pantograph — it tested well with a felt marker on the end. Next, he built a camera obscura into a small wood box with a matte plexiglass top, which didn’t work quite so well. A magnifying glass above the camera’s pinhole aperture helped, but arduous testing was needed to ensure it was set at perfect position for a clear image. The matte plexiglass was also thrown out and, after some experimentation, replaced with a sheet of semi-transparent baking paper sandwiched between two pieces of clear plexiglass. The result is hard to argue with.

Continue reading “Tracing A Scene An Old-Fashioned Way”

Cryptocurrency Mining Post-Bitcoin

While the age of using your own computer to mine Bitcoin during spare CPU cycles has long passed, average folks aren’t entirely shut out of the cryptocurrency game yet. Luckily, Bitcoin isn’t the only game in town anymore, and with GPUs coming down in price it’s possible to build a mining rig for other currencies like Etherium.

[Chris]’s build starts with some extruded aluminum and a handful of GPUs. He wanted to build something that didn’t take up too much space in the small apartment. Once the main computer was installed, each GPU was installed upwards in the rack, with each set having its own dedicated fan. After installing a fan controller and some plexiglass the rig was up and running, although [Chris] did have to finagle the software a little bit to get all of the GPUs to work properly.

While this build did use some tools that might only be available at a makerspace, like a mill and a 3D printer, the hardware is still within reason with someone with a little cash burning a hole in their pockets. And, if Etherium keeps going up in value like it has been since the summer, it might pay for itself eventually, providing that your electric utility doesn’t charge too much for power.

And if you missed it, we just ran a feature on Etherium.  Check it out.

Hack Together A Whack-A-Mole In A Box!

Here’s a project that you can throw together in an afternoon, provided you have the parts on hand, and is certain to entertain. Hackaday.io user [SunFounder] walks us through the process of transforming a humble cardboard box into a whack-a-mole game might be just the ticket to pound out some stress or captivate any children in the vicinity.

A multi-control board and nine arcade buttons are the critical pieces of hardware here, with wires and a USB cable rounding out  the rest of the electronics. Separate the button core from the upper shell, mounting the shell in the box, and connect the button core’s LED cathode to the button’s ON terminal. Repeat eight times. Solder the buttons in parallel and add some more wire to the buttons’ ON terminals to extend their reach. Repeat eight more times.

Place the finished LED+cores into the buttons and connect their ON terminals to their respective buttons on the multi control board. Now for the hard step: use a mini-USB to USB cable to connect the controller to a computer you want to use to run the game’s code in the Arduino IDE. Modify the key-mappings and away you go! Check out the build video after the break.

Continue reading “Hack Together A Whack-A-Mole In A Box!”

Hackaday Prize Entry: Fighting Dehydration One Sip At A Time

Humans don’t survive long without water, and most people walk around in a chronic state of mild dehydration even if they have access to plenty of drinking water. It’s hard to stay properly hydrated, and harder still to keep track of your intake, which is the idea behind this water-intake monitoring IoT drinking straw.

Dehydration is a particularly acute problem in the elderly, since the sense of thirst tends to diminish with age. [jflaschberger]’s Hackaday Prize entry seeks to automate the tedious and error-prone job of recording fluid intake, something that caregivers generally have to take care of by eyeballing that half-empty glass and guessing. The HydrObserve uses a tiny turbine flowmeter that can mount to a drinking straw or water bottle cap. A Hall sensor in the turbine sends flow data to a Cypress BLE SoC module, which totalizes the volume sipped and records a patient identifier. A caregiver can then scan the data from the HydrObserve at the end of the day for charting and to find out if anyone is behind on their fluids.

There are problems to solve, not least being the turbine, which doesn’t appear to be food safe. But that’s a small matter that shouldn’t stand in the way of an idea as good as this one. We’ve seen a lot of good entries in the Assistive Technology phase of the 2017 Hackaday Prize, like a walker that works on stairs or sonic glasses for the blind. There are only a couple of days left in this phase — got any bright ideas?

Coca-Cola's 3D sign

Coca-Cola’s New 3D Times Square Sign Invokes Inceptionism

Coca-Cola has updated their sign in Times Square, and this one has a mesmerizing 3D aspect to it, giving the spooky feeling you get from watching buildings curl up into the sky in the movie, Inception. That 3D is created by breaking the sign up into a 68’x42′ matrix of 1760 LED screens that can be independently extended out toward the viewer and retracted again. Of course, we went hunting for implementation details.

Moving Cube Module
Moving Cube Module

On Coca-Cola’s webpage listing the partners involved in putting it together, Radius Displays is listed as responsible for sign design, fabrication, testing and installation support. Combing through their website was the first step. Sadly we found no detailed design documents or behind-the-scenes videos there. We did find one CAD drawing of a Moving Cube Module with a 28×28 matrix of LEDs. Assuming that’s accurate then overall there are 1,379,840 LEDs — try ordering that many off of eBay. EDIT: One behind-the-scenes video of the modules being tested was found and added below.

So the patent hunting came next, and that’s where we hit the jackpot. Read on to see the results and view the videos of the sign in action below.

Continue reading “Coca-Cola’s New 3D Times Square Sign Invokes Inceptionism”

Nerf Gun Ammo Counter And Range Finder

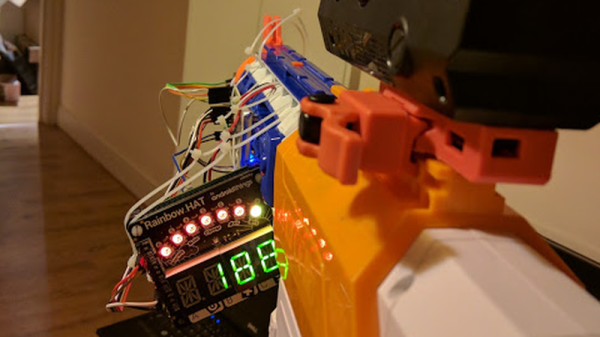
The proliferation of breakout boards that the DIY electronics movement has allowed has been staggering. Buy a few different boards, wire them together to a microcontroller or credit-card computer (both on their own breakout board) and write a bit of code, and you can create some really interesting things. Take Reddit user [Lord_of_Bone]’s Nerf Gun ammo counter and range finder, for example, a great example of having a great idea and looking around for the ways to implement it.

For the range finder, [Lord_of_Bone] looked to an ultrasonic rangefinder. For the ammo counter, [Lord_of_Bone] chose a proximity sensor. To run everything, the Raspberry Pi Zero was used and the visuals were supplied by a Rainbow Hat. The range finder is self-explanatory. The proximity sensor is located at the end of the gun’s muzzle and when it detects a Nerf dart passing by it reduces the ammo count by one. Blu-tack is used to hold everything in place, but [Lord_of_Bone] plans to use Sugru when he’s past the prototype stage.

The one problem [Lord_of_Bone] has with the build is that there’s no way to tell how many Nerf bullets are in the magazine. Currently the wielder must push a button when reloading to reset the count to a preset amount. We’re sure that [Lord_of_Bone] would appreciate any suggestions the Hack-A-Day crowd could offer.

[Lord_of_Bone] gives a full bill of materials, Python code, a lot of pictures and step-by-step instructions so that you, too, can determine how far away your target is, and whether or not you have enough ammo to hit them. We have quite a few Nerf mods on the site, and [Lord_of_Bone] could take a look at this article about how to keep track of your Nerf ammo, and here’s a different method of determining if a Nerf dart has been fired (and measuring its speed.)

[via Reddit] Continue reading “Nerf Gun Ammo Counter And Range Finder”

A BluePill For Arduino Dependence

Arduinos are helpful but some applications require more than what Arduinos can provide. However, it’s not always easy to make the switch from a developed ecosystem into the abyss that is hardware engineering. [Vadim] noticed this, which prompted him to write a guide to shepherd people on their quest for an Arduino-free environment, one BluePill at a time.

With an extended metaphor comparing Arduino use and physical addiction, [Vadim’s] writing is a joy to read. He chose to focus on the BluePill (aka the next Arduino Killer™) which is a $1.75 ARM board with the form factor of an Arduino Nano. After describing where to get the board and it’s an accompanying programmer, [Vadim] introduces PlatformIO, an alternative to the Arduino IDE. But wait! Before the Arduino die-hards leave, take note that PlatformIO can use all of the “Arduino Language,” so your digitalWrites and analogReads are safe (for now). Like any getting started guide, [Vadim] includes the obligatory blinking an LED program. And, in the end, [Vadim] sets his readers up to be comfortable in the middle ground between Arduino Land and the Wild West.

The debate for/against Arduino has been simmering for quite some time, but most agree that Arduino is a good place to start: it’s simpler and easier than jumping head first. However, at some point, many want to remove their “crippling Arduino dependency” (in the words of [Vadim]) and move on to bigger and better things. If you’re at this point, or still cling to your Uno, swing on over and give Vadim’s post a read. If you’re already in the trenches, head on over and read our posts about the BluePill and PlatformIO which are great complements for [Vadim’s].