Addition On The Strangest Vacuum Tube

[Uniservo] made a video of a tube he’s been trying to acquire for a long time: a Rogers 6047 additron. Never heard of an additron? We hadn’t either. But it was a full binary adder in a single vacuum tube made in Canada around 1950. You can see the video below.

The unique tubes were made for the University of Toronto Electronic Computer (UTEC). A normal tube-based computer would require several tubes to perform an addition, but the additron was a single tube that used beam switching to perform the addition in a single package. [Uniservo] points out how the tube could have revolutionized tube computing, but before it could really appear in real designs, transistors — and later, integrated circuits — would take over.

Continue reading “Addition On The Strangest Vacuum Tube”

Cleaning Up A Low-Cost Buck-Boost Supply

Cheap DC-DC converters have been a boon on the hobbyist bench for a while now, but they can wreak havoc with sensitive circuits if you’re not careful. The problem: noise generated by the switch-mode supply buried within them. Is there anything you can do about the noise?

As it turns out, yes there is, and [Shahriar] at The Signal Path walks us through a basic circuit to reduce noise from DC-DC converters. The module under the knife is a popular buck-boost converter with a wide input range, 0-32 VDC output at up to 5 amps, and a fancy controller with an LCD display. But putting the stock $32 supply on a scope reveals tons of harmonics across a 1 MHz band and overall ripple of about 66 mV. But a simple voltage follower built from a power op-amp and a Zener diode does a great job of reducing the spikes and halving the ripple. The circuit is just a prototype and is meant more as a proof of principle and launching point for further development, and as such it’s far from perfect. The main downside is the four-volt offset from the input voltage; there’s also a broad smear of noise at the high end of the spectrum that persists even with the circuit in place. Centered around 900 MHz as it is, we suspect a cell signal of some sort is getting in. 900 kHz.

If you haven’t checked out the videos at The Signal Path, you really should. [Shahriar] really has a knack for explaining advanced topics in RF engineering, and has a bench to die for. We’ve covered quite a few of his projects before, from salvaging a $2700 spectrum analyzer to multiplexing fiber optic transmissions.

Continue reading “Cleaning Up A Low-Cost Buck-Boost Supply”

Build Your Own Wave Tank

Wave tanks are cool, but it’s likely you don’t have one sitting on your coffee table at home. They’re more likely something you’ve seen in a documentary about oil tankers or icebergs. That need no longer be the case – you can build yourself a wave generator at home!

This build comes to use from [TVMiller] who started by creating a small tank out of acrylic sheet. Servo-actuated paddles are then placed in the tank to generate the periodic motion in the water. Two servos are controlled by an Arduino, allowing a variety of simple and more complex waves to be created in the tank. [TVMiller] has graciously provided the code for the project on Hackaday.io. We’d love to see more detail behind the tank build itself, too – like how the edges were sealed, and how the paddles are hinged.

A wave machine might not be the first thing that comes to mind when doing science at home, but with today’s hardware, it’s remarkable how simple it is to create one. Bonus points if you scale this up to the pool in your backyard – make sure to hit the tip line when you do.

Neural Network Gimbal Is Always Watching

[Gabriel] picked up a GoPro to document his adventures on the slopes and trails of Montreal, but quickly found he was better in front of the camera than behind it. Turns out he’s even better seated behind his workbench, as the completely custom auto-tracking gimbal he came up with is nothing short of a work of art.

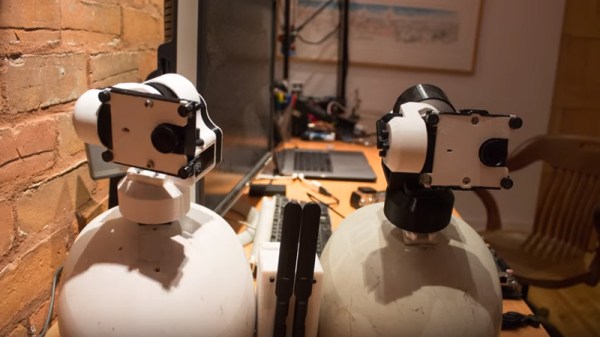
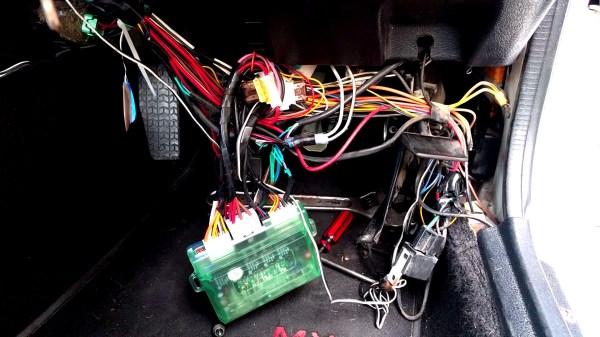
There’s quite a bit going on here, and as you might expect, it took several iterations before [Gabriel] got all the parts working together. The rather GLaDOS-looking body of the gimbal is entirely 3D printed, and holds the motors, camera, and a collection of ultrasonic receivers. The Nvidia Jetson TX1 that does the computational heavy lifting is riding shotgun in its own swanky looking 3D printed enclosure, but [Gabriel] notes a future revision of the hardware should be able to reunite them.

In the current version of the system, the target wears an ultrasonic emitter that is picked up by the sensors in the gimbal. The rough position information provided by the ultrasonics is then refined by the neural network running on the Jetson TX1 so that the camera is always focused on the moving object. Right now the Jetson TX1 gets the video feed from the camera over WiFi, and commands the gimbal hardware over Bluetooth. Once the Jetson is inside the gimbal however, some of the hardware can likely be directly connected, and [Gabriel] says the ultrasonics may be deleted from the design completely in favor of tracking purely in software. He plans on open sourcing the project, but says he’s got some internal house keeping to do before he takes the wraps off it.

From bare bones to cushy luxury, scratch-built camera gimbals have become something of a right of passage for the photography hacker. But with this project, it looks like the bar got set just a bit higher.

Continue reading “Neural Network Gimbal Is Always Watching”

Hackaday Prize Entry: UAProsthetics, A Powered Hand

One of the great successes of desktop 3D printers is custom prosthetics and orthotics. For a fraction of the price of a prosthetic arm, you can buy a machine capable of producing hundreds of completely customizable prosthetics. [Taran Ravindran]’s project in the running for the 2017 Hackaday Prize follows the long tradition of building customized prosthetics. His prosthetic hand designed to be simpler and cheaper than conventional artificial limbs while still giving us some innovation in how this hand will move.

The digits on [Taran]’s hand are controlled by linear servos pulling on a series of Bowden cables. One servo actuates the index finger, with a double differential to close the three less important figures — the middle, ring, and pinky fingers don’t need the articulation of the forefinger and thumb. Those three are actuated together, saving cost and complexity — they basically operate to support the index and thumb rather than being controllable independently. The thumb has 2 DOF by itself to give it the maximum amount of utility.

Another area of importance [Taran]’s focusing on is the matter of ease of use. If the prosthesis is too complicated, difficult, or unpleasant to use, it won’t get used regardless of its awesome features. Knowing this, he focused on making the hand as simplified as possible. Right now, the project has been modeled in CAD, and [Taran] is just waiting for the SLS parts to arrive before assembling the whole thing. It’s a great project, and a great entry for this year’s Hackaday Prize.

The Bane Of Aftermarket Car Alarms

The humble car alarm has been around almost as long as the car itself, first being developed by an unknown prisoner in Denver, circa 1913. To the security-conscious motorist, they make a lot of sense. The noise of a car alarm draws attention which is the last thing a would-be thief wants, and the in-built immobilizers generally stop the car being moved at all without a time-consuming workaround. Both are a great deterrent to theft.

It may then surprise you to know that I, dear readers, consider the aftermarket car alarm to be one of the most heinous devices ever fitted to the modern automobile. Combining the unholy trifecta of being poorly designed, cheaply made, and fitted by only the most untalented or uncaring people to wield a soldering iron, they are a blight that I myself refuse to accept.

It was my very own Mazda that suffered at the hands of a car alarm system. Two days after purchasing the car, the keyfob died, and thus the car would no longer start. My other car was already out of action due to bent valves, and I needed to get to work, so I figured as a competent hacker, I’d be able to quickly disable it.

Continue reading “The Bane Of Aftermarket Car Alarms”

3D Printed Lamp Even Prints The Nuts And Bolts

The first print to come off a shiny new 3D printer is usually a toy widget of some sort that will forever sit at your desk without purpose. The alternative is a practical project that is custom and personal like this 3D Printed Articulating Lamp. [IgorF2] shares his design for this wall mounted device which was created using Fusion 360.

The complete design consists of eight parts which includes the arms, nuts, and bolts, as well as the wall mount, each of which can be printed individually. These come together to form a structure that can be attached to a wall or your work bench. Though [IgorF2] has provided arm pieces of length 100 mm, 140 mm and 200 mm, you can mix and match to create a much larger project. The files are available for download from Thingiverse for your making pleasure.

We think this can be a great basic structure for someone looking at custom wall mounted projects. The lamp mount can be easily supplemented by a Raspberry Pi and Camera holder if you feel like live streaming your bench. Alternatively, it may be customized to become a motion detecting lamp just for fun. We hope to see some good use come of it in the future.