Radio Tuning The Quicksilver Way

Modern radios are often digital affairs, in which the frequency is derived from a stable crystal oscillator and varied through a microprocessor controlled frequency synthesiser. It won’t drift, and it’s exactly on the frequency dialed in. Older radios though relied on a tuned circuit, a combination of capacitor and inductor, for their frequency selection. If you were curious enough to peer inside — and we know you were — you’d have seen the moving vanes of a variable capacitor controlled by the tuning knob.

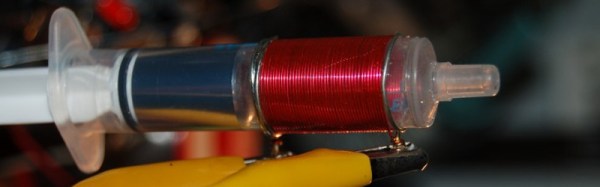
Of course, there is another way to adjust a tuned circuit: by changing the value of the inductor. Older car radios for instance moved a ferrite slug inside a coil to tune from station to station. But that method is not good enough for [David Mills]. Being in possession of some finely graduated syringes he decided to try liquid tuning by increasing the volume within the coil.

Solutions of salts made little difference, so he reached for some mercury. The result is an RF inductor wound round a syringe body, with a body of mercury whose position can be adjusted by the plunger. He measures the Q factor of the coil with air core or mercury core, and as the inductance decreases with more mercury, so does the Q.

We see home-made parts from time to time, and there’s nothing too special about permeability tuning. However, this unusual take on the matter makes this one rather special. We doubt we’ll see its like very often in the future.

SpiderMAV drone perching from the ceiling

SpiderMAV Drone Shoots Webs To Perch And Stabilize

Introducing your friendly neighborhood SpiderMAV, a micro aerial vehicle that shoots webbing to enable it to hang from ceilings and stabilize itself horizontally using low power. It’s inspired by the Darwin’s bark spider that spins a circular web with anchor lines up to 25 meters (82 feet) long.

SpiderMAV perching and stabilizing modules

For the DJI Matrice 100 drone to hang from a ceiling, a compressed gas cylinder fires a magnet with a trailing polystyrene line up to a steel beam. The line can then be reeled in to the desired length. For horizontal stabilization, line-trailing magnets are fired horizontally instead and then reeled in to tension the lines.

To test the effectiveness of the system, a cross wind was produced using a fan. With the DJI’s attitude-hold mode, maximum X, Y and Z deviations were 136, 386 and 106 mm respectively. With the stabilization, however, the deviations were reduced to 47, 80 and 74 mm. The power requirements were also reduced to essentially nil. Watch it in action in the videos below.

SpiderMAV is the brainchild of Imperial College London’s Aerial Robotics Laboratory, led by [Mirko Kovac], and is still experimental. For example, a magnet release mechanism has yet to be built in. Perhaps a sharp tug by the reeling mechanism, or a sudden thrust by the drone would release the magnets. Or the permanent magnets could be replaced with electromagnets, provided the required current doesn’t offset the efficiency gains. What solutions can you come up with? Let us know in the comments.

Continue reading “SpiderMAV Drone Shoots Webs To Perch And Stabilize”

Dog-POV: Canine Speed Indicator

[Johan Beyers] built an elegantly simple Dog Speedometer project that uses a POV display to display a running dog’s speed without the benefit of an accelerometer. Using an Arduino (looks like it might be a D-love) and a line of 5 LEDs, [Johan] built a dirt-simple POV — 39 lines of code — that times out the flashes so that an immobile viewer sees the dog’s speed. How do you know your pup’s loping speed? That’s the beauty of this project.

Instead of putting all of the LEDs in a line, they are arranged in a V-shape. Because of this spatial offset, the patterns flashed out only “look right” at the right speed. Each number is flashed at a different speed, so you just look for the least distorted numeral.

[Johan]’s code does only what it needs to get the job done. The character data are stored in arrays that are played back directly to the pins of PORTD — avoiding most of the usual Arduino-style complexity with pin definitions and other foolery.

POV displays can be leveraged to add pizzazz to any project — this CD-ROM POV clock and this wind-powered POV weather station come to mind.

The Hackaday Prize: Growing Your Own Soil

When a rainforest is clearcut for agricultural use, we only see the surface problems: fewer trees, destruction of plant and animal habitats, and countless other negative effects on the environment. A lurking problem, however, is that the soil is often non-ideal for farming. When the soil is exhausted, the farmers move further into the rainforest and repeat the process.

In the Amazon, however, there are pockets of man-made soil that are incredibly nutrient-dense. Figuring out how to make this soil, known as Terra Preta, on a massive scale would limit the amount of forest destruction by providing farmers a soil with more longevity which will, in turn, limit the encroachment on the rainforest. That’s the goal of this Hackaday Prize entry by [Leonardo Zuniga]: a pyrolysis chemical reactor that can make this soil by turning organic matter into a type of charcoal that can be incorporated into the soil to make Terra Preta.

As a bonus to making this nutrient-dense soil on a massive scale, this reactor also generates usable energy as a byproduct of processing organic waste, which goes several steps beyond simple soil enrichment. If successful and scalable, this project could result in more efficient farming techniques, greater yields, and, best of all, less damage to the environment and less impact on the rainforests.

RetroModem For The Commodore 64

Retrocomputers are fun, but ultimately limited in capability compared to modern hardware. One popular pursuit to rectify this is the connection of early home computers to the Internet. To that end, [que] built the Retromodem for the Commodore 64.

The build starts with a case from an Intel 14.4 modem. A little fast for the Commodore 64 era, but anachronism is charming when done tastefully. Inside is an Arduino with an ethernet module to handle the heavy lifting of carrying packets to the outside world.  [que] took the time to wire up status LEDs for the proper vintage look, which really adds something to the project. They switch on and off to indicate the various settings on the modem – it’s great to see in the video below the break the “HS” LED light up when the baud rate is changed to a higher speed.

The project implements most of the Hayes command set, so you can interface with it over a serial terminal just like it’s 1983. [que] doesn’t go into too many details of how it’s all put together, but for the experienced code warrior it’s a project that could be whipped up in a weekend or two. For a more modern take, perhaps you’d like to hook your C64 up over Wifi instead?

Continue reading “RetroModem For The Commodore 64”

Virtual Analog Synth Brings Tunes To The Masses

Part of the problem with getting involved in a new hobby is the cost. Whether you’re learning to surf, weld, garden, or program, often the entry cost is several hundred dollars. We’re huge fans of things with low barriers to entry, though, so we were happy to see the latest project from [pappas.chris] which promises to introduce newcomers to the musical hobby of synthesizers for just over $20.

The build revolves around an STM32F7 microcontroller and offers a 6-voice virtual analog synthesizer. The build is expandable, too, so if you want to build on the STM platform with any other add ons the process is relatively simple. This might not be necessary for a while, though; the current iteration offers many features that a typical synthesizer would have. Exhausting the possibilities with this tiny device will take some effort.

Since the synth is built on a common microcontroller platform, it’s easily programmable too, which isn’t often a feature of commercial synthesizers. You can listen to a sample audio file on the project page, and get started building your own as well. If you don’t have your own keyboard to use with it, there are other DIY synths that cover that area as well.

Arduino Uno Strain Relief

Do jumper wires pulling out of your Uno have you pulling your hair out? Is troubleshooting loose jumpers making you lose your mind?  Are your projects backing up because of all the time you’ve lost keeping jumper wires secure in your Arduino Uno? Then you need the all new Ardunio Strain Relief Enclosure!

[Jeremy Cook] has had it with loose jumpers pulling out of his Uno, so he designed a case that not only secures the Arduino; it also keeps those dastardly jumper wires from pulling out at the most inconvenient times.

Composed of 3/4 inch thick MDF and 1/8 inch thick polycarbonate, the Arduino Strain Relief enclosure is sure to be a hit for every hacker’s work bench. [Jeremy] used a CNC router to cut the enclosure and top. The plastic top is secured to the MDF base via four 4-40 screws. Interestingly – he applied super glue to the screw holes in the MDF before tapping them. We’ll have to try this trick on our next project!