Faux-Retro “Tape” Player Runs On ESP32 And 80s Vibes

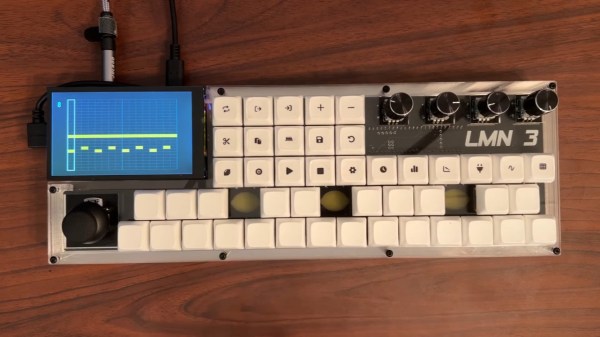
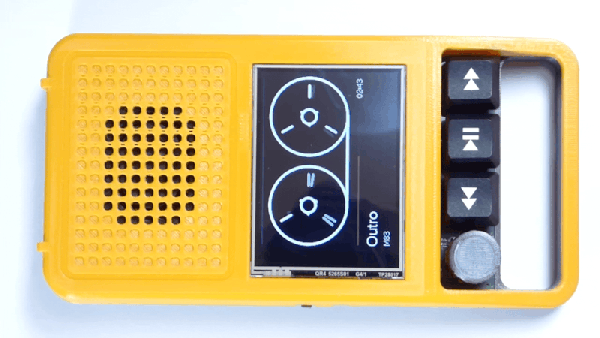
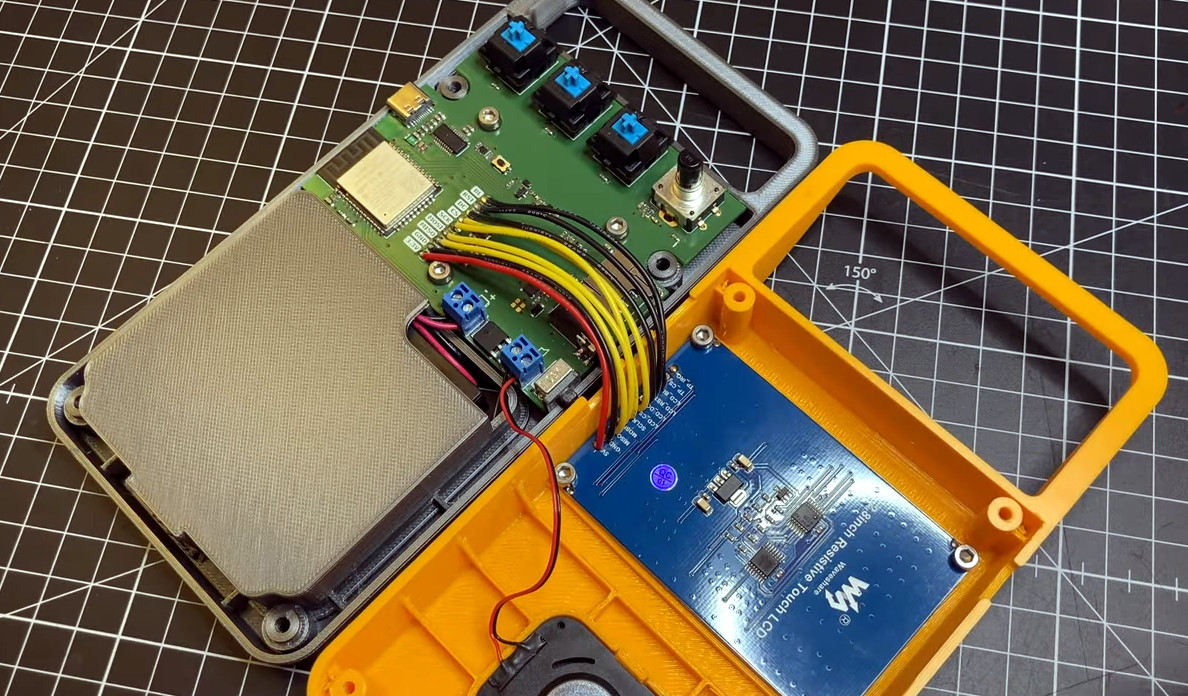
At first glance, this gorgeous retro-styled audio player built by [Max Kern] could absolutely pass for the genuine article. But then you take a closer look and realize that the “tape” it’s playing is actually an animation running on a 320 x 240 IPS display, and the Play and Rewind buttons on the front aren’t the chunky electromechanical affairs of yesteryear but actually cleverly repurposed MX keyboard switches.

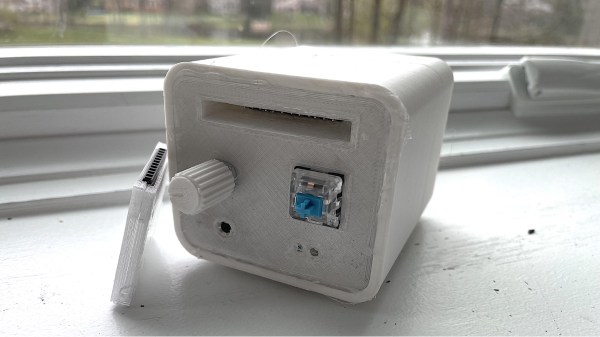
By now you’re probably realizing that this player is quite a bit smaller than you first imagined, which in turn, means that it even its case is a modern fabrication. While it might perfectly encapsulate the look and feel of a piece of 1980s consumer electronics, it was squirted out on a thoroughly modern desktop 3D printer.

Even so, [Max] made sure to include draft angles in the CAD design and and a distinctive separation line so the case looked like it was injection molded. Following similar logic, he decided against using a modern rechargeable battery pack to power the electronics, opting instead for a more era-appropriate set of AA batteries.

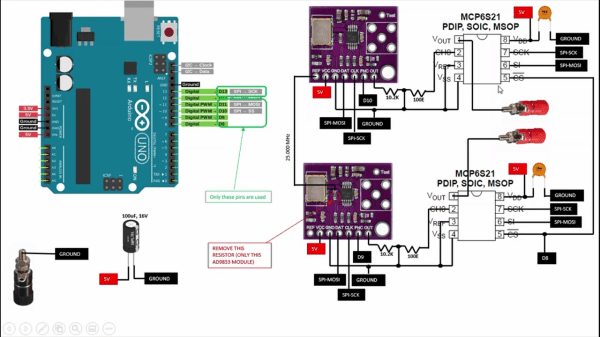
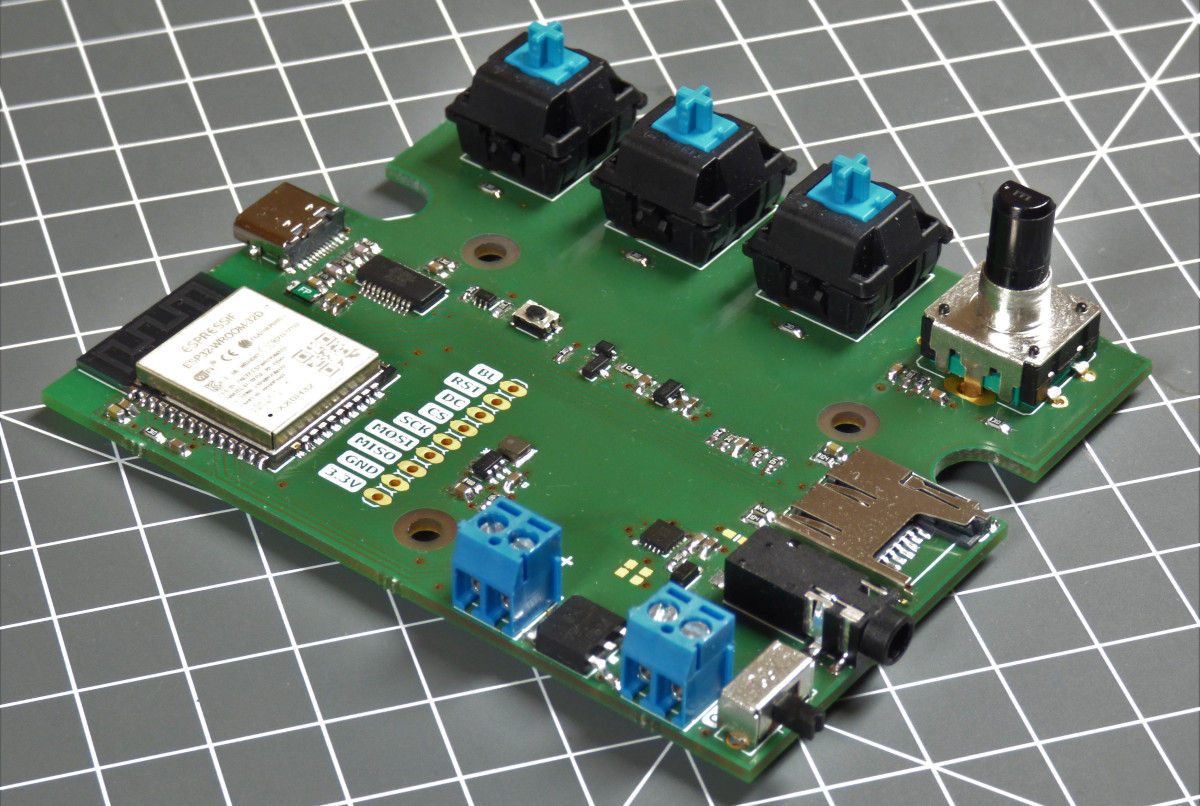
In terms of hardware, the custom PCB is home to an ESP32 WROOM, a MAX98357A I2S audio amplifier, a FT231XS USB-to-serial chip, with enough passives and regulators to keep them all well fed and happy. The ESP32 has more than enough computational horsepower to chew through MP3 files, which are conveniently loaded via an SD slot built into the side of the player. As the player was actually intended for audio books, onboard playback is limited to a mono speaker; though there is a 3.5 mm audio jack to plug in a pair of headphones for when the built-in speaker isn’t up to the task.

Check out the video after the break to see how the player is assembled, as well as a demonstration of its simple three-button user interface. It looks like a joy to use, though the lack of fast forward and rewind sound effects took us a bit by surprise given the otherwise impeccable attention to detail. We’ll assume there’s some technical limitation that makes this particularly difficult to implement, and that their absence is currently keeping [Max] up at night.

As impressive as the final product is, we can’t say it’s a surprise. Frankly, we wouldn’t expect anything less from [Max] at this point. His adaptive OLED macro pad wowed us back in 2020, and his ZeroBot is still one of the slickest designs for a DIY two-wheeled robots we’ve ever seen.

Continue reading “Faux-Retro “Tape” Player Runs On ESP32 And 80s Vibes”

LMN-3: Putting The ‘OP’ In Open Source Synthesizers

Some projects you come across simply leave you in awe when you look at the thought and the resulting amount of work that went into it, not only for the actual implementation, but everything around it. Even more so when it’s a single-developer open source project. [Stone Preston]’s synth / sampler / sequencer / DAW-in-a-box LMN-3 absolutely fits the description here, and it seems like he has set his heart on making sure everyone can built one for themselves, by providing all the design files from case down to the keycaps.

The LMN-3 (LMN as in “lemon”, not “comes before the OP“) is intended as a standalone, portable digital audio workstation, and is built around a Raspberry Pi 4 with a HyperPixel display for the user interface. The UI itself, and with it the core part of the software, was created using the Tracktion Engine, which itself uses the JUCE framework and combines your typical synthesizer, sequencer, and sampler features with the DAW part to handle recording, editing, and mixing. The remaining hardware is a custom-designed PCB with a set of function and keyboard buttons, along with a pitch bend joystick and four rotary encoders with push buttons that serve as main input handlers. Oh yes, and a Teensy board.

The UI is actually entirely controlled via MIDI commands, and custom firmware on the Teensy is translating the input events from buttons, encoders, and joystick accordingly. This essentially decouples the hardware from the software, and using a cross-platform framework underneath, you can also run the UI standalone on your computer and use any 3rd-party MIDI controller you like. Or then, as [Stone] thought really about everything, use a hardware emulator he created in addition. You could even leave out the Raspberry Pi and software altogether and turn this into a pure MIDI controller. If that sounds tempting, but you’re looking for something with more knobs and sliders instead of buttons, check out the Traktorino. And if you actually prefer a mouse as input device, there’s always something running in a browser.

Continue reading “LMN-3: Putting The ‘OP’ In Open Source Synthesizers”

A Lab-Grade Measurement Microphone For Not A Lot

The quality of any measurement can only be as good as the instrument used to gather it, and for acoustic measurements, finding a good enough instrument can be surprisingly difficult. Commonly available microphones can be of good quality, but since they are invariably designed for speech or music, they need not have the flat or wide enough response and low noise figure demanded of an instrumentation microphone.

Microphones for measurement purposes can be had for a very large outlay, but here’s [Peter Riccardi] with a unit designed around an array of MEMS capsules that delivers comparable performance for a fraction of the cost.

The result is both an extremely interesting project for those of us with an interest in audio, and a thorough delve into some aspects of its design for those who are merely curious. It uses four capsules in an effort to cancel out induced electrical noise, and boasts some impressive comparative measurements when tested against a commercial measurement microphone. We could almost see ourselves building this project.

Interested in audio technology? Try our Know Audio series.

picture of finished mp3 player that uses a cartridge to select songs

An MP3 Player That Gives Off Nintendo Vibez

We’re definitely pretty fond of the DIY MP3 players here at Hackaday, but we don’t think we’ve seen one like CartridgeMP3 from [jpet26] before.

All the electrical components are what we’ve come to expect. [jpet26] uses the popular VS1053 decoder to read MP3 files stored on an SD card. He also includes a potentiometer for adjusting volume, a USB C port for power and programming, a headphone jack for the audio output, a general-purpose status LED, and an on/off switch.

But what really caught our attention is the form factor [jpet26] selected for his MP3 player. Though the MP3 files are stored on an SD card, he uses a cartridge interface, similar to that of a Nintendo 64 or Game Boy of yesteryear, to choose which MP3 to play from the SD card. The cartridge interface is tied to a few GPIO pins and by reading the status of each pin, the device determines which MP3 to select.

You could say that the cartridge is a little unnecessary, and we wouldn’t argue with you. The cartridge doesn’t actually store the MP3 files, the SD card does. It might make a bit more sense if the cartridge housed the SD card itself with a few select MP3s stored on the card. That would be a quirky way of sharing your favorite playlists with your friends. So, yeah some clumsy handshaking there, but who isn’t guilty of that from time to time? We like it and thought you might appreciate it as well.

Cool MP3 player, [jpet26]! May we suggest a speaker for V2? And maybe some flex cables.

Continue reading “An MP3 Player That Gives Off Nintendo Vibez”

Desktop Soundbar Is Ideal For PC Use

Soundbars are a rather strange category of speaker, most typically used with televisions to add some punch that the drivers crammed into a flatscreen TV simply can’t match. [Matt] of DIY Perks wanted a soundbar that was better suited to use on a computer desk rather than in a loungeroom, and set about creating one.

Regular soundbars aren’t great for a computer desk as they tend to deliver sound directed at one’s chest rather than one’s ears. [Matt]’s design instead angles its speakers slightly upwards, aimed at the user’s head as it should be. The build uses reclaimed wooden flooring for a cheap source of pretty wood that isn’t as ugly or flaky as MDF.

The design acts as a monitor stand and keyboard hutch, raising the screen to a comfortable height for viewing. The speakers themselves are in acoustic enclosures mounted on either side, also helping to provide good stereo separation. A subwoofer is also built into the shelf to add some bass response, with an impressively-neat bass chamber design. Finished off with some LED lights and a USB hub, the design delivers great sound along with a lovely desk environment for getting work done.

[Matt] does love a nice DIY build; his water-cooled outdoor TV is a particular delight. Video after the break.

Continue reading “Desktop Soundbar Is Ideal For PC Use”

Low-Cost, Two-Channel Scriptable Waveform Generator

Microcontroller addict [Debraj] decided to make his own programmable sine wave generator, and was able to put it together for under $40 USD. Other than low-cost, his list of requirements was as follows:

  • Dual sine wave output, synchronized
  • Frequency, Amplitude, and Phase control
  • Low harmonics under 1 MHz
  • Scriptable via Python

The heart of the project is the Analog Devices AD9833, a complete Direct Digital Synthesis (DDS) waveform generator system on a chip. If you’ve ever rolled your own DDS using discrete ICs or in an FPGA, you can appreciate the benefit of squeezing the phase accumulator, sine lookup table, DAC, and control logic all into a single ten-pin package. [Debraj] uses AD9833 modules from the usual online vendors for a few dollars each. He synchronizes the generators by disconnecting the reference crystal on the second module and driving it from the first one. The remaining specifications are met by the inherent characteristics of the DDS system, and the scriptable interface is accomplished with an Arduino controlling the AD9833 chips and two programmable gain amplifiers (MCP6S31). We like the confidence that [Debraj] displays by sketching the initial circuit diagram with a ball-point pen — check out the sketch and the final pictorial schematic in the video below the break.

This is a good example of combining off-the-shelf modules to quickly build a project. This approach is great for one-off builds or as a proof-of-concept test bed that can later be spun onto a custom PCB. Another reason to use modules these days is that the modules are often in-stock but the chips are unobtainable. Though it appears [Debraj]’s only needs one of these generators, it would be an easy board to layout and build — if you can buy the parts.

Continue reading “Low-Cost, Two-Channel Scriptable Waveform Generator”

Bend It Like (Sonar) Beacon With A Phased Array

Ultrasonic transducers are incredible, with them you can detect distances, as well as levitate and peer through objects. They can emit and receive ultrasonic soundwaves (typically above 18khz) and just like all waves, they can be steered via a phased array. [Bitluni] was trying to accurately measure distances but found the large field of view of the sensor was just too imprecise, so he made a phased array of transducers.

The inspiration came from a Hackaday Supercon talk from 2019 about phased arrays. [Bitluni] walks through an excellent explanation of how the array works with a bucket of water and his finger, as well as a separate simulation. By changing the phase offset of the different array members, the beam can effectively be steered as interference muffs the undesired waves. Using a set of solenoids, he created a test bench to validate his idea in a medium he could see; water. The solenoids fire a single pulse into the water creating a wave. You can see the wave move in the correct direction in the water, which validates the concept. A simple PCB sent off to a fab house with a stencil offers a surface to solder the transducers and drivers onto. An ESP32 drives the 8 PWM signals that go to the transmitters and reads in the single receiver via a small amplifier. Still not content to let the idea be unproven, he sets up the receiver on his CNC gantry and plots the signal strength at different points, yielding beautiful “heat maps.”
bitluni's heatmap for his sonar array

It sweeps a 60-degree field in front of it at around 1-3 frames per second. As you might imagine, turning sound wave reflections into distance fields is a somewhat noisy affair. He projects the sonar display on top of what we can see in the camera and it is fun to see the blobs line up in the correct spot.

We noticed he built quite a few boards, perhaps in the future, he will scale it up like this 100 transducer array? Video after the break.

Continue reading “Bend It Like (Sonar) Beacon With A Phased Array”