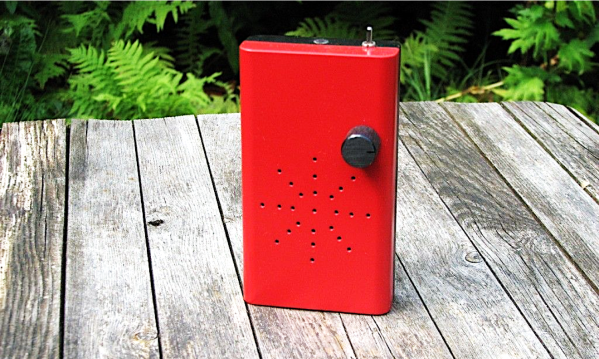
Media Streamer With E-Ink Display Keeps It Classy

The Logitech SqueezeBox was a device you hooked up to your stereo so you could stream music from a Network Attached Storage (NAS) box or your desktop computer over the network. That might not sound very exciting now, but when [Aaron Ciuffo] bought it back in 2006, it was a pretty big deal. The little gadget has been chugging all these years, but the cracks are starting to form. Before it finally heads to that great electronics recycling center in the sky, he’s decided to start work on its replacement.

Thanks to the Raspberry Pi, building a little device to stream digital audio from a NAS is easy these days. But a Pi hooked up to a USB speaker isn’t necessarily a great fit for the living room. [Aaron] didn’t necessarily want his replacement player to actually look like the SqueezeBox, but he wanted it to be presentable. While most of us probably would have tried to make something that looked like a traditional piece of audio gear, he took his design is a somewhat more homey direction.

An OpenSCAD render of the enclosure.

The Raspberry Pi 4 and HiFiBerry DAC+ Pro live inside of a wooden laser cut case that [Aaron] designed with OpenSCAD. We generally associate this tool with 3D printing, but here he’s exporting each individual panel as an SVG file so they can be cut out. We especially like that he took the time to add all of the internal components to the render so he could be sure everything fit before bringing the design into the corporeal world.

While the case was definitely a step in the right direction, [Aaron] wasn’t done yet. He added a WaveShare e-Paper 5.83″ display and mounted it in a picture frame. Software he’s written for the Raspberry Pi shows the album information and cover art on the display while the music is playing, and the current time and weather forecast when it’s idle. He’s written the software to plug into Logitech’s media player back-end to retain compatibility with the not-quite-dead-yet SqueezeBox, but we imagine the code could be adapted to whatever digital media scheme you’re using.

Over the years, we’ve seen a number of SqueezeBox replacements. Many of which have been powered by the Raspberry Pi, but even the ESP8266 and ESP32 have gotten in on the action recently.

How To Hack A Portable Bluetooth Speaker By Skipping The Bluetooth

Portable Bluetooth speakers have joined the club of ubiquitous personal electronics. What was once an expensive luxury is now widely accessible thanks to a prolific landscape of manufacturers mass producing speakers to fit every taste and budget. Some have even become branded promotional giveaway items. As a consequence, nowadays it’s not unusual to have a small collection of them, a fertile field for hacking.

But many surplus speakers are put on a shelf for “do something with it later” only to collect dust. Our main obstacle is a side effect of market diversity: with so many different speakers, a hack posted for one speaker wouldn’t apply to another. Some speakers are amenable to custom firmware, but only a small minority have attracted a software development community. It doesn’t help that most Bluetooth audio modules are opaque, their development toolchains difficult to obtain.

So what if we just take advantage of the best parts of these speakers: great audio fidelity, portability, and the polished look of a consumer good, to serves as the host for our own audio-based hacks. Let’s throw the Bluetooth overboard but embrace all those other things. Now hacking these boxes just requires a change of mindset and a little detective work. I’ll show you how to drop an Arduino into a cheap speaker as the blueprint for your own audio adventures.

Continue reading “How To Hack A Portable Bluetooth Speaker By Skipping The Bluetooth”

Organic Audio: Putting Carrots As Audio Couplers To The Test

[Boltz999]'s carrot interconnect.
[Boltz999]’s carrot interconnect.
If there’s one thing that gives us joy here at Hackaday it’s a story of audio silliness. There is a rich vein of dubious products aimed at audiophiles which just beg to be made fun of, and once in a while we oblige. But sometimes an odd piece of audio equipment emerges with another purpose. Take [Boltz999]’s interconnects for example, which were born of necessity when there were no female-to-female phono adapters to connect a set of cables. Taking a baby carrot and simply plugging the phonos into its flesh delivered an audio connectivity solution that worked.

Does this mean that our gold-nanoparticle-plated oxygen-free directional audio cables are junk, and we should be heading for the supermarket to pick up a bag of root vegetables instead? I set out to test this new material in the secret Hackaday audio lab, located on an anonymous 1970s industrial estate in Milton Keynes, UK.

Continue reading “Organic Audio: Putting Carrots As Audio Couplers To The Test”

A STM32 Tonewheel Organ Without A Single Tonewheel

The one thing you might be surprised not to find in [Laurent]’s beautiful tonewheel organ build is any tonewheels at all.

Tonewheels were an early way to produce electronic organ sounds: by spinning a toothed wheel at different frequencies and transcending the signal one way or another it was possible to synthesize quite an array of sounds. We like to imagine that they’re all still there in [Laruent]’s organ, albeit very tiny, but the truth is that they’re being synthesized entirely on an STM32 micro controller.

The build itself is beautiful and extremely professional looking. We were unaware that it was possible to buy keybeds for a custom synthesizer, but a model from FATAR sits at the center of the show. There’s a MIDI encoder board and a Nucleo development board inside, tied together with a custom PCB. The UI is an momentary encoder wheel and a display from Mikroelektronika.

You can see and hear this beautiful instrument in the video after the break.

Continue reading “A STM32 Tonewheel Organ Without A Single Tonewheel”

Microphone Isolation Shield Is A Great IKEA Hack; Definitely Not A Xenomorph Egg

As any content creator knows, good audio is the key to maintaining an audience. Having a high quality microphone is a start, but it’s also necessary to reduce echoes and other unwanted noise. An isolation shield is key here, and [phico] has the low down on making your own.

The build starts with an IKEA lampshade, so it’s a great excuse to head down to the flatpack store and grab yourself some Köttbullar for lunch while you’re at it (that’s meatballs for those less versed in IKEA’s cafeteria fare). This is really more of a powder-coated steel frame than a shade, perfect as the bones of an enclosure. [Phico] hacks it open with a Dremel to make room for the microphone. Cardboard soaked in wallpaper paste is then used to create a papier-mache-like shell, which is then stuffed with acoustic foam. A small opening is left to allow the narrator’s voice to reach the microphone, while blocking sound from other directions. Finally, a stocking is wrapped around the whole assembly to act as an integral anti-pop filter.

It’s a tidy build, and while it looks a bit like a boulder to some, if you encounter a room full of ovomorphs that look just like this, tiptoe right out of there. IKEA hacks are always popular, and this laser projector lamp is a great example. If you’ve got your own nifty Swedish-inspired build, make sure you let us know!

InstaBeat Started Out Of Spite

[Tom] teaches electronics with this small programmable MP3 player, but it didn’t get its start as a teaching tool.

As all parents are sometimes required to do, [Tom] was acting as chauffeur for his daughter and his friends. When he played the Beatles one of his passengers informed him that she was completely devoid of taste and didn’t like them at all. So he decided what the world needed was a Beatles appliance. This way all the ignorant plebs could educate themselves at the push of a button.

The machine is based around some SEED studio parts and a simple PCB. It was able to hold all 12 original albums and even announced their titles in a generated voice. Since the kit is easy to put together it was quickly re-purposed as a teaching aid. They get to learn the laser cutter and do some through-hole soldering.

He has plans to turn it into a more formal how-to workshop that anyone can duplicate.He’d also like to make a small software suite for playing with text-to-speech and hacking the speaker into other roles such as a multi meter.

Use Your Earbud’s Media Controls On Your Laptop With This Useful Dongle

[David] sends in his very nicely designed “Thumpware Media Controller” that lets your mobile phone headphones control the media playback on your PC.

We realize that some PCs have support for the extra pins on cellphone earbuds, but at least some of us have experienced the frustration (however small) of habitually reaching up to touch the media controls on our earbuds only to hear the forlorn click of an inactive-button. This solves that, assuming you’re still holding on to those 3.5mm headphones, at least.

The media controls are intercepted by a PIC16 and a small board splits and interprets the signals into a male 3.5mm and a USB port. What really impressed us is the professional-looking design and enclosure. A lot of care was taken to plan out the wiring, assembly, and strain relief. Overall it’s a pleasure to look at.

All the files are available, so with a bit of soldering, hacking, and careful sanding someone could put together a professional looking dongle for their own set-up.