ATX2AT Makes Retrocomputing Safer, Heads To Kickstarter

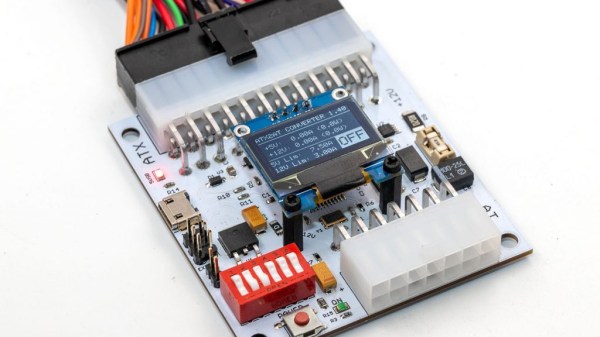
It’s easy to take power supplies for granted in modern computing, but powering vintage hardware is not always so simple or worry-free. The power supplies for old electronics are themselves vintage, and the hardware being powered can be quite precious. A power problem can easily cause fried components and burned traces on a board. As [Doc TB] observes, by the time you hear crackling, it’s already far too late.

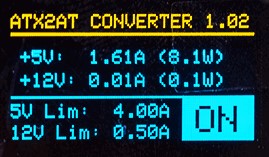
To address this, [Doc TB] designed the ATX2AT Smart Converter as an open source project and recently decided to make it available through a Kickstarter campaign. ATX2AT is a way to safely and securely replace some vintage power supplies with a standard PC ATX power supply, and adds a large number of protection features such as current monitoring and programmable reaction time for overcurrent protection. All of this can help prevent a retrocomputer enthusiast’s precious vintage hardware from being damaged in the event of a problem. It’s not just for powering known-good hardware; it can be invaluable when testing or repairing hardware that might be in an unknown state.

When we first came across [Doc TB]’s ATX2AT project we recognized it as a well-made device to address a specific niche, and to do it well. Assessing risk takes into account not only the probability of a problem occurring, but also just how bad things would be if it did happen. If your old hardware is precious enough to warrant the extra protection, or you are into repairing or assessing old hardware, then an ATX2AT might be just what you need. You can see it in action in the video embedded below.

Continue reading “ATX2AT Makes Retrocomputing Safer, Heads To Kickstarter”

Barcaderator Is Coin-Op Arcade Up Top And Kegerator Down Below

It’s a common sight in our community for a life-expired arcade cabinet to be repurposed as a MAME cabinet with an up-to-date screen and other internals. Many of us have had some fun pursuing high scores in a hackerspace somewhere, and even if they don’t have the screen burn and annoying need for cash of the originals they still deliver plenty of fun.

But if there’s one pleasure an adult can pursue that a kid in a 1980s arcade couldn’t, it’s a cool glass of beer. [Marcus Young] has brought together the two with his Barcaderator, a custom MAME cabinet with a beer tap on the side and a fridge for a keg in its base.

The MAME internals include a Lattepanda Alpha and an LED controller for those illuminated buttons. Where this build shines is in its custom cabinet, which instead of being an all-in-one unit takes the form of a base and top half that are detatchable. It appears to take its inspiration and build techniques from the world of flight cases. You can see the detail where the two halves come together in this image. The result should be of great interest to anyone who has struggled with moving an unwieldy traditional arcade cabinet.

This is we think the first beer/arcade combo to grace these pages. But we’ve had more than one arcade cabinet, and definitely quite a few kegs along the way.

Microphone Isolation Shield Is A Great IKEA Hack; Definitely Not A Xenomorph Egg

As any content creator knows, good audio is the key to maintaining an audience. Having a high quality microphone is a start, but it’s also necessary to reduce echoes and other unwanted noise. An isolation shield is key here, and [phico] has the low down on making your own.

The build starts with an IKEA lampshade, so it’s a great excuse to head down to the flatpack store and grab yourself some Köttbullar for lunch while you’re at it (that’s meatballs for those less versed in IKEA’s cafeteria fare). This is really more of a powder-coated steel frame than a shade, perfect as the bones of an enclosure. [Phico] hacks it open with a Dremel to make room for the microphone. Cardboard soaked in wallpaper paste is then used to create a papier-mache-like shell, which is then stuffed with acoustic foam. A small opening is left to allow the narrator’s voice to reach the microphone, while blocking sound from other directions. Finally, a stocking is wrapped around the whole assembly to act as an integral anti-pop filter.

It’s a tidy build, and while it looks a bit like a boulder to some, if you encounter a room full of ovomorphs that look just like this, tiptoe right out of there. IKEA hacks are always popular, and this laser projector lamp is a great example. If you’ve got your own nifty Swedish-inspired build, make sure you let us know!

Robotic Skin Sees When (and How) You’re Touching It

Cameras are getting less and less conspicuous. Now they’re hiding under the skin of robots.

A team of researchers from ETH Zurich in Switzerland have recently created a multi-camera optical tactile sensor that is able to monitor the space around it based on contact force distribution. The sensor uses a stack up involving a camera, LEDs, and three layers of silicone to optically detect any disturbance of the skin.

The scheme is modular and in this example uses four cameras but can be scaled up from there. During manufacture, the camera and LED circuit boards are placed and a layer of firm silicone is poured to about 5 mm in thickness. Next a 2 mm layer doped with spherical particles is poured before the final 1.5 mm layer of black silicone is poured. The cameras track the particles as they move and use the information to infer the deformation of the material and the force applied to it. The sensor is also able to reconstruct the forces causing the deformation and create a contact force distribution. The demo uses fairly inexpensive cameras — Raspberry Pi cameras monitored by an NVIDIA Jetson Nano Developer Kit — that in total provide about 65,000 pixels of resolution.

Apart from just providing more information about the forces applied to a surface, the sensor also has a larger contact surface and is thinner than other camera-based systems since it doesn’t require the use of reflective components. It regularly recalibrates itself based on a convolutional neural network pre-trained with data from three cameras and updated with data from all four cameras. Possible future applications include soft robotics, improving touch-based sensing with the aid of computer vision algorithms.

While self-aware robotic skins may not be on the market quite so soon, this certainly opens the possibility for robots that can detect when too much force is being applied to their structures — the machine equivalent sensation to pain.

Continue reading “Robotic Skin Sees When (and How) You’re Touching It”

Mike Harrison Knows Everything About LEDs

Driving an LED and making it flash is probably the first project that most people will have attempted when learning about microprocessor control of hardware. The Arduino and similar boards have an LED fitted, and turning it on and off is a simple introduction to code. So it’s fair to say that many of us will think we have a pretty good handle on driving an LED; connect it to a I/O pin via a resistor and that’s it. If this describes you, then Mike Harrison’s talk at the recent Hackaday Superconference (embedded below) will be an education.

Mike has appeared on these pages multiple times as he pushes LEDs and PCB techniques to their limits, even designing our 2017 Superconference badge, and his many years of work in the upper echelons of professional LED installations have given him an unrivaled expertise. He has built gigantic art projects for airports, museums, and cities. A talk billed as covering everything he’s learned about LEDs them promises to be a special one.

If there’s a surprise in the talk, it’s that he’s talking very little about LEDs themselves. Instead we’re treated to a fundamental primer in how to drive a lot of LEDs, how to do so efficiently, with good brightness and colour resolution, and without falling into design traps. It’s obvious that some of his advice such at that of relying on DIP switches rather than software for configuration of multi-part installations has been learned the hard way.

Multiple LEDs at once from your driver chip, using a higher voltage.

We are taken through a bit of the background to perceived intensity and gamma correction for the human eyesight. This segues neatly into the question of resolution, for brightness transitions to appear smooth it is necessary to have at least 12 bits, and to deliver that he reaches into his store of microcontroller and driver tips for how to generate PWM at the right bitrate. His favoured driver chip is the Texas TLC5971, so we’re treated to a primer on its operation. A useful tip is to use multiple smaller LEDs rather than a single big one in the quest for brightness, and he shows us how he drives series chains of LEDs from a higher voltage using just the TI chip.

Given the content of the talk this shouldn’t come as a shock, but at the end he reminds us that he doesn’t use all-in-one addressable LEDs such as the WS2932 or APA102. These are  the staple of so many projects, but as he points out they are designed for toy type applications and lack the required reliability for a multi-thousand LED install.

Conference talks come in many forms and are always fascinating to hear, but it’s rare to see one that covers such a wide topic from a position of experience. He should write it into a book, we’d buy it!

Continue reading “Mike Harrison Knows Everything About LEDs”

New Silicon Carbide Semiconductors Bring EV Efficiency Gains

After spending much of the 20th century languishing in development hell, electric cars have finally hit the roads in a big way. Automakers are working feverishly to improve range and recharge times to make vehicles more palatable to consumers.

With a strong base of sales and increased uncertainty about the future of fossil fuels, improvements are happening at a rapid pace. Oftentimes, change is gradual, but every so often, a brand new technology promises to bring a step change in performance. Silicon carbide (SiC) semiconductors are just such a technology, and have already begun to revolutionise the industry.

Mind The Bandgap

A graph showing the relationship between band gap and temperature for various phases of Silicon Carbide.

Traditionally, electric vehicles have relied on silicon power transistors in their construction. Having long been the most popular semiconductor material, new technological advances have opened it up to competition. Different semiconductor materials have varying properties that make them better suited for various applications, with silicon carbide being particularly attractive for high-power applications. It all comes down to the bandgap.

Electrons in a semiconductor can sit in one of two energy bands – the valence band, or the conducting band. To jump from the valence band to the conducting band, the electron needs to reach the energy level of the conducting band, jumping the band gap where no electrons can exist. In silicon, the bandgap is around 1-1.5 electron volts (eV), while in silicon carbide, the band gap of the material is on the order of 2.3-3.3 eV. This higher band gap makes the breakdown voltage of silicon carbide parts far higher, as a far stronger electric field is required to overcome the gap. Many contemporary electric cars operate with 400 V batteries, with Porsche equipping their Taycan with an 800 V system. The naturally high breakdown voltage of silicon carbide makes it highly suited to work in these applications.

Continue reading “New Silicon Carbide Semiconductors Bring EV Efficiency Gains”

Patrol The Sprawl With This Battle Ready Cyberdeck

The recent crop of cyberdeck builds are inspired, at least tangentially, by William Gibson’s novel Neuromancer and its subsequent sequels. In the novels, the decks are used as mobile terminals to access the virtual reality of cyberspace. In our world, they’re usually just quasi-retro boxes with Raspberry Pis in them. Artistic license and all that. But the “XMT-19 Cutlass”, a deck built by [CaptNumbNutz], attempts to hew more closely to the source material than most builds we’ve seen.

Of course it won’t be transporting you into the matrix, and ultimately it’s still just a casemod for the Raspberry Pi. But at least it does a fantastic job of fitting the Neuromancer motif. The design is supposed to look like the XMT-19 was a piece of high-tech military hardware that was later co-opted by a cyberspace cowboy operating in the urban megatropolis that Gibson called the Sprawl, with exposed wiring and a visual mish-mash of components.

If you can believe it, the build started out as a locking clipboard of all things. From there, [CaptNumbNutz] started layering on the hand-cut foam greebles and spraying on the WWII inspired color scheme. We especially like the yellow tips on the antennas that invoke the propellers of vintage airplanes, and the serial number stenciled onto the bottom. In a departure from basically every other cyberdeck we’ve seen to date, there appear to be no 3D printed elements on the XMT-19; all the parts are hand made with nothing more than an a sharp knife and a heap of patience.

In terms of the electronics, the whole build has been greatly simplified by the use of a SmartiPi Touch case, which integrates the Pi and touch screen into a single hinged unit that just needed to get bolted to the top of the deck. Plus it gave him an excuse to put a big rainbow ribbon cable on the back of it to reach the Pi’s GPIO ports, which as you know, instantly makes everything look more retro-futuristic.

It might not be packing the raw power of the Intel NUC cyberdeck we covered last year, or have the convincingly vintage look of the VirtuScope, but we’d take the XMT-19 Cutlass into the matrix any day.