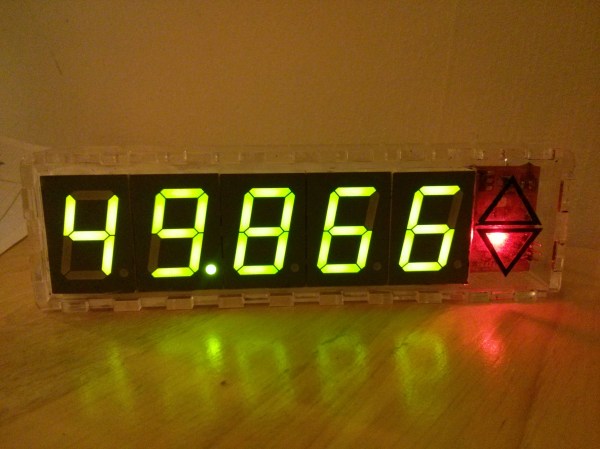
Using Ultrasonic Sensors To Measure And Log Oil Tank Levels

[Mike] lives in a temperate rainforest in Alaska (we figured from his website’s name) and uses a 570 gallon oil tank to supply his furnace. Until now, he had no way of knowing how much oil was left in the tank and what his daily usage was. As he didn’t find any commercial product that could do what he wanted, he designed his own solution. In his write-up, [Mike] started by listing all the different sensors he had considered to measure the oil level and finally opted for an ultrasonic sensor. In his opinion, this kind of sensor is the best compromise between cost, ease of use, range and precision for his application. The precise chosen model was the ping))) bought from our favorite auction website for around $2.5.

[Mike] built the custom enclosure that you can see in the picture above using PVC parts. Enclosed are the ultrasonic sensor, a temperature sensor and an LED indicating the power status. On the other side of the CAT5 cable can be found an Arduino compatible board with an XBee shield and a 9V battery. Using another XBee shield and its USB adapter board, [Mike] can now wirelessly access the tank oil level log from his computer.

Arduino-Powered Steampunk Steam Gauge

steampunkGauge

[Murphy’s_Lawyer] had some empty space on the wall in his kitchen, so he decided to fill it with a whirring Steampunk gizmo: an Arduino-driven steam gauge.

The build began as an old 10″ Ashcroft pressure gauge sourced from eBay, which [Murphy’s_Lawyer] dissected to determine the state of its guts. Finding the gauge’s Bourdon tube intact, he got to work constructing a method of generating motion without the need for actual steam. The solution was to mount a continuous rotation servo between the tube and the case. The servo lacked the strength to flex the tube on its own, so [Murphy’s_Lawyer] fashioned a simple lever out of brass to help it along.

The electronics consist of an Arduino Uno and an accompanying homemade PCB. The code for the Uno generates random motion for twirling the servo, and three LEDs built into the face reflect values generated for speed, pause and run time. The final upgrade came in the form of a new dial face, which provides some updated text as well as a cutout square that lets you see the previously obscured gears in action. Check out the video below, then see another Steampunk overhaul: the Edwardian Laptop.

Continue reading “Arduino-Powered Steampunk Steam Gauge”

Fail Of The Week: How A Cheap USB AC Adapter Might Indirectly Burn Your House Down

This Fail of the Week will remind our readers that every project they make, no matter how small they might be, may have big consequences if something goes wrong. Shown in the picture above is an oven that [Kevin] tweaked to perform reflow soldering. The story is he had just moved into a new place a few weeks ago and needed to make a new batch of boards. As he had cycled this oven many times, he was confident enough to leave the room to answer a few emails. A few minutes later, he had the unfortunate experience of smelling something burning as well as discovering white smoke invading his place.

Continue reading “Fail Of The Week: How A Cheap USB AC Adapter Might Indirectly Burn Your House Down”

DIY Home Control Using A SSRelay

ssrelay

[Ben Jones] just started a new site called Maker-Guide, where he makes some very informative and well produced DIY videos on anything from homemade photography hacks, to controlling an outlet using a solid-state relay.

It’s not the first time we’ve seen a relay controlled outlet, or this one… but it’s certainly one of the cleanest jobs we’ve seen. In his video guide, [Ben] shows us exactly how to fit a standard solid state relay into a regular outlet box, and easily control it with an Arduino Uno.

It even looks like there might be enough space inside the box for a small wireless setup — maybe using a Trinket even? What about using Power-Line networking to control each box via LAN? Could be the easiest home automation implementation yet! Well, aside from certain NEC (national electrical code) concerns of running high and low voltage in the same box…

Anyway if that wet your whistle, check out the great video guides after the break!

Continue reading “DIY Home Control Using A SSRelay”

Oscar Updates Your Grocery List From The Trash

grocerylist

[Dan] has come up with a novel solution to the age old problem of keeping your grocery list up to date. He’s added a bar code scanner and a Raspberry Pi under a kitchen cabinet. He calls the system “Oscar”, though we don’t see any grouchiness in his trash can. When [Dan] runs out of a product, he simply throws it away. Just above his garbage and recycling bin is a low cost barcode scanner. [Dan] holds the item until the scanner reads, then sends it on it’s way to recycling or the landfill. The decoded bar code is processed by a Raspberry Pi also hiding under the cabinet. The Raspberry Pi sends the data to Trello.comusing the Trello api.

If a product isn’t recognized by Trello’s database, trello dispatches a text message to [Dan’s] phone. He can then add the product information via a web interface. We think the user interface is what’s great here. Once products are in the database, the only thing that has to be done day to day is pause for a moment before throwing a package away. [Dan] has all his code up on github, and has also created a reddit thread for Oscar.

http://www.youtube.com/watch?v=9_MNOOgFDg4

[via reddit.com]

Hack Your Stove In The Name Of Homebrewing

stovehack

[Tim] is a homebrewer. Temperature profiling during the mashing process is apparently even more critical than the temperature curve of a solder reflow oven. His stove just wasn’t giving him the level of control he needed, so [Tim] added a PID temperature controller to his stove. Electric stoves generally use an “infinite switch” to control their burners. Infinite switches are little more than a resistor and a bimetallic strip in a single package. Not very good for accurate temperature control. The tricky part of this hack was to make it reversible and to have little visual impact on the stove. A stove top with wires hanging out would not only be dangerous electrically, it would also create a hazardous situation between [Tim] and his wife.

[Tim’s] brewpot only fit on the stove’s largest burner, so that was the only one that needed PID control. To keep things simple, he kept the commercial PID controller outside the stove’s enclosure. Inside the stove, [Tim] added a solid state relay. The relay is mounted to a metal plate, which screws to the back of the stove. The relay control lines run to an audio jack on the left side of the stove. Everything can be bypassed with a switch hidden on the right side of the stove. In normal operation, the switch is in “bypass” mode, and the stove works as it always has. When mashing time comes along, [Tim] flips the switch and plugs the jack into his PID controller. The temperature sensor goes into the brewpot itself, so no stove modification was needed there.

The end result is a very clean install that both [Tim] and his wife can enjoy.  Save a few bottles for us, [Tim]!

DIY Bluetooth Home Automation

blueboard

Interested in a bit of home automation? Don’t know where to start? We just found a great Instructable on making your own bluetooth controlled relay module!

[Kyle’s] been working on this for a while, and finally at his 5th iteration he’s ready to share it with the public. It’s a project you can make from scratch, and each unit will cost approximately ~$25 in components — which can control up to two outputs. He’s included an inkscape PCB layout which you can easily etch on your own using the toner transfer method. The heart of the build is an Atmega328, which helps keep the costs down — after all, it is only controlling two outputs! Then it’s just a matter of adding the components, a bit of soldering, and uploading the firmware! 

The entire design is open source, and [Kyle] would love some feedback to continue improving upon it. The write-up is quite thorough, so if you’re interested, take a look and leave him a comment!