Adding MQTT To A Solar Powered PIR Light

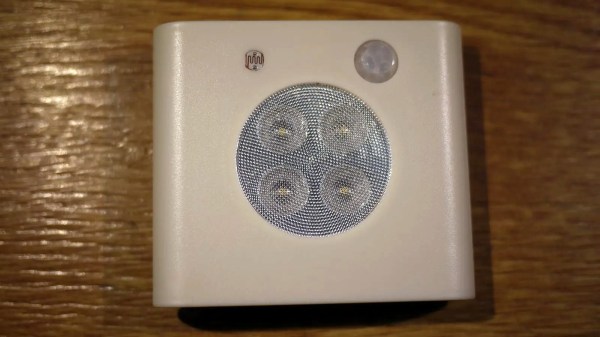
The size and price of the ESP wifi modules have quickly made them into one of the preferred building blocks for IoT devices. Unfortunately they are not particularly well suited for very low power applications.  [LittlePetieWheat] wanted to add MQTT to a cheap PIR solar light, so he paired an ESP with an Attiny85 to hold it to a strict power budget.

Most of these lights contain some sort of no-name microcontroller that monitors the analog PIR sensor, and turns on the LEDs as required. [LittlePetieWheat] replaced the PIR sensor with one that gives a digital output for simpler interfacing. The Attiny serves as the low power brains of the project. Its tasks include reading the solar panel and battery voltages, and PIR output. When movement is detected by the sensor, it activates a clever little latching power circuit to power on the ESP01 just long enough to send a MQTT message. The LEDs are only turned on if there is no power coming from the solar panel. The solar power is stored in a 18650 battery.

The Attiny85 might not be a powerhouse, but it is perfect for simple, low power applications like this. We’ve also seen it pushed to its limits by running tiny machine learning models, or receiving software updates over I2C. Continue reading “Adding MQTT To A Solar Powered PIR Light”

Pool Temperature Monitor Mollifies Fortunate But Frustrated Children

Who needs the city pool when you can party in the private pool over at Grandma and Grandpa’s house? No need to wait until Memorial Day weekend when it hits 90° F in the first week of May. But how can you placate grandchildren who want to know each and every day if it’s finally time to go swimming, and the pool itself is miles away? Although grandparents probably love to hear from you more often there’s no need to bother them with hourly phone calls. You just have to build a floating, remote pool temperature monitor which broadcasts every 30 minutes to an Adafruit MagTag sitting at kid’s eye level on the refrigerator.

Between the cost of commercial pool temperature monitors and all the reviews that mention iffy Wi-Fi connections, it sounds like [Blake] is better off rolling his own solution. Inside the floating part is an ESP32, a DS18B temperature sensor, and a 18650 cell. Most of the body is PVC, except for the 3D-printed torus that holds some foam for buoyancy. A handful of BBs in the bottom keep the thing pointed upright. For now, it shows the water temperature, but [Blake]’s ultimate goal is to show the air temperature as well.

Maybe it’s still too cold to swim, but the sun shines brightly most days. Why not harness its energy to heat up the water?

This Bunny Reminds Toddlers That It’s Night Time

It’s easy to spot recent parents, they are the people who look as though they haven’t slept in months. Sometimes the little bundle of joy responsible isn’t even a babe in arms but a toddler; old enough to wake up and find their parents for some solace but not old enough to understand that not everyone is up for being woken at 3 am. [Eyal] approached this problem in some style, by modifying a rabbit night light to indicate the time by changing colour, reminding the youngster when it’s a bit early to be rousing the grown-ups.

The bunny in question is a plastic moulding, sold with a white LED providing illumination, This was removed, and replaced with a rather nice custom PCB sporting a ring of addressable LEDs surrounding a Wemos ESP8266 board. In the darkest hours of the night, it is lit as a soft red to indicate sleep time. When an appropriate wake-up point is reached it bursts into a vibrant light show of many colours. Thus the recalcitrant early-riser can be taught to give Mum & Dad a little rest through the medium of light and colour.

This isn’t the first kids night light we’ve seen, indeed some of them have been rather elegant.

Keep In Touch With Grandma, With This Lo-Tech Interface

We have so many options through which to communicate with our friends and relatives during the lockdown, thanks to our smartphones and the number of apps that serve all possible needs. Impressive as they are though, a smartphone is not suitable for everyone. In particular older people can find them less easy to use, and the consequent loss of communication ability is addressed by [Manu] with the Yayagram, described in a thread of Spanish-language Tweets and later the thread was translated into English.

On the top of the box is a microphone with push-to-talk switch, a small thermal printer, and a set of 1/4″ jack sockets with associated jump lead. Each socket corresponds to a relative, and an audio message to that relative can be posted via Telegram simply by speaking into the microphone with the button pressed. Replies are then printed through the thermal printer. Meanwhile behind the scenes is a Raspberry Pi holding it all together.

We like the simplicity of the interface, and who wouldn’t want to ensure that their older relatives were able to keep in touch! But while the jump lead is a neat touch, we hope it’s not too difficult for extremely frail hands. It’s certainly not the first accessibility project for older people that we’ve seen.

Arduino MKR Makes Nespresso Monitoring Easy

Monitoring an appliance with a microcontroller usually follows a well-worn path of diving inside and finding somewhere in the electrical circuitry that can be connected through some kind of interface to a microcontroller. For his Nespresso pod coffee machine, [Steadman] eschewed tearing into the device, and instead chose to monitor the sound it makes. A commodity sound threshold sensor board is hooked up to an Arduino MKR Zero, and this set-up logs coffee consumption. It’s important to note how this generation of Arduino is no longer one of the simple boards of old, instead it sports an RTC and SD card alongside its SAMD21 Cortex-M0+ processor so it is perfect for just such a datalogging project. The coffee data can be saved into a CSV file viewable by a spreadsheet, for which code is provided.

We like this project for its non-invasive simplicity, and we can see that there could be plenty of other similar machines that could benefit from an analagous technique for non-invasive monitoring. While the pages of Hackaday are full of coffee machine projects we see surprisingly few pod coffeemakers, perhaps because our readers are a canny bunch who balk at paying a premium for their caffeine. If you do happen to have a Nespresso machine though, perhaps you’d like some help identifying the capsules.

Heating A Home With Sunlight… And Water

The sun is a tremendous source of energy, and while photovoltaic panels are an easy way to harvest some of that energy especially now that prices for them are incredibly low, there are plenty of other ways to tap into that free energy as well. [Engelbert] was looking for alternative ways to heat his house since traditional methods were prohibitively expensive, and ended up building a heat exchanger using solar-heated water to cover his home heating needs. (Google Translate from Dutch)

The system uses several large roof-mounted hot water heating panels. The heat captured by them is then pumped into an underground pipe network which is able to warm up a large area of earth in the summer. In the winter, that heat is able to be extracted back out of the earth and used to heat his home. The system includes almost three kilometers of pipe which are buried two meters below grade, so this will probably not be a weekend project, but it still cost much less than the €80,000 to install gas heating in his home.

[Engelbert] is able to use this self-built system to keep his home and another smaller building at a constant 23°C all year. He actually overbuilt the system slightly and has since disconnected almost half of the pipes, but we certainly understand the desire to over-engineer things around here. The only problem he has had is with various government entities that are slow to adopt energy-efficient systems like these. Perhaps the Dutch government can take some notes from the Swiss when it comes to installing geothermal systems like these.

Thanks to [Jero] for the tip!

Smart Pet Feeder Is Well Engineered

Having pets can sometimes be more demanding than raising kids. Pet owners obviously love and adore their pets, but anything that can be done to reduce their “chores” can be a welcome relief. One big pain point is feeding them at the right time and in the right amount, especially when it comes to cats. As the saying goes, “Dogs have Masters, Cats have Staff! ”

[Sebastian] had had it with his cat [Strachu] nagging him at odd hours for food. Luckily, [Sebastian] is a skilled maker, and his IoT Cat Feeder is not only practical, but also extremely well engineered. He designed and built it from scratch, and the beautiful, final version shows the effort he put in to it. His requirements were quite straightforward. It had to integrate with his home automation system, had to dispense food based on a regular schedule, send him a notification at other times of the day when the feeder detected the cat so he could decide if the cat deserved a special treat or not, and allow him to manually dispense cat food. Finally, he also wanted it to be easy to take apart so he could wash the parts that are in contact with food.

For the electronics, [Sebastian] designed a custom board to hold the ESP12F module and all the other associated parts. Everything, other than the stepper motor is mounted on the PCB. A PIR sensor is used for cat detection. A piezo buzzer lets the cat know that food is ready. A push button can be used to manually dispense food when required. The ESP8266 is flashed with ESPhome which allows control via simple yet powerful configuration files and control them remotely through the Home Assistant addon. If you’re interested in taking a look under the hood, [Sebastian] walks through some of the key code blocks on the ESP side, as well as the various configuration and setting options for the Home Assistant.

But by far the most effort he needed was in getting the mechanical design perfected. He had to go through several rounds of prototype iterations – after all, his cat deserved the very best in feeder design. The basic parts of the design are simple – a stepper motor drives an auger that pushes the cat food from the main container and deposits it in the bowl. Check out the detailed assembly instructions and pictures on his blog. The best part of his design is how easy it is to take it apart the feeder for cleaning. The stepper motor is held in place by a snap fit end piece without using any screws. The main body then just slides out from the top of the electronics box. Check out [Sebastian]’s cat feeder video after the break for details.

If this design makes you hanker to make one for your cat too, head over to his blog post and provide your mail address and [Sebastian] will send all the files for the project.

If your cat isn’t satisfied with dry food nuggets, you probably ought to build this Automated Cat Feeder That Handles Wet Food With Aplomb.

Continue reading “Smart Pet Feeder Is Well Engineered”