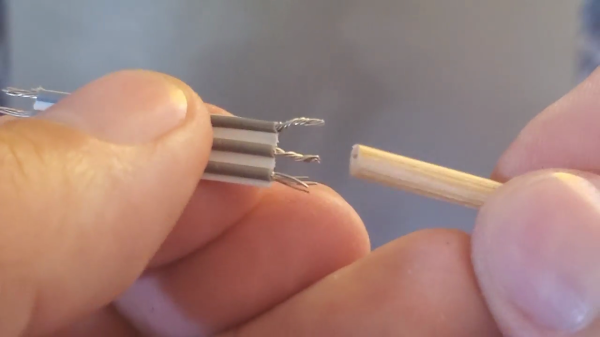
Expanding On The Creation Of Collapsible Containers

You might remember that industrial designer [Eric Strebel] tried to make a collapsible silicone container with 3D printed molds a few weeks ago, and was finally successful after dozens of attempts. Someone commented that commercial containers are molded in the collapsed position instead of the expanded position, so naturally, [Eric] had to try it once he saw the photographic proof of these molds.

Adding sand to a partially-cured silicone piece so it will take the shape of the expanded mold.This time around, [Eric] made things easier on himself by adding some handles to the mold and using both wax and spray mold release before pouring in the degassed silicone. The first one was a failure —  he had let it cure the whole time in the collapsed mold, and it just didn’t want to stay expanded. On the second attempt, [Eric] decided to pull the piece while it was curing, about 5 1/2 hours into the process.

After carefully de-molding the piece, he pressed it into the grooves of one of the older molds from the days of molding containers in the expanded state. Then he filled it with sand and let it cure the rest of the way. That worked out quite well, but even so, [Eric] made a third attempt that he pulled after 3.5 hours or so when the silicone was still sticky.  He did the sand trick again, but this time, he ran a piece of string up the wall and over the edge so that the air that gets trapped under the sand can escape. The final result looks great, albeit a little bit floppy, but [Eric] fits the final product into a frame that makes them much sturdier. Check out the process in the video after the break.

Did you miss the first installment? It’s worth a look into the science of creating collapsible walls.

Continue reading “Expanding On The Creation Of Collapsible Containers”

Robert Dunn holds a button in his hand for controlling a spot welder

Gorgeous Battery Welder Hits The Spot

Raise you’re hand if you’ve ever soldered directly to a battery even though you know better. We’ve all been there. Sometimes we get away with it when we have a small pack and don’t care about longevity. But when [Robert Dunn] needed to build a battery pack out of about 120 Lithium Ion cells, he knew that he had to do it The Right Way and use a battery spot welder. Of course, buying one is too simple for a hacker like [Robert]. And so it was that he decided to Build a Spot Welder from an old Microwave Oven and way too much mahogany, which you can view below the break.

A Battery Cell with a spot welding tab attached
Spot Welding leaves two familiar divots in the attached tab, which can be soldered or welded as need.

For the unfamiliar, a battery spot welder is the magical device that attaches tabs to rechargeable batteries. You’ll notice that all battery packs with cylindrical cells have a tab with two small dimples. These dimples are where high amperage electricity quickly heats the battery terminal and the tab until they’re red hot, welding them together. The operation is done and over in less than a second, well before any heat damage can be done. The tab can then be soldered to or spot welded to another cell.

One of the most critical parts of spot welding batteries is timing. While [Robert Dunn] admits that a 555 timer or even just a manual switch and relay could have done the job, he opted for an Arduino Uno with a 4 character 7 segment LED display that shows the welding time in milliseconds. A 3d printed trigger and welder handle wrap up the hardware nicely.

The build is topped off by a custom mahogany enclosure that is quite a bit overdone. But if one has the wood, the time, the tools and skills (and a YouTube channel perhaps?) there’s no reason not to put in the extra effort! [Robert]’s resulting build is almost too nice, but it’ll certainly get the job done.

Of course, spot welders are almost standard fare here at Hackaday, and we’ve covered The Good, The Bad, and The Solar. Do you have a battery welder project that deserves a spot in Hackaday’s rotation? By all means, send it over to the Tip Line!

Continue reading “Gorgeous Battery Welder Hits The Spot”

A couple of joysticks wired up to a Teensy for prototyping.

Custom Joystick Build Guide Should Point You In The Right Direction

Over the last two years, [benkster] has been perfecting their ideal flight controller. Like many people, they started out with a keyboard and mouse and eventually moved on to a joystick. While a HOTAS (hands on throttle-and-stick — e.g. a yoke controller with inputs right there on the sides) might have been the next logical step, those things cost too much. Naturally, the answer is to build one, ideally for less money. Hey, it could happen.

The design went from just an idea to a cardboard prototype, and then to a wooden enclosure and later, a 3D-printed case. Since [benkster] learned a great deal along the way, they want to give back to the community with a comprehensive joystick design/build guide so that others don’t have to start from zero, overwhelmed with information.

[benkster] wanted three joysticks, a bunch of big buttons, a throttle, a display to show component status (as in, is joystick #3 a joystick right now or a WASD keyboard?), and immersive details everywhere — you know, a million buttons and switches to give it that cockpit feel. [benkster] is using a Teensy 4 to control two 3-axis joysticks and one 2-axis stick. Since this adds up to too many axes for Windows/DirectX to read in, the 2-axis stick is used as a WASD keyboard.

This guide is a great place to start, especially for folks who may be newer to electronics. There are nice introductions to many types of components and tidbits that are relevant outside the world of joysticks.

You want immersive flight simulation away from the PC? Here’s a printable flexure-based ‘stick that snaps right on your Xbox controller and pushes the buttons.

How To Get Good With Wood

It’s perhaps unsurprising that we don’t see much in the way of woodworking here at Hackaday; after all, this is a plastics and metal community if there ever was one. But that doesn’t mean you’ll never come across a situation where a dead tree needs to be cut or shaped to your will, so we appreciate [Eric Strebel] demonstrating some tips and best practices for working with this exceptionally versatile building material.

The first video assumes you’re a lumber neophyte, and goes over topics such as the different species of wood you’re likely to find at the hobby shop, proper sanding technique, and the differences between cutting with and against the grain. Some of the different cutting tools you can use are also covered, ranging from the humble hobby knife to the band saw. As always, [Eric] sprinkles the video with tips and tricks gained from his considerable professional experience, such as using some glue and a bit of sawdust to fill in any gaps left behind by an uneven joint.

In the second video, things start getting more advanced. [Eric] demonstrates how you can create custom laminates, and how wood can be permanently bent into arbitrary shapes with sufficient steam and clamping pressure. By combining these new techniques with the basic concepts covered in the first video, surprisingly complex shapes can be formed with minimal effort.

[Eric] previously put together a similar series of videos on working with acrylic, a material that’s arguably far more familiar to the Hackaday readership. But whatever material you use, the takeaway message from this series is clear: get the right tools, learn the techniques, and professional results are well within your reach.

Continue reading “How To Get Good With Wood”

‘Quiet On The Set’ Goes For Objects, Too

Unless you’re sonically savvy, trying to sleep, or simply on edge, you probably don’t realize just how noisy common items can be. Pretty much everything makes enough racket to ruin a sound man’s day, or at the very least, their chance of picking up the dialogue between two characters. What you need on a set are noiseless but realistic versions of common noisemakers like paper bags, ice cubes, and to a lesser extent, billiard balls.

If you’ve spent any time at all on Reddit, you’ve probably seen frustratingly short GIFs of [Tim Schultz] quickly explaining how this or that noiseless prop is made. Embedded below is a compendium of prop hacks with more information worked in along the way. Talk about dream job! Problem solving and then hacking together a solution for a living sounds terrifying and delightful all at once.

Speaking of terrifying and delightful hacks, there’s still plenty of time to enter our Halloween Hackfest contest, which runs through Monday, October 11th. Halloween is the best time to go all out, so show us what you can do!

Continue reading “‘Quiet On The Set’ Goes For Objects, Too”

How To Make Resin Prints Crystal Clear

[Matou] has always been entranced by the beauty of natural crystal formations [and has long wished for a glowing crystal pendant]. Once he got a resin-based 3D printer, he was majorly disappointed to find out that although transparent resin prints look like delicious candy when they’re still wet, they turn cloudy and dull after being washed in an isopropyl bath and cured with UV light. There must be a way to either polish pieces back to clear, or keep them clear in the first place, [Matou] thought, and set about experimenting with some test crystals (video, embedded below).

As [Matou] found out, the dullness is caused by surface imperfections. Resin prints have layer lines, too, and although they may be super fine and invisible to the naked eye, they will still scatter light. The choices seem obvious — either polish the proud parts down with many grits of sandpaper, or fill the valleys with something to smooth everything out. As you’ll see in the video after the break, [Matou] tried it all, including a coat of the same resin that made the print. It’s an interesting look at the different ways to smooth out resin prints, though you may not be surprised to find that the one with the most work put into it looks the best.

We were hoping to see [Matou] try a green LED in the pendant, but it didn’t happen. If you’re dying to know what that looks like, you can get one of these pendants for yourself by supporting [Matou] on Patreon.

We think crystals are pretty cool, too — especially crystal radios. Here’s the hack-iest one of those we’ve ever seen, free of charge.

Continue reading “How To Make Resin Prints Crystal Clear”

New Video Series: Raspberry Pi Pico And RP2040 Deep Dive With Uri Shaked

In case you’ve been living under a rock that doesn’t have internet access, the Raspberry Pi Foundation got into the silicon sales and microcontroller game all at once this year with the Raspberry Pi Pico. It’s small, it’s capable, and it costs a measly $4. Surely you have one or two of them by now, right? But how much do you know about what it can do?

Or maybe you don’t have one yet, but it’s on your list. In either case, you can get started learning about them right away because [Uri Shaked]’s Raspberry Pi Pico and RP2040 Deep Dive course has recently been freed from the hallowed halls of HackadayU. He even built an emulator to go with it. [Uri] is a great instructor, and we’re sure that goes double if you ever need a salsa dance teacher, which he has also mastered.

This class was held for five weeks beginning in May 2021, with each session being roughly an hour long. The only prerequisite is a basic understanding of bitwise math, but there are resources for that on the class IO page linked above.

Each class is incredibly well-organized and informative. In the first class, [Uri] begins building a living document that includes the class agenda, links to all resources used and mentioned, code examples, and assembly instructions where applicable. It’s basically a syllabus plus a whole lot more. [Uri] also spends a lot of time in the incredibly thorough 649-page data sheet for the RP2040, and a little bit of time in the much shorter Getting Started guide. If you think the data sheet is inaccessible, you’ll likely change your tune by the end of the first class after you’ve seen [Uri] use and peruse it.

Continue reading “New Video Series: Raspberry Pi Pico And RP2040 Deep Dive With Uri Shaked”